1. Giriş
The Crivit Suspension Trainer is a versatile and effective fitness device designed for comprehensive full-body workouts. It utilizes your body weight to develop strength, coordination, balance, and improve posture. This system is suitable for users of all fitness levels, from beginners to advanced athletes, and can be used conveniently at home or while traveling.
This manual provides essential information for the safe and effective use of your Crivit Suspension Trainer. Please read it thoroughly before initial use and retain it for future reference.
2. Güvenlik Bilgileri
- Always inspect the suspension trainer, including straps, handles, and anchor points, for any signs of wear, damage, or defects before each use. Do not use if any part is damaged.
- Ensure the door anchor is securely placed over a sturdy door that closes towards you during exercise. The door must be strong enough to support your body weight.
- Ensure sufficient clear space around you to perform exercises safely without hitting objects or people.
- Yeni bir egzersiz programına başlamadan önce, özellikle önceden var olan sağlık sorunlarınız varsa, bir doktora danışın.
- Ağrı, baş dönmesi veya rahatsızlık hissederseniz egzersizi hemen bırakın.
- Do not exceed the maximum recommended user weight (if specified by the manufacturer, generally around 120-150 kg for similar products).
- Kullanım sırasında çocukları ve evcil hayvanları ekipmandan uzak tutun.
3. Ürün Bileşenleri
Your Crivit Suspension Trainer package includes the following components:
- Main Suspension Straps with adjustable buckles
- Handles with foot loops
- Kapı Çapa
- Uzatma Kayışı
- Depolama Kesesi
- Exercise Poster (not shown in image, but included as per product description)

Şekil 3.1: All components of the Crivit Suspension Trainer system, including the main straps, handles, foot loops, door anchor, extension strap, and storage pouch.
4. Kurulum
4.1. Door Anchor Installation
- Open a sturdy door that closes towards the direction you will be exercising.
- Place the door anchor over the top of the door, ensuring the padded stopper is on the opposite side of the door from where you will be training.
- Close the door firmly. The door anchor should be securely wedged in place.
- Pull on the strap to test the security of the anchor before attaching the suspension trainer.
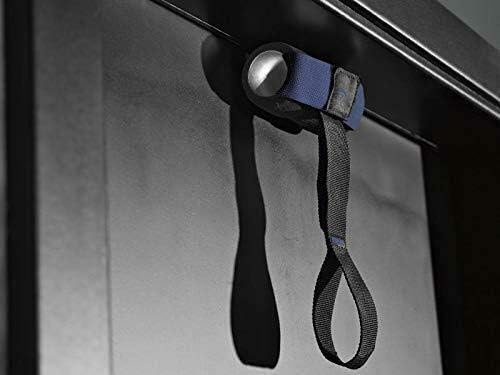
Şekil 4.1: Proper installation of the door anchor, showing the padded stopper on one side of the door and the strap extending to the other side.
4.2. Attaching the Suspension Trainer
Once the door anchor is secure, attach the main suspension straps to the loop of the door anchor. Ensure the carabiner or attachment mechanism is fully closed and locked.
4.3. Using the Extension Strap
The extension strap can be used to lengthen the overall reach of the suspension trainer, which is useful for higher anchor points (e.g., a pull-up bar or beam) or for users who require more length for certain exercises. Simply connect the main suspension straps to one end of the extension strap, and the other end of the extension strap to your anchor point.
4.4. Adjusting Strap Length
The suspension trainer features adjustable buckles on the straps. To adjust the length, press the buckle and slide the strap to the desired length. Ensure both straps are adjusted to the same length for balanced training, unless an asymmetrical setup is specifically required for an exercise.
5. Kullanım Talimatları
The Crivit Suspension Trainer allows for a wide range of exercises targeting various muscle groups. The intensity of the workout can be adjusted by changing your body angle relative to the anchor point. The further your body is from the anchor point, the easier the exercise; the closer you are, the more challenging it becomes.
5.1. General Exercise Principles
- Isınma: Always perform a 5-10 minute warm-up before starting your workout.
- Biçim: Focus on maintaining proper form throughout each exercise. Engage your core to stabilize your body.
- Nefes: Breathe deeply and consistently. Exhale during the exertion phase and inhale during the recovery phase.
- İlerleme: Start with easier variations and gradually increase the difficulty as your strength and balance improve.
- Sakin ol: Finish your workout with a 5-10 minute cool-down and stretching.
5.2. Using Handles and Foot Loops
The handles are primarily used for upper body push and pull exercises, as well as core exercises. The foot loops, which are integrated into the handles, allow for lower body exercises and advanced core work where your feet are suspended.
5.3. Egzersiz Examples
Refer to the included exercise poster for a variety of specific exercises and their proper execution. Below are some illustrative exampŞunlar:

Şekil 5.1: A user demonstrating a chest press exercise, engaging the chest, shoulders, and triceps while maintaining core stability.

Şekil 5.2: A user performing a suspension row, targeting the back muscles and biceps. The body angle dictates the exercise intensity.

Şekil 5.3: Bir üstten view of a user executing a chest fly, emphasizing chest muscle activation and control.
6. Bakım
- Temizlik: Wipe down the straps and handles with a damp cloth after each use to remove sweat and dirt. Do not use harsh chemicals or abrasive cleaners.
- Denetleme: Regularly inspect all components for signs of wear, fraying, tears, or damage. Pay close attention to stitching, buckles, and the door anchor.
- Depolamak: Store the suspension trainer in its provided storage pouch in a cool, dry place away from direct sunlight and extreme temperatures.
- Yenisiyle değiştirme: If any part of the suspension trainer shows significant wear or damage, discontinue use immediately and replace the affected component or the entire unit.
7. Sorun Giderme
- Instability during exercise: Ensure the anchor point is secure and stable. Check that both straps are adjusted to the same length. Focus on engaging your core muscles for better stability.
- Straps slipping through buckles: Verify that the straps are correctly threaded through the buckles and that the buckles are fully engaged. Avoid excessive force that could cause slippage.
- Discomfort in hands/feet: Ensure handles are gripped properly. If using foot loops, wear appropriate athletic footwear. Consider using gloves for hand comfort if needed.
- Door anchor not holding: Ensure the door is sturdy and closes towards you. The door anchor must be placed over the top edge of the door, not through the hinge side.
8. Özellikler
| Özellik | Şartname |
|---|---|
| Marka | Crivit |
| Model Numarası (ASIN) | B00H5Z84TC |
| Ürün Boyutları (U x G x Y) | 22.5 x 18.49 x 11 cm (yaklaşık 8.86 x 7.28 x 4.33 inç) |
| Net Ürün Ağırlığı | 1.2 Kilogram (yaklaşık 2.65 lbs) |
| Batteries/Piles Included | HAYIR |
9. Garanti ve Destek
Garanti bilgileri ve müşteri desteği için lütfen satın alma sırasında sağlanan belgelere bakın veya satıcınızla iletişime geçin. Herhangi bir garanti talebi için satın alma belgenizi saklayın.