1. Giriş
This manual provides detailed instructions for the installation, operation, and maintenance of your Soundstream VL-11A Single DIN Digital Media Receiver. Please read this manual thoroughly before using the product to ensure proper operation and to prevent damage.
The Soundstream VL-11A is designed to provide high-quality audio playback from various digital sources, including USB drives, SD cards, and auxiliary input devices. It features a compact single DIN chassis for easy integration into most vehicle dashboards.
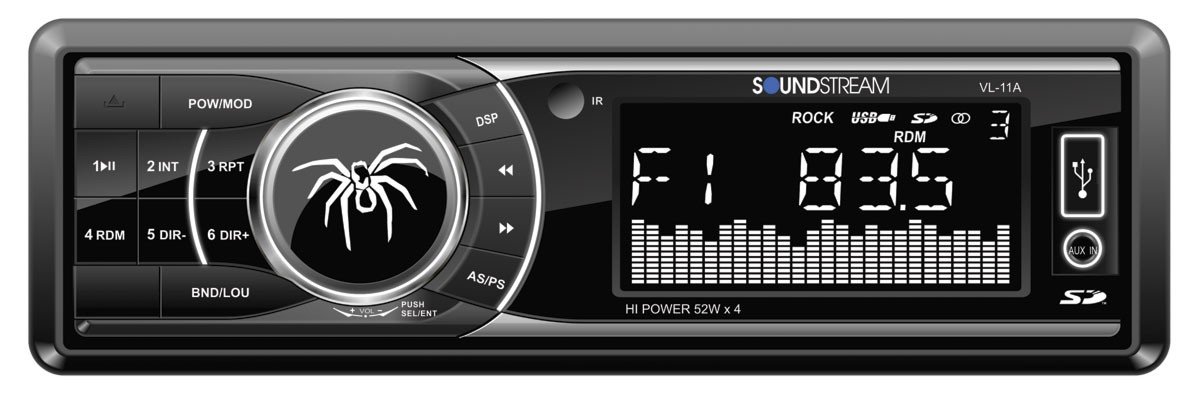
Şekil 1.1: Ön view of the Soundstream VL-11A Digital Media Receiver. This image displays the main unit with its control buttons and display panel.
2. Güvenlik Bilgileri
Yaralanmayı veya ünitenin hasar görmesini önlemek için aşağıdaki güvenlik önlemlerine uyun:
- Üniteyi sürüş sırasında dikkatinizi dağıtacak şekilde kullanmayın. Yol güvenliğini her zaman ön planda tutun.
- Ensure proper wiring connections. Incorrect wiring can cause fire or damage to the vehicle's electrical system.
- Cihazı neme veya aşırı sıcaklıklara maruz bırakmaktan kaçının.
- Üniteyi sökmeye veya değiştirmeye çalışmayın. Tüm bakım işlemlerini yetkili personele yaptırın.
- Ses seviyesini dışarıdaki trafik seslerini duyabileceğiniz düzeyde tutun.
3. Paket İçeriği
Paketin içinde tüm öğelerin mevcut olduğundan emin olun:
- Soundstream VL-11A Digital Media Receiver
- Kablo demeti
- Montaj Donanımı (Vidalar, Montaj Manşonu)
- Uzaktan kumanda
- Kullanım Kılavuzu (bu belge)
4. Ürün Bittiview
4.1 Ön Panel Kontrolleri
The front panel provides access to primary functions and media inputs.
Şekil 4.1: Illustrative diagram of the VL-11A front panel. This image highlights the display, volume knob, mode button, track controls, USB port, SD card slot, and auxiliary input.
- Güç / Mod Düğmesi: Press to turn on/off. Short press to cycle through audio sources (Radio, USB, SD, AUX).
- Ses Düğmesi: Sesi ayarlamak için döndürün. Ses ayarlarına (Bas, Tiz, Denge, Ses Seviyesi Ayarı, Ekolayzır) erişmek için basın.
- Görüntülemek: Mevcut durumu, rota bilgilerini ve ayarları gösterir.
- USB Bağlantı Noktası: Medya oynatmak için USB depolama aygıtlarını bağlayın.
- SD Kart Yuvası: Medya oynatımı için SD kartları takın.
- AUX Girişi: Harici ses cihazlarını 3.5 mm jak aracılığıyla bağlayın.
- Track/Tune Buttons: Navigate tracks or tune radio frequencies.
4.2 Arka Bağlantılar
The rear of the unit contains the main wiring harness and preamp Çıktılar.
Şekil 4.2: Illustrative diagram of the VL-11A rear connections. This image shows the main wiring harness connector and the RCA preamp Çıktılar.
- Ana Kablo Demeti: Connects to vehicle power, ground, accessory, and speaker wires.
- RCA Önamp Çıktılar: Two sets of 2V outputs for connecting external ampcankurtaranlar
5. Kurulum
5.1 Kurulum
Professional installation is recommended. If installing yourself, ensure the vehicle's battery is disconnected before beginning.
- Montaj: Insert the metal mounting sleeve into the vehicle's dashboard opening. Bend the tabs to secure it.
- Kablolama: Connect the supplied wiring harness to the vehicle's wiring. Match wire colors and functions carefully.
- Hoparlör Bağlantıları: Connect the speaker wires from the harness to your vehicle's speakers. Ensure correct polarity.
- Güç Bağlantıları: Connect the yellow wire (constant 12V), red wire (switched 12V), and black wire (ground) to the appropriate vehicle circuits.
- Anten: Aracın anten kablosunu ünitenin anten girişine bağlayın.
- Güvenli Ünite: Slide the VL-11A into the mounting sleeve until it clicks into place.
Warning: Incorrect wiring can cause severe damage to the unit or vehicle. Consult a professional if unsure.
5.2 İlk Güçlendirme
After installation, reconnect the vehicle's battery. Press the power button on the unit or remote control to turn it on. The display should illuminate.
6. Kullanım Talimatları
6.1 Temel Kontroller
- Güç Açma/Kapatma: Basın PWR/MODE düğme.
- Ses Ayarı: Döndür HACİM topuz.
- Kaynak Seçimi: Kısa basın PWR/MODE button to cycle through Radio, USB, SD, and AUX.
6.2 Ses Ayarları
Basın HACİM knob to enter the audio menu. Rotate the knob to navigate options and press to select.
- BAS/TİZ: Bas ve tiz seviyelerini ayarlayın.
- DENGE: Adjust audio balance between left and right speakers.
- YAYGINLAŞTIRICI: Adjust audio balance between front and rear speakers.
- EQ (Ekolayzır): Select from preset EQ curves (e.g., Pop, Rock, Classic) or a custom setting.
6.3 USB/SD Oynatma
Insert a USB drive into the USB port or an SD card into the SD card slot. The unit will automatically switch to the respective source and begin playback.
- Oynat/Duraklat: Basın OYNAT/DURDUR düğme.
- Sonraki / Önceki Parça: Basın SONRAKİ/ÖNCEKİ düğmeler.
- Klasör Gezintisi: Kullanın KATLANIR YUKARI/AŞAĞI buttons (if available on remote or unit).
6.4 Yardımcı Giriş (AUX)
Connect an external audio device (e.g., smartphone, MP3 player) to the 3.5mm AUX input on the front panel using an audio cable. Select AUX as the source using the MOD düğme.
6.5 Radyo Tuner
Select Radio as the source. The unit supports AM/FM bands.
- Bant Seçimi: Basın BANT button to switch between FM1, FM2, FM3, and AM.
- Manuel Ayarlama: Kısa basın TUNE UP/DOWN buttons to adjust frequency step-by-step.
- Ayarlama Arayın: Uzun basın TUNE UP/DOWN Bir sonraki güçlü istasyonu otomatik olarak aramak için düğmeler.
- Önceden Ayarlanmış İstasyonlar: Press and hold a numbered preset button (1-6) to save the current station. Short press to recall a saved station.
6.6 Uzaktan Kumanda
The included remote control provides convenient access to most functions. Point the remote control towards the unit's front panel sensor.
Şekil 6.1: Illustrative diagram of the VL-11A remote control. This image shows the various buttons for power, mode, volume, track control, and numeric presets.
7. Bakım
7.1 Ünitenin Temizlenmesi
- Ön paneli ve ekranı silmek için yumuşak, kuru bir bez kullanın.
- Aşındırıcı temizleyiciler, cilalar veya çözücüler kullanmayın.
- Temizlik solüsyonlarını doğrudan cihazın üzerine püskürtmekten kaçının.
7.2 Genel Bakım
- Aşırı ısınmayı önlemek için ünite çevresinde uygun havalandırma olduğundan emin olun.
- Ünitenin üzerine ağır nesneler koymaktan kaçının.
- If the unit is exposed to extreme cold, allow it to warm up before operation to prevent condensation.
8. Sorun Giderme
If you encounter issues, refer to the following table before contacting support:
| Sorun | Olası Neden | Çözüm |
|---|---|---|
| Güç yok | Blown fuse; Incorrect wiring; Disconnected battery. | Check vehicle fuses and unit fuse. Verify wiring connections. Ensure battery is connected. |
| Ses yok | Ses seviyesi çok düşük; Sessize alma etkinleştirilmiş; Hoparlör kablolaması yanlış; Kaynak seçilmemiş. | Increase volume. Deactivate mute. Check speaker connections and polarity. Select correct audio source. |
| USB/SD oynatılamıyor | Desteklenmiyor file format; Corrupt media; Incorrectly inserted device. | Medyanın desteklenen ses dosyalarını içerdiğinden emin olun. files (e.g., WMA). Try a different USB/SD. Reinsert device. |
| Radyo sinyali zayıf | Anten bağlı değil; Sinyal zayıf bölge. | Anten bağlantısını kontrol edin. Daha güçlü bir istasyona geçmeyi deneyin. |
| Uzaktan kumanda çalışmıyor | Dead battery; Obstruction; Not pointing at sensor. | Replace remote battery. Remove obstructions. Ensure direct line of sight to unit's IR sensor. |
9. Özellikler
Technical specifications for the Soundstream VL-11A Digital Media Receiver:
- Modeli: VL-11A
- Marka: Ses akışı
- Üretici: Ses akışı
- Ürün Ölçüleri: 22.35x20.32x9.65 cm
- Ürün Ağırlığı: 771.11 g (1.7 Pound)
- Sesli Wattage: 52 Watt (Maks.)
- Kanal Sayısı: 4
- Önamp Çıktılar: 2 Sets of 2V
- Medya Formatı: WMA (and other common digital audio formats)
- Özel Özellikler: SD Card Input, USB Input, Auxiliary Input
- Bağlantı Tipi: Auxiliary, USB, 3.5mm Jack
- Uyumlu Cihazlar: Konuşmacı
- Kontrol Yöntemi: Uzak
10. Garanti ve Destek
Soundstream ürünleri en yüksek kalite standartlarında tasarlanıp üretilmektedir. Özel garanti bilgileri için lütfen ürününüzle birlikte verilen garanti kartına bakın veya resmi Soundstream web sitesini ziyaret edin. webalan.
For technical support or service inquiries, please contact Soundstream customer service through their official channels. Keep your purchase receipt and product model number (VL-11A) handy when contacting support.