1. Giriş
Thank you for choosing the Voltcraft VC-11 Digital Multimeter. This portable, Category III, 250V multimeter with a 2000-count display is designed for accurate electrical measurements in various applications. This manual provides essential information for safe operation, proper use, and maintenance of your device. Please read it thoroughly before use and keep it for future reference.
2. Güvenlik Bilgileri
WARNING: Electrical shock hazard. Improper use of this meter can cause damage, shock, injury, or death. Read and understand this manual before operating the meter.
- Always ensure the meter is in good working condition and the test leads are not damaged.
- Nominal hacimden fazlasını uygulamayıntage, ölçüm cihazında işaretlendiği gibi, terminaller arasında veya herhangi bir terminal ile toprak arasında.
- vol ile çalışırken çok dikkatli oluntages above 25V AC RMS or 35V DC. These voltagşok tehlikesi yaratabilir.
- Fonksiyonları veya aralıkları değiştirmeden önce test uçlarını devreden mutlaka ayırın.
- Pil kapağı çıkarılmış veya gevşetilmiş haldeyken ölçüm cihazını çalıştırmayın.
- Adhere to local and national safety codes. Use personal protective equipment (PPE) such as approved safety glasses and electrically insulated gloves.
3. Ürün Bittiview
The Voltcraft VC-11 is a compact digital multimeter featuring a clear LCD display, a rotary function switch, and input jacks for test leads. It is designed for measuring DC/AC voltage, DC current, resistance, and includes diode and continuity test functions.
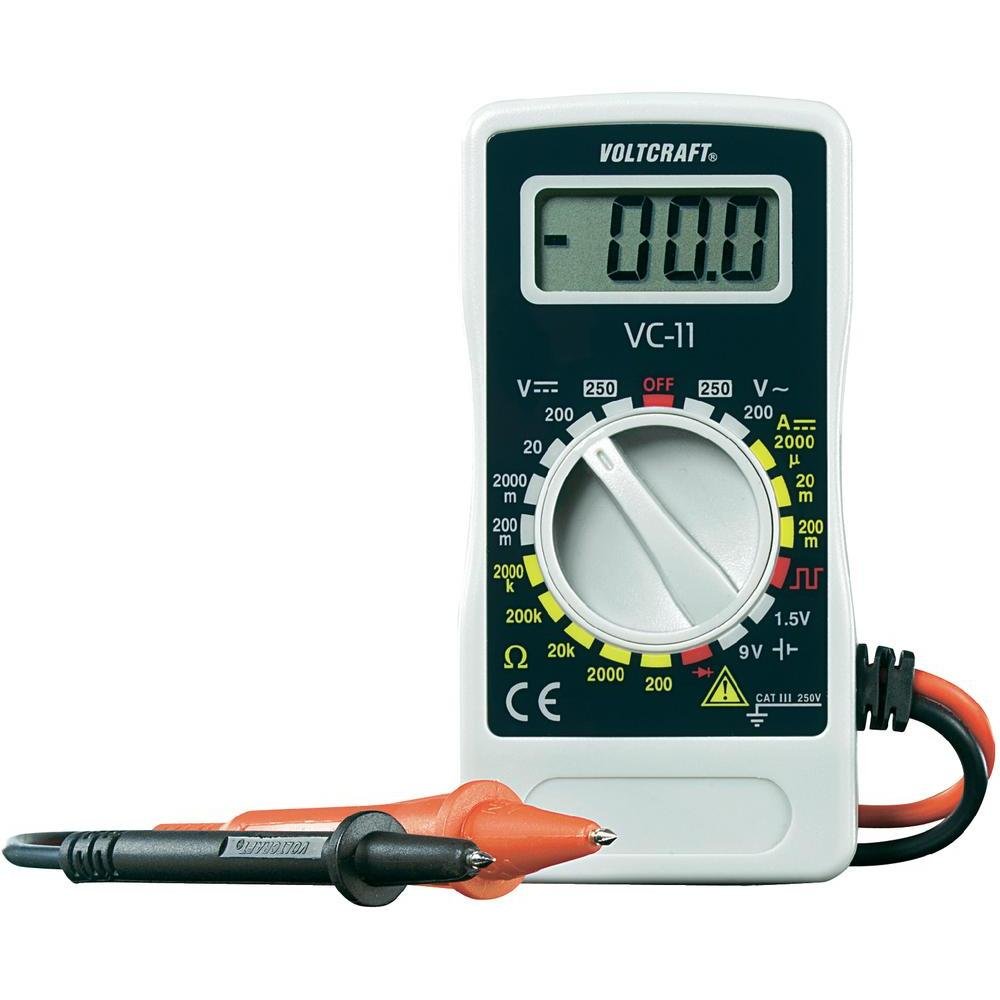
Şekil 1: Ön view of the Voltcraft VC-11 Digital Multimeter with test leads connected. This image shows the LCD display, rotary switch, and input terminals.

Şekil 2: Açısal view of the Voltcraft VC-11 Digital Multimeter, highlighting the compact design and the CE marking.

Figure 3: The Voltcraft VC-11 Digital Multimeter shown with its test leads detached, illustrating the input ports.
3.1 Bileşenler
- LCD Ekran: Ölçüm değerlerini, birimleri ve fonksiyon göstergelerini gösterir.
- Döner anahtar: Ölçüm fonksiyonlarını ve aralıklarını seçmek için kullanılır.
- Giriş Jakları: Ports for connecting the test leads (COM, VΩmA).
- Test Uçları: Red and black leads for connecting to the circuit under test.
4. Kurulum
4.1 Pil Kurulumu
The Voltcraft VC-11 requires a 9V battery for operation (not included). To install or replace the battery:
- Multimetrenin KAPALI olduğundan emin olun ve tüm test uçlarını çıkarın.
- Ölçüm cihazının arkasındaki pil bölmesi kapağını bulun.
- Pil kapağını sabitleyen vidayı çıkarmak için bir tornavida kullanın.
- Kapağı dikkatlice çıkarın.
- Yeni bir 9V pili, doğru kutuplara dikkat ederek pil klipsine bağlayın.
- Pili bölmeye yerleştirin ve kapağı vidayla sabitleyerek yerine takın.
4.2 Test Uçlarının Bağlanması
Always connect the black test lead to the 'COM' (common) jack. Connect the red test lead to the appropriate input jack based on the desired measurement:
- cilt içintage (V), Resistance (Ω), Diode, and Continuity measurements, connect the red lead to the 'VΩmA' jack.
- For Current (A) measurements, connect the red lead to the 'VΩmA' jack (for mA range).
5. Kullanım Talimatları
Before taking any measurement, ensure the test leads are correctly connected and the rotary switch is set to the desired function and range.
5.1 DC Vol Ölçümütage (V=)
- Döner anahtarı istenen DC Vol değerine ayarlayıntage (V=) range (e.g., 200mV, 2V, 20V, 200V, 250V). If the voltage bilinmiyorsa en yüksek aralıktan başlanıp gerektiği kadar azaltılabilir.
- Siyah test ucunu 'COM' jakına, kırmızı test ucunu ise 'VΩmA' jakına bağlayın.
- Ölçüm yapılacak bileşen veya devreye test problarını paralel olarak bağlayın.
- Cildi okutagLCD ekranda e değeri.
5.2 AC Vol Ölçümütage(V~)
- Döner anahtarı istenen AC Vol değerine ayarlayıntage (V~) aralığı (örneğin, 200V, 250V).
- Siyah test ucunu 'COM' jakına, kırmızı test ucunu ise 'VΩmA' jakına bağlayın.
- Test problarını AC kaynağına veya bileşene paralel olarak bağlayın.
- Cildi okutagLCD ekranda e değeri.
5.3 Doğru Akımın Ölçülmesi (A=)
- Set the rotary switch to the desired DC Current (A=) range (e.g., 2000µA, 20mA, 200mA).
- Siyah test ucunu 'COM' jakına, kırmızı test ucunu ise 'VΩmA' jakına bağlayın.
- UYARI: To measure current, the meter must be connected in series with the circuit. Break the circuit and insert the meter.
- Connect the test probes in series with the circuit.
- LCD ekranda mevcut değeri okuyun.
5.4 Direncin Ölçülmesi (Ω)
- Direnci ölçmeden önce devrenin enerjisinin kesildiğinden emin olun.
- Set the rotary switch to the desired Resistance (Ω) range (e.g., 200Ω, 2kΩ, 20kΩ, 200kΩ, 2000kΩ).
- Siyah test ucunu 'COM' jakına, kırmızı test ucunu ise 'VΩmA' jakına bağlayın.
- Ölçümü yapılacak bileşenin üzerine test problarını bağlayın.
- LCD ekranda direnç değerini okuyun.
5.5 Diyot Testi
- Devre enerjisinin kesildiğinden emin olun.
- Set the rotary switch to the Diode symbol (usually next to resistance).
- Siyah test ucunu 'COM' jakına, kırmızı test ucunu ise 'VΩmA' jakına bağlayın.
- Kırmızı probu diyotun anot ucuna, siyah probu ise diyotun katot ucuna bağlayın. Ekranda ileri-geri akım (ileri-geri) değeri gösterilecektir.tage damla.
- Reverse the probes. The display should show 'OL' (Overload) for a good diode.
5.6 Süreklilik Testi
- Devre enerjisinin kesildiğinden emin olun.
- Set the rotary switch to the Continuity symbol (usually next to diode/resistance).
- Siyah test ucunu 'COM' jakına, kırmızı test ucunu ise 'VΩmA' jakına bağlayın.
- Test problarını devreye veya bileşene bağlayın.
- If the resistance is below a certain threshold (typically 30-50Ω), the meter will emit an audible beep, indicating continuity.
6. Bakım
6.1 Temizlik
Sayaçları reklamla silinamp Bir bez ve hafif bir deterjan kullanın. Aşındırıcı veya çözücü maddeler kullanmayın. Kullanmadan önce ölçüm cihazının tamamen kuru olduğundan emin olun.
6.2 Pil Değişimi
When the battery symbol appears on the LCD display, the 9V battery needs to be replaced. Refer to section 4.1 for battery installation instructions.
7. Sorun Giderme
| Sorun | Olası Neden | Çözüm |
|---|---|---|
| Ekran yok veya soluk ekran | Pil bitmiş veya düşük | 9V pili değiştirin. |
| Yanlış okumalar | Incorrect function/range selected Poor test lead connection Hasarlı test uçları | Select the correct function and range. Ensure test leads are firmly connected. Inspect and replace damaged test leads. |
| "OL" (Aşırı Yük) görüntülendi | Ölçüm, seçilen aralığı aşıyor. Open circuit (for resistance/current) | Select a higher range. Check for breaks in the circuit. |
8. Özellikler
- Marka: VOLTCRAFT
- Model Numarası: VC11
- Üretici: VOLTCRAFT
- Ürün Ağırlığı: Approximately 9.07 g (without packaging)
- Paket Boyutları: 14.8x8x3.6 cm
- Kategori Derecelendirmesi: KAT III 250V
- Görüntülemek: 2000 Sayım
- Güç Kaynağı: 9V Pil (dahil değildir)
9. Garanti Bilgileri
This product is covered by a standard manufacturer's warranty. Please refer to the warranty card included with your purchase or contact your retailer for specific terms and conditions. The warranty typically covers defects in materials and workmanship under normal use.
10. Müşteri Desteği
For technical assistance, troubleshooting, or service inquiries, please contact Voltcraft customer support or your local distributor. Contact information can usually be found on the manufacturer's websitede veya ürün ambalajında yer almamaktadır.


