1. Giriş
The Intermatic EI500WC is a 7-day single-pole digital time switch designed for automated control of lights, fans, pumps, and other medium-duty loads. It offers up to 7 ON and 7 OFF operations per week, providing flexibility for energy savings, security, and convenience. This timer is compatible with incandescent, fluorescent, CFL, and LED lighting.
This manual provides detailed instructions for the safe installation, setup, programming, and maintenance of your EI500WC digital time switch.

Figure 1: Intermatic EI500WC Digital Time Switch installed in a standard wall plate.
2. Güvenlik Önlemleri
Please read and understand all instructions before installing or operating this device. Failure to follow these instructions may result in electrical shock, fire, or serious injury.
- UYARI: Risk of Electric Shock. Disconnect power at the circuit breaker or fuse box before installation or servicing.
- Kurulum, tüm yerel ve ulusal elektrik yönetmeliklerine uygun olarak kalifiye bir elektrikçi tarafından yapılmalıdır.
- Bu cihazı belirtilen elektrik değerlerini aşan yüklerle kullanmayın.
- Tüm kablo bağlantılarının güvenli ve düzgün bir şekilde yalıtıldığından emin olun.
- Bu cihaz yalnızca iç mekanda kullanıma uygundur.
3. Paket İçeriği
- Intermatic EI500WC 7-Day Digital Time Switch
- Tel Somunlar
- Kullanım Kılavuzu (bu belge)
4. Ürün Bittiview
The EI500WC features a clear digital display and intuitive buttons for programming. The main ON and OFF buttons are visible on the front, while programming buttons are located behind a hinged cover.

Şekil 2: Ön view of the EI500WC with the programming button cover open, showing CLK, DAY, PROG, RESET, HOUR, MIN, and MODE buttons.
5. Kurulum Talimatları
5.1. Gerekli Araçlar
- Tornavida (Yıldız uçlu ve/veya düz uçlu)
- Tel Soyucular
- Cilttage Test Cihazı
- Elektrik Bandı
5.2. Kablolama Talimatları
- Gücü kapatın: Değiştireceğiniz şalteri kontrol eden devre kesiciyi veya sigortayı bulun ve KAPATIN. Ses seviyesi göstergesi kullanarak gücün kapalı olduğunu doğrulayın.tage test cihazı.
- Eski şalteri çıkarın: Carefully remove the existing wall plate and switch from the electrical box.
- Kabloları tanımlayın: The EI500WC requires a neutral wire. Identify the LINE (hot), LOAD, NEUTRAL, and GROUND wires in your electrical box. If a neutral wire is not present, consult a qualified electrician.
- Kabloları bağlayın: Use the provided wire nuts to connect the EI500WC wires to your household wiring as shown in the diagram below.
- Black wire (LINE): Connect to the incoming hot wire from the circuit breaker.
- Red wire (LOAD): Connect to the wire going to the light fixture or appliance.
- White wire (NEUTRAL): Connect to the neutral wire (typically white) in the electrical box.
- Green wire (GROUND): Connect to the bare copper or green ground wire in the electrical box.
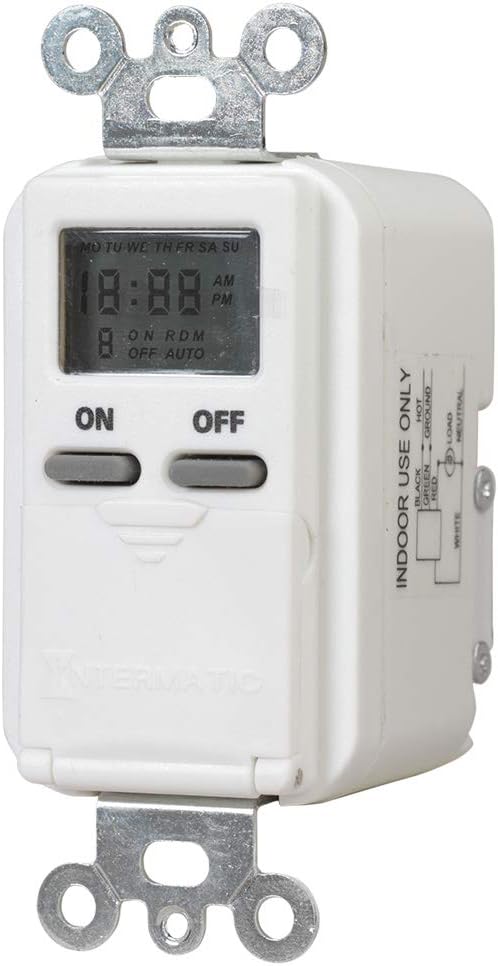
Figure 3: Wiring diagram for the EI500WC, showing connections for LINE (Black), LOAD (Red), NEUTRAL (White), and GROUND (Green).
5.3. Montaj
- Carefully push the wired timer into the electrical box, ensuring wires are not pinched.
- Secure the timer to the electrical box using the mounting screws.
- Attach the wall plate (not included) over the timer.
- Gücü geri yükleyin: Devre kesiciden gücü tekrar AÇIN.
6. İlk Kurulum
İlk güç açıldığında veya güç kapatıldıktan sonratage, the display may show '12:00 AM' and 'MO'. The internal battery maintains settings during brief power interruptions.
6.1. Güncel Saat ve Günü Ayarlama
- Open the hinged cover to access the programming buttons (refer to Figure 2).
- Basın CLK düğmesine basın. Zaman göstergesi yanıp sönecektir.
- Basın SAAT button to set the current hour. Observe the AM/PM indicator.
- Basın DAKİKA Güncel dakikayı ayarlamak için düğmeye basın.
- Basın GÜN button to set the current day of the week (MO, TU, WE, TH, FR, SA, SU).
- Basmak CLK again to save the settings and exit time setting mode.
7. Çalıştırma ve Programlama
The EI500WC allows for up to 7 ON and 7 OFF programming events per week. Each event can be set for a specific day or combination of days.
7.1. Setting ON/OFF Programs
- Menteşeli kapağı açın.
- Basın PROG tuşuna basın. Ekranda '1 ON' yazısı görünecek ve saat yanıp sönecektir.
- Basmak SAAT Ve DAKİKA Program 1 için istenilen AÇIK zamanını ayarlamak için.
- Basmak GÜN to select the day(s) for this program. Options include individual days, weekdays (MO TU WE TH FR), weekends (SA SU), or all days (MO TU WE TH FR SA SU).
- Basmak PROG again. The display will show '1 OFF' and the time will flash.
- Basmak SAAT Ve DAKİKA to set the desired OFF time for program 1.
- Basmak GÜN to select the day(s) for this OFF program (should match the ON program days).
- Repeat steps 2-7 for additional ON/OFF programs (up to 7 pairs). To skip a program, press PROG repeatedly until you reach the desired program number or exit programming mode.
- Basmak CLK to exit programming mode and return to normal operation.
7.2. Rastgele Mod
The random mode feature varies the ON/OFF schedule by a few minutes, providing a 'lived-in' appearance for enhanced security.
- To activate Random Mode: Press the MOD button until 'RDM' appears on the display.
- To deactivate Random Mode: Press the MOD button until 'RDM' disappears.
7.3. Manuel Geçersiz Kılma
You can manually turn the connected load ON or OFF at any time without affecting the programmed schedule.
- Büyük tuşuna basın ON button to manually turn the load ON.
- Büyük tuşuna basın KAPALI button to manually turn the load OFF.
- The timer will revert to its programmed schedule at the next scheduled ON or OFF event.
8. Bakım
8.1. Pil Bilgileri
The EI500WC includes an internal battery that provides backup power to maintain time and program settings during power outages. This battery is typically long-lasting and not user-replaceable. If the display is blank or settings are lost frequently after power interruptions, the unit may need replacement.
8.2. Temizlik
Zamanlayıcının yüzeyini yumuşak bir bezle temizleyin.amp bezle silin. Aşındırıcı temizleyiciler veya çözücüler kullanmayın.
9. Sorun Giderme
- Zamanlayıcı ekranı boş: Ensure power is supplied to the circuit. Check circuit breaker.
- Load does not turn ON/OFF as programmed:
- Verify current time and day are set correctly.
- Check that ON/OFF programs are set for the correct times and days.
- Ensure the timer is not in manual override mode conflicting with the program.
- Kablo bağlantılarının sağlam olduğundan emin olun.
- Elektrik kesintisi sonrasında zamanlayıcı ayarları kayboluyor.tage: The internal backup battery may be depleted. The unit may require replacement.
- Yeniden başlatma tuşu: If the timer behaves erratically, use a pointed object (like a paperclip) to press the recessed SIFIRLAMA button. This will clear all settings and restore default values, requiring you to re-enter time, day, and programs.
10. Teknik Özellikler
| Özellik | Şartname |
|---|---|
| Model Numarası | EI500WC |
| Cilttage | 125 VAC, 60Hz |
| Maksimum Yük | 15 Amps (1875 Watts) Resistive, 1000 Watts Tungsten |
| Motor Yükü | 1 / 4 HP |
| Program Sayısı | Up to 7 ON/OFF events per week |
| Anahtar Türü | Single-Pole (1-way) |
| Montaj Tipi | Decorator Wall Plate/Standard Wall Box |
| Boyutlar (Y x G x D) | 2.75" x 1.75" x 1.36" |
| Renk | Beyaz |
| Sertifikalar | UL Listeli |
11. Garanti Bilgileri
Intermatic warrants this product to be free from defects in material and workmanship for a period of one (1) year from the date of purchase. This warranty covers replacement of the unit only and does not include labor costs associated with removal or reinstallation.
This warranty does not apply to defects resulting from improper installation, misuse, abuse, accident, or unauthorized modifications. For warranty service, please contact Intermatic customer support.
12. Müşteri Desteği
If you have any questions regarding the installation, operation, or troubleshooting of your Intermatic EI500WC Digital Time Switch, please refer to the Intermatic website or contact their customer support directly. Always have your model number (EI500WC) available when contacting support.


