1. Giriş
The Velleman DVM810 is a compact and economical 3 1/2 digit digital multimeter designed for measuring DC and AC voltages, DC currents, resistance, and for performing diode and transistor (hFE) tests. It features overload protection and automatic polarity indication, making it suitable for hobbyists, field use, and workshops. This manual provides essential information for the safe and effective operation of your DVM810 multimeter.
2. Ürün Özellikleri
- Automatic polarity indication
- Cilttage measurements: AC 500V and DC 500V maximum
- Current measurements: DC 10A maximum (0.2A fused, 10A unfused)
- Resistance measurements: Up to 2MΩ
- Diode and transistor (hFE) test functions
- Aşırı yük koruması
- Compact design with 3 1/2 digit LCD display
3. Paket İçeriği
Lütfen paket içeriğini kontrol ederek tüm öğelerin mevcut olduğundan emin olun:
- Velleman DVM810 Dijital Multimetre
- Test Uçları (bir kırmızı, bir siyah)
- Kullanım Kılavuzu
4. Önemli Güvenlik Bilgileri
Bu ürünü kullanmadan önce tüm güvenlik uyarılarını ve talimatlarını dikkatlice okuyun. Bu talimatlara uyulmaması elektrik çarpmasına, yangına veya ciddi yaralanmaya neden olabilir.
- Herhangi bir ölçüm yapmadan önce multimetrenin doğru fonksiyona ve aralığa ayarlandığından emin olun.
- Never exceed the maximum input limits for any range. The maximum voltage for AC/DC is 500V.
- Do not attempt to measure current on circuits with voltag250V'u aşıyor.
- Inspect test leads for damaged insulation or exposed metal before each use. Replace damaged leads immediately.
- Hasarlı görünüyorsa veya kasası açıksa multimetreyi kullanmayın.
- Exercise extreme caution when working with live circuits. Use appropriate personal protective equipment.
- Always disconnect power to the circuit and discharge high-voltage capacitors before measuring resistance or performing diode/transistor tests.
- Replace the battery when the low battery indicator appears on the display to ensure accurate readings.
5. Ürün Bittiview
Familiarize yourself with the components of your Velleman DVM810 multimeter:
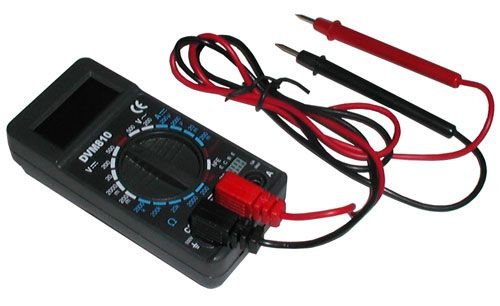
Figure 1: Velleman DVM810 Digital Multimeter. This image displays the front view of the compact multimeter, highlighting its liquid crystal display (LCD), the central rotary function switch, and the input jacks for test leads at the bottom.
- LCD Ekran: Shows measurement readings, units, and polarity.
- Döner anahtar: İstenilen ölçüm fonksiyonunu ve aralığını seçmek için kullanılır.
- Giriş Jakları:
- COM Jakı: Common (negative) input for all measurements. Connect the black test lead here.
- VΩmA Jack: Hacim için pozitif giriştage, resistance, and current measurements up to 200mA. Connect the red test lead here.
- 10A Jak: Positive input for high current measurements (up to 10A). Connect the red test lead here for 10A measurements.
- Test Uçları: Multimetreyi test edilecek devreye bağlamak için kullanılan kırmızı ve siyah kablolar.
6. Kurulum
6.1 Pil Kurulumu
The DVM810 multimeter requires a 9V battery (not always included). To install or replace the battery:
- Ensure the multimeter is turned OFF (rotary switch set to OFF).
- Ünitenin arkasındaki pil bölmesi kapağını bulun.
- Kapağı sabitleyen vidayı/vidaları çıkarın ve kapağı dikkatlice kaldırın.
- Yeni bir 9V pili, doğru kutuplara dikkat ederek pil klipsine bağlayın.
- Pili bölmeye yerleştirin ve kapağı vida(lar)la sabitleyerek yerine takın.
6.2 Test Uçlarının Bağlanması
Doğru ve güvenli ölçümler için test uçlarını her zaman doğru şekilde bağlayın:
- Siyah test kablosunu Bİlgİ (Ortak) kriko.
- Çoğu ölçüm için (hacim)tage, resistance, diode, hFE, and current up to 200mA), insert the red test lead into the VΩmA kriko.
- Yüksek akım ölçümleri (10A'e kadar) için kırmızı test ucunu şuraya takın: 10A kriko.
7. Kullanım Talimatları
Before making any measurement, ensure the test leads are correctly connected and the rotary switch is set to the appropriate function and range.
7.1 DC Vol Ölçümütage (V=)
- Kırmızı ucu takın VΩmA jack and the black lead into the Bİlgİ kriko.
- Döner anahtarı istenen DC Vol değerine ayarlayıntage (V=) range. Start with the highest range if the voltage bilinmiyor.
- Connect the test leads across the component or circuit to be measured (in parallel).
- Cildi okutage value on the LCD display. The display will show the correct polarity.
7.2 AC Vol Ölçümütage(V~)
- Kırmızı ucu takın VΩmA jack and the black lead into the Bİlgİ kriko.
- Döner anahtarı istenen AC Vol değerine ayarlayıntage (V~) range. Start with the highest range if the voltage bilinmiyor.
- Connect the test leads across the component or circuit to be measured (in parallel).
- Cildi okutagLCD ekranda e değeri.
7.3 Doğru Akımın Ölçülmesi (A=)
Caution: Never connect the multimeter in parallel with a voltage source when measuring current, as this can blow the fuse or damage the meter.
- Determine the expected current. For currents up to 200mA, insert the red lead into the VΩmA jack. For currents up to 10A, insert the red lead into the 10A jack. Always insert the black lead into the Bİlgİ kriko.
- Set the rotary switch to the appropriate DC Current (A=) range. Start with the highest range if the current is unknown.
- Turn off power to the circuit. Open the circuit where the current is to be measured.
- Multimetreyi devreye seri olarak bağlayın.
- Restore power to the circuit and read the current value on the LCD display.
7.4 Direncin Ölçülmesi (Ω)
Caution: Ensure the circuit is completely de-energized and all capacitors are discharged before measuring resistance.
- Kırmızı ucu takın VΩmA jack and the black lead into the Bİlgİ kriko.
- Set the rotary switch to the desired Resistance (Ω) range. Start with a higher range if the resistance is unknown.
- Ölçümü yapılacak bileşenin üzerine test uçlarını bağlayın.
- LCD ekranda direnç değerini okuyun.
7.5 Diyot Testi
Caution: Ensure the diode is disconnected from the circuit or the circuit is de-energized before testing.
- Kırmızı ucu takın VΩmA jack and the black lead into the Bİlgİ kriko.
- Set the rotary switch to the Diode symbol (→|).
- Kırmızı ucu diyotun anoduna, siyah ucu ise katoduna bağlayın. Ekranda ileri-geri akım (Voltaj) gösterilecektir.tage düşüşü (silikon diyotlar için tipik olarak 0.5V ila 0.8V).
- Reverse the leads. The display should show 'OL' (Overload) for a good diode. If it shows a reading in both directions or 'OL' in both directions, the diode may be faulty.
7.6 Transistör (hFE) Testi
Caution: Ensure the transistor is disconnected from the circuit before testing.
- Kırmızı ucu takın VΩmA jack and the black lead into the Bİlgİ kriko.
- Döner anahtarı hFE konumuna getirin.
- Identify if the transistor is NPN or PNP. Insert the transistor's emitter, base, and collector leads into the corresponding holes in the hFE socket on the multimeter.
- LCD ekranda hFE (DC akım kazancı) değerini okuyun.
8. Özellikler
| Parametre | Değer |
|---|---|
| Marka | Velleman |
| Model Numarası | DVM810 |
| Ölçüm Türü | Multimetre |
| DC Hacmitage Aralık | 500V'a kadar |
| AC Hacmitage Aralık | 500V'a kadar |
| DC Akım Aralığı | Up to 10A (0.2A fused, 10A unfused) |
| Direnç Aralığı | 2MΩ'a kadar |
| Diyot Testi | Evet |
| Transistör (hFE) Testi | Evet |
| Görüntülemek | 3 1/2 Digit LCD |
| Güç Kaynağı | 9V Pil (dahil değildir) |
| Boyutlar | Yaklaşık 3.70" x 1.81" x 1.03" |
| Ürün Ağırlığı | Yaklaşık 3.2 ons (0.2 lbs) |
| UPC | 836479002272 |
9. Bakım
9.1 Pil Değişimi
When the low battery indicator appears on the LCD, replace the 9V battery as described in Section 6.1. A weak battery can lead to inaccurate readings.
9.2 Temizlik
Multimetreyi temizlemek için kasayı bir bezle silin.amp Bir bez ve yumuşak bir deterjan kullanın. Aşındırıcı veya çözücü maddeler kullanmayın. Kullanmadan önce ünitenin tamamen kuru olduğundan emin olun.
9.3 Test Ucu Muayenesi
Test uçlarını düzenli olarak hasar belirtileri açısından kontrol edin; örneğin, yalıtımda çatlak, açıkta kalan teller veya gevşek bağlantılar olup olmadığını inceleyin. Elektrik çarpması tehlikesini önlemek için hasarlı uçları derhal değiştirin.
10. Sorun Giderme
- Ekranda görüntü yok veya çok silik görüntü var: Pili kontrol edin. Gerekirse değiştirin.
- Yanlış okumalar:
- Döner anahtarın doğru fonksiyona ve aralığa ayarlandığından emin olun.
- Pil hacmini kontrol edintage; replace if low.
- Test uçlarının doğru şekilde bağlandığından ve hasar görmediğinden emin olun.
- For resistance measurements, ensure the circuit is de-energized.
- 'OL' (Aşırı Yük) görüntülendi: Ölçülen değer seçilen aralığı aşıyor. Daha yüksek bir aralık seçin veya devrenin ölçüm cihazının kapasitesi dahilinde olduğundan emin olun.
- Fuse blown (during current measurement): If the meter stops measuring current, the internal fuse may have blown. Refer to a qualified technician for fuse replacement.
11. Garanti ve Destek
Warranty information for the Velleman DVM810 Digital Multimeter is typically provided with your purchase documentation or can be found on the official Velleman website. For technical support, service, or further inquiries, please refer to the contact information provided by your retailer or the manufacturer's official support channels.