
giriiş
This manual provides essential instructions for the safe installation, operation, and maintenance of your Lithonia Lighting 2GT8 2 U316 A12 MVOLT GEB10IS Fluorescent Troffer. Please read all instructions carefully before proceeding with installation or use. Retain this manual for future reference.
Güvenlik Bilgileri
- Aydınlatma armatürünü takmadan, bakımını yapmadan veya temizlemeden önce daima devre kesiciden elektriği kesin.
- Kurulum, geçerli tüm ulusal ve yerel elektrik yönetmeliklerine uygun olarak, yetkili bir elektrikçi tarafından yapılmalıdır.
- Olası elektrik çarpmasını önlemek için armatürün doğru şekilde topraklanmış olduğundan emin olun.
- Yanıcı malzemelerin yakınına kurmayın.
- Kurulum ve bakım sırasında uygun kişisel koruyucu ekipman (KKD) giyin.
Kurmak
Kurulum
The Lithonia Lighting 2GT8 troffer is designed for recessed installation in grid ceilings. Follow these general steps:
- Tavan Açıklığını Hazırlayın: Ensure the ceiling grid opening matches the fixture dimensions (24 x 24 inches).
- Kablolama: Route electrical supply wires to the fixture location. Connect the fixture's wiring to the building's electrical system according to local codes. Ensure proper grounding.
- Montaj: Carefully lift the troffer into the ceiling grid opening. The fixture is designed for lay-in grid installation. Secure the fixture to the grid using appropriate clips or hangers as required by local codes.
- Ampul Montajı: Install two (2) U31W T8 fluorescent bulbs (not included) into the fixture's sockets. Ensure bulbs are seated correctly.
- Objektif Kurulumu: Close and secure the hinged steel door with the acrylic patterned lens.
Refer to the mounting data and dimensions diagram below for detailed measurements and installation guidance.

Image: A technical diagram illustrating the mounting data and dimensions of the Lithonia Lighting 2GT8 troffer. It shows various measurements in inches and millimeters for the fixture's depth, width, and mounting points, along with a small diagram of a lay-in grid installation.
İşletim
Temel İşlemler
Once installed and wired correctly, the Lithonia Lighting 2GT8 troffer operates by a standard wall switch connected to the electrical circuit. Ensure the correct T8 fluorescent bulbs are installed before restoring power.
Ampul Değişimi
To replace bulbs:
- Gücü Kesin: Elektrik şalterinden armatürün elektriğini kesin.
- Open Lens: Unlatch and open the hinged steel door to access the bulbs.
- Eski Ampulleri Çıkarın: Carefully twist and remove the old T8 fluorescent bulbs.
- Install New Bulbs: Insert new U31W T8 fluorescent bulbs, ensuring they are securely seated in the sockets.
- Close Lens: Close and secure the hinged steel door.
- Gücü Geri Yükle: Devre kesicide gücü tekrar açın.
Bakım
Temizlik
Regular cleaning helps maintain optimal light output and appearance.
- Gücü Kesin: Temizliğe başlamadan önce daima elektriği kesin.
- Dış Görünümü Temizleyin: Dış yüzeyleri yumuşak, damp bez. Aşındırıcı temizleyicilerden kaçının.
- Lensi Temizle: The acrylic patterned lens can be cleaned with a mild, non-abrasive cleaner specifically designed for plastics. Open the hinged door for easier access.
- Ensure all parts are dry before restoring power.
Lens Değiştirme
The hinged steel door allows for easy replacement of the acrylic patterned lens if it becomes damaged or discolored. Contact Lithonia Lighting customer support for replacement lens options.
Sorun giderme
If you encounter issues with your fluorescent troffer, refer to the following common problems and solutions:
- Işık Yanmıyor:
- Devre kesicinin açılıp açılmadığını kontrol edin.
- Verify that bulbs are correctly installed and not faulty.
- Tüm kablo bağlantılarının güvenli olduğundan emin olun.
- Işık Titriyor:
- Replace old or faulty fluorescent bulbs.
- Check for loose bulb connections.
- A failing ballast may cause flickering; consult a qualified electrician for inspection.
- Azaltılmış Işık Çıkışı:
- Clean the lens and bulbs to remove dust and debris.
- Bulbs may be nearing the end of their lifespan and require replacement.
Sürekli devam eden sorunlar için müşteri desteğiyle veya yetkili bir elektrikçiyle iletişime geçin.
Özellikler
Key specifications for the Lithonia Lighting 2GT8 2 U316 A12 MVOLT GEB10IS Fluorescent Troffer:
| Özellik | Detay |
|---|---|
| Marka | Lithonia Aydınlatma |
| Model Numarası | 2GT8 2 U316 A12 MVOLT GEB10IS |
| Işık Kaynağı Türü | Floresan |
| Işık Kaynağı Sayısı | 2 |
| Ampul Tipi | U31W T8 (not included) |
| Cilttage | MVOLT (Multi-Voltage) |
| Netage | 32 watts (per bulb, total 64W) |
| Parlaklık | 5600 Lumens (total) |
| Malzeme | Steel (housing), Acrylic (lens) |
| Bitiş Türü | Parlak Beyaz |
| Kurulum Türü | Recessed (Lay-in Grid) |
| Ürün Boyutları | 24 x 24 x 4.25 inç |
| Ürün Ağırlığı | 11.5 pound |
| İç/Dış Mekan Kullanımı | Kapalı |
| Özel Özellik | Enerji Verimliliği |
For additional technical details, refer to the product datasheet below.
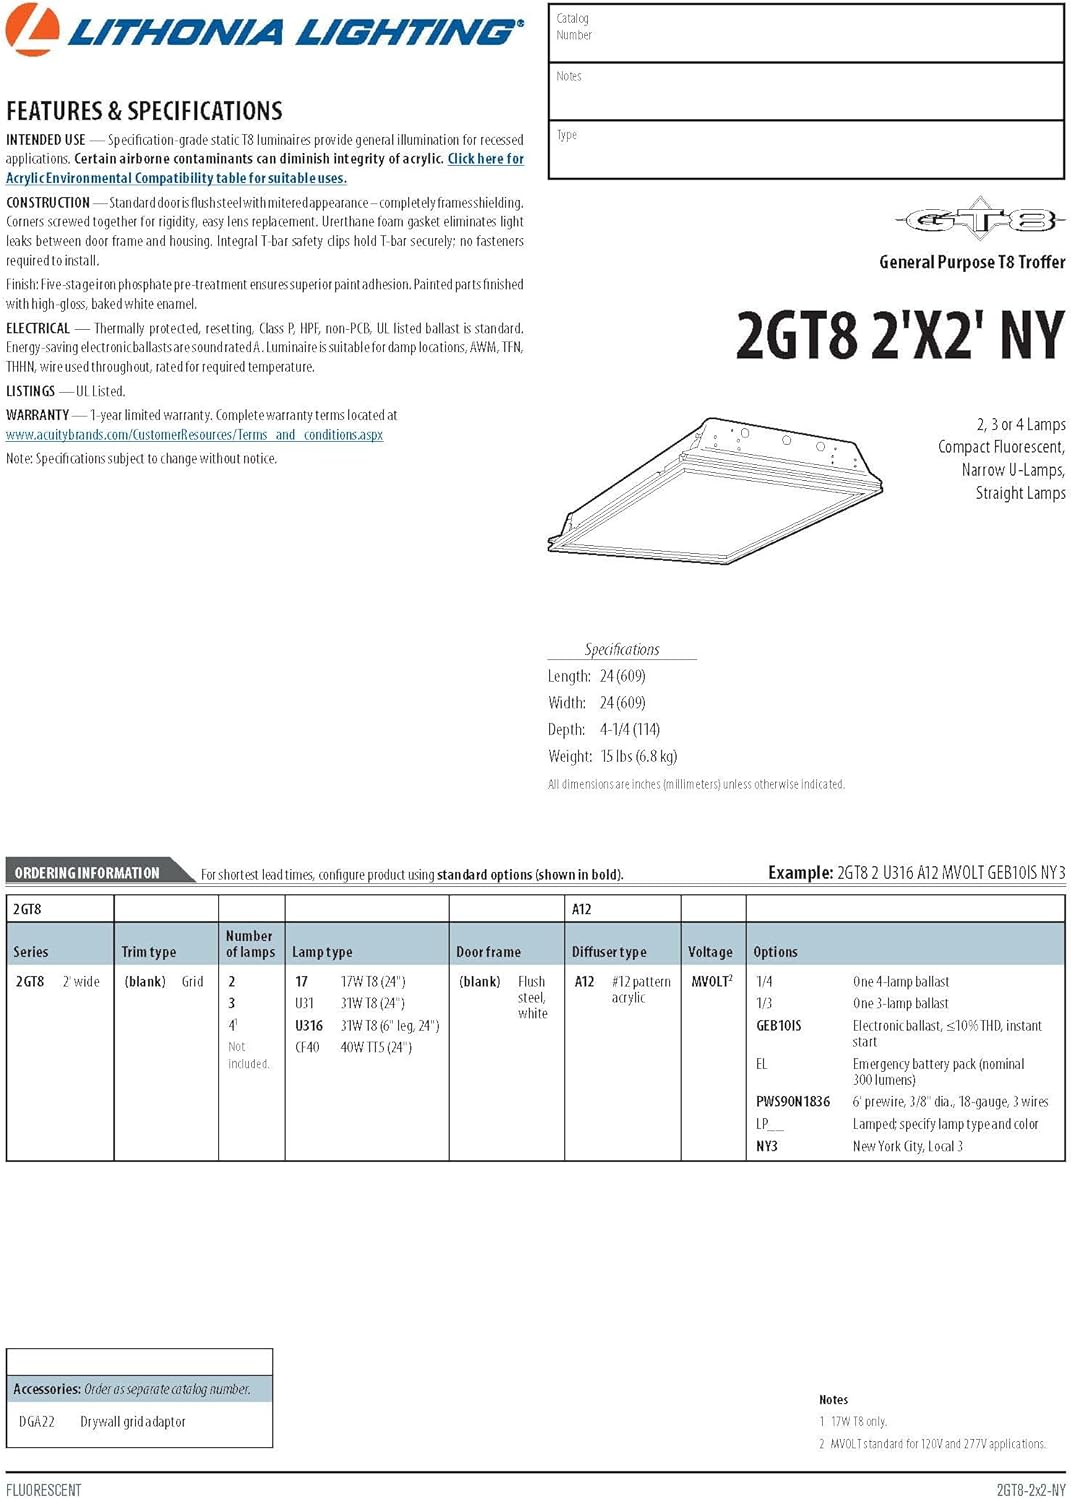
Image: A section of the Lithonia Lighting 2GT8 product datasheet, detailing features, specifications, and ordering information for various configurations of the 2GT8 series troffer, including the 2GT8 2 U316 A12 MVOLT GEB10IS model.
Garanti Bilgileri
This Lithonia Lighting product is covered by a 3 yıllık sınırlı garanti. This warranty covers defects in materials and workmanship under normal use. For specific terms and conditions, please refer to the official warranty documentation provided with your purchase or visit the Lithonia Lighting webalan.
Müşteri Desteği
For technical assistance, replacement parts, or warranty claims, please contact Lithonia Lighting customer support.
- Üretici: Acuity Brands Lighting Inc.
- Çevrimiçi destek: Resmi ziyaret edin Lithonia Lighting Store Daha fazla bilgi ve kaynak için.


