1. Giriş
This manual provides essential information for the safe and efficient operation of your Singer Tiny Tailor Mending Sewing Machine, Model TT600. Designed for quick mending tasks, this compact and portable machine offers a durable lockstitch for various fabric repairs.

Image 1.1: The Singer Tiny Tailor Mending Sewing Machine shown in its original packaging. This image provides a general overview of the product as it appears when unboxed.
2. Güvenlik Talimatları
Yangın, elektrik çarpması veya kişilerin yaralanma riskini azaltmak için lütfen bu cihazı kullanmadan önce tüm talimatları okuyun.
- Always unplug the machine from the electrical outlet immediately after using and before cleaning, making any adjustments, or removing/attaching any parts.
- Do not operate the machine with a damaged cord or plug, or if it has been dropped or damaged.
- Parmaklarınızı tüm hareketli parçalardan uzak tutun. Dikiş makinesi iğnesinin çevresinde özel dikkat gereklidir.
- Yalnızca üretici tarafından önerilen ekleri kullanın.
- Hiçbir zaman herhangi bir nesneyi herhangi bir açıklığa düşürmeyin veya sokmayın.
- Açık havada kullanmayınız.
- Aerosol (sprey) ürünlerinin kullanıldığı veya oksijen verilen yerlerde çalışmayın.
3. Paket İçeriği
Paketin içinde tüm öğelerin mevcut olduğundan emin olun:
- Singer Tiny Tailor Mending Sewing Machine (Model TT600)
- Ayak kontrolü
- Güç Adaptörü
- Extra Needle
- Bobbins (pre-wound or empty)
- İğne İpliği
- Seam Opener/Thread Trimmer
- Kullanım Kılavuzu (bu belge)
4. Parça Tanımlama
Dikiş makinenizin bileşenlerini tanıyın:
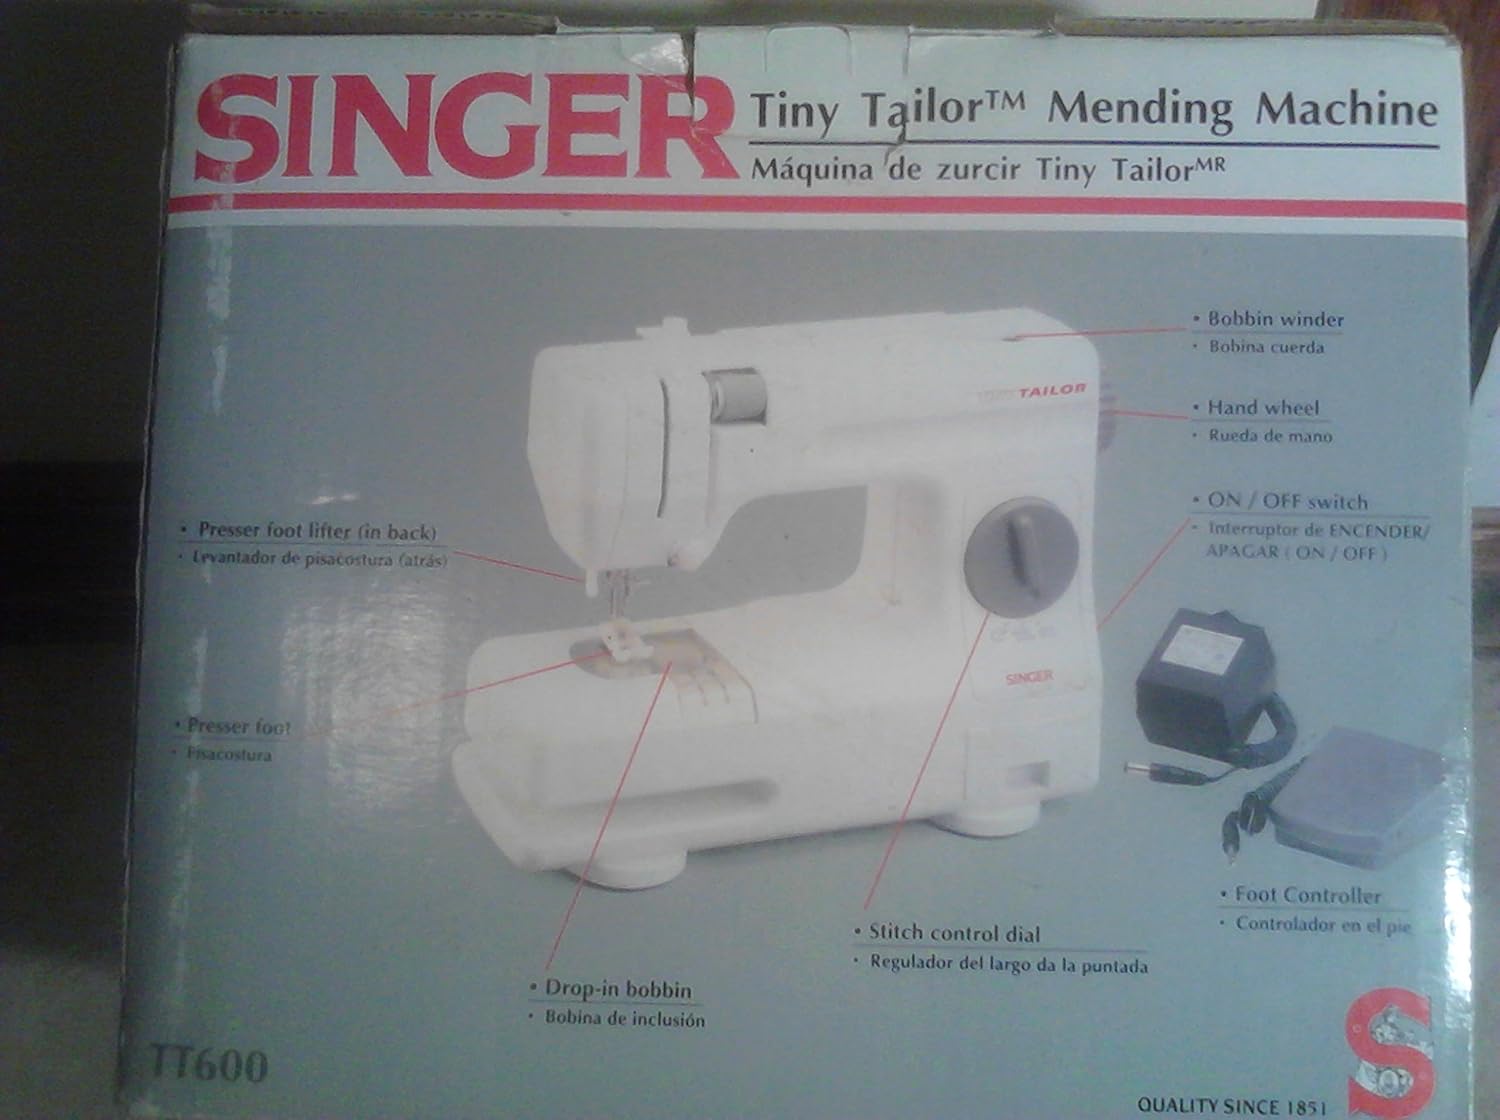
Image 4.1: Diagram illustrating the key parts of the Singer Tiny Tailor Mending Sewing Machine, including the bobbin winder, hand wheel, ON/OFF switch, presser foot lifter, presser foot, drop-in bobbin, stitch control dial, and foot controller.
- Bobin Sarıcı: Used to wind thread onto bobbins.
- El Çarkı: İğneyi elle yukarı ve aşağı hareket ettirir.
- Açma / kapama düğmesi: Makineyi açar veya kapatır.
- Pres Ayağı Kaldırıcı: Raises and lowers the presser foot.
- Baskı Ayağı: Dikiş sırasında kumaşı sıkıca yerinde tutar.
- Drop-in Bobbin: Easy access bobbin system.
- Stitch Control Dial: Adjusts the length of the stitch.
- Ayak Kumandası: Controls the sewing speed, freeing hands for fabric guidance.
5. Kurulum
5.1 Güç Bağlantısı
- Ensure the ON/OFF switch is in the "OFF" position.
- Insert the power adapter plug into the machine's power jack.
- Güç adaptörünü standart bir elektrik prizine takın.
5.2 Foot Control Connection
- Locate the foot control jack on the machine.
- Insert the foot control plug firmly into the jack.
5.3 Bobini Sarma
- Makara pimine bir makara iplik yerleştirin.
- Bobin sarımı için ipliği gergi diskinden geçirin.
- Boş bir bobini bobin sarma miline yerleştirin.
- İpliği makaraya birkaç kez sarın, ardından makara sarma milini sağa doğru itin.
- Turn on the machine and gently press the foot control until the bobbin is sufficiently wound.
- Push the bobbin winder spindle back to the left and trim the thread.
5.4 Inserting the Drop-in Bobbin
- Bobin kapağını açın.
- Sarılmış makarayı makara kutusuna yerleştirin ve ipliğin doğru yönde (genellikle saat yönünün tersine) açıldığından emin olun.
- Bobin ipliğini gergi yayından geçirerek iplik kılavuz yuvasına yerleştirin.
- Bobin kapak plakasını kapatın.
5.5 Üst Dişliyi Takma
- Baskı ayağı kaldırıcısını kaldırın.
- Makara pimine bir makara iplik yerleştirin.
- Guide the thread through the upper thread guides and tension discs as indicated by the machine's markings.
- Thread the needle from front to back using the needle threader or manually.
- İğne deliğinden yaklaşık 6 santimetre iplik geçirin.
5.6 Bobin İpliğini Yukarı Çıkarma
- Üstteki ipliği sol elinizle hafifçe tutun.
- İğneyi iğne yuvasına indirmek için el çarkını kendinize doğru çevirin ve ardından tekrar yukarı kaldırın.
- The needle thread will catch the bobbin thread, forming a loop.
- Pull the loop to bring the bobbin thread up through the needle plate opening.
- Hem üst hem de alt iplikleri baskı ayağının altından makinenin arkasına doğru çekin.
6. Makinenin Çalıştırılması
6.1 Temel Dikiş Teknikleri
- Place the fabric under the presser foot, aligning the edge with a seam guide if available.
- Lower the presser foot using the presser foot lifter.
- ON/OFF düğmesini kullanarak makineyi açın.
- Gently press the foot control to start sewing. The harder you press, the faster the machine will sew.
- Guide the fabric gently with both hands, ensuring it feeds evenly. Do not pull or push the fabric forcefully.
- To stop sewing, release the foot control.
- Raise the needle to its highest position by turning the hand wheel.
- Raise the presser foot and pull the fabric away from the machine.
- Trim the threads using the seam opener/thread trimmer or scissors.
6.2 Dikiş Uzunluğunu Ayarlama
The Stitch Control Dial allows you to adjust the length of your stitches. Turn the dial to select the desired stitch length. Experiment on scrap fabric to find the appropriate setting for your project.
6.3 Mending Techniques
The Tiny Tailor is ideal for quick mending. For tears, align the edges of the fabric and stitch across the tear, overlapping the stitches slightly for reinforcement. For seams, simply stitch along the original seam line. For delicate fabrics, use a finer needle and thread and a shorter stitch length.
7. Bakım
7.1 Temizlik
Regular cleaning helps maintain your machine's performance:
- Temizlemeden önce daima makinenin fişini çekin.
- Use a soft brush or lint brush to remove lint and dust from the bobbin area and under the needle plate.
- Makinenin dış yüzeyini yumuşak, kuru bir bezle silin. Sıvı temizleyiciler veya sert kimyasallar kullanmayın.
7.2 İğne Değişimi
Replace the needle regularly, especially if it becomes bent, dull, or if you experience skipped stitches or thread breakage.
- Makinenin fişinin çekildiğinden emin olun.
- İğneyi gevşetin clamp vidası.
- Eski iğneyi çıkarın.
- Yeni iğneyi düz tarafı makinenin arkasına bakacak şekilde yerleştirin ve sonuna kadar yukarı doğru itin.
- İğneyi sıkınamp güvenli bir şekilde vidalayın.
8. Sorun Giderme
| Sorun | Olası Neden | Çözüm |
|---|---|---|
| Makine açılmıyor | Power cord not plugged in; ON/OFF switch off. | Check power connections; ensure switch is ON. |
| Atlanan dikişler | Bent or dull needle; incorrect needle size; improper threading. | Replace needle; ensure correct needle for fabric; re-thread machine. |
| İplik kopması | Yanlış gerilim; düşük kaliteli iplik; bükülmüş veya körelmiş iğne; yanlış iplik geçirme. | Adjust tension; use good quality thread; replace needle; re-thread machine. |
| Kumaş beslenmiyor | Presser foot not lowered; lint under needle plate. | Lower presser foot; clean bobbin area. |
| Bobbin thread tangling | Improper bobbin insertion; incorrect bobbin winding. | Re-insert bobbin correctly; re-wind bobbin evenly. |
9. Özellikler
| Model Numarası | TT600 |
| Marka | ŞARKICI |
| ASIN | B000KGIHVI |
| UPC | 037431203144 |
| Renk | Beyaz |
| Elektrikli | Evet |
| Piller Gerekli | HAYIR |
| Ürün Ağırlığı | 6.05 pound |
| Paket Boyutları | 13.4 x 10.3 x 8.5 inç |
10. Garanti ve Destek
For warranty information, product registration, or technical support, please refer to the official SINGER webSite üzerinden satın alabilir veya doğrudan müşteri hizmetleriyle iletişime geçebilirsiniz. Satın alma belgenizi saklayın.
Not: Belirli garanti koşulları bölgeye ve perakendeciye göre değişiklik gösterebilir.


