
1. Giriş
Thank you for choosing the BitFenix AL118 ATX Mid Tower PC Case. This manual provides essential information for the proper installation, operation, and maintenance of your new PC case. Please read this manual thoroughly before beginning installation to ensure correct setup and to prevent any damage to the product or its components. Keep this manual for future reference.
Güvenlik Bilgileri
- Herhangi bir bileşeni takmadan veya çıkarmadan önce daima güç kaynağını duvar prizinden çıkarın.
- Handle components with care to avoid electrostatic discharge (ESD) damage. Consider using an anti-static wrist strap.
- Kabloların fanlara veya diğer hareketli parçalara müdahale etmemesi için hepsinin düzgün bir şekilde yönlendirildiğinden ve sabitlendiğinden emin olun.
- Do not open the power supply unit (PSU) as it contains high voltage bileşenleri.
- Keep the case away from direct sunlight, high temperatures, and moisture.
2. Ürün Bittiview ve Özellikler
The BitFenix AL118 is a high-performance ATX Mid Tower PC case designed for enthusiasts. It features a tempered glass side panel, integrated ARGB lighting, and comes equipped with a 1000W 80+ Gold Gen5 ATX 3.0 power supply unit. The case offers extensive compatibility for various motherboard sizes, GPUs, and cooling solutions.
Temel Özellikler:
- Form Faktörü: ATX Orta Kule
- Güç Kaynağı: Integrated 1000W 80+ Gold Gen5 ATX 3.0 PSU
- Yan panel: Temperli Cam
- Aydınlatma: Addressable RGB (ARGB) elements
- Anakart Desteği: MicroATX, Mini-ITX (ATX implied by case type)
- Ön G / Ç: 1 x USB 3.2 Type-C, 2 x USB 3.0
- Storage Bays: 2 x 2.5" internal, 1 x 3.5" internal
- GPU Açıklığı: 400mm'ye kadar
- Soğutma Desteği:
- Top Radiator: 240mm, 280mm, 360mm
- Rear Radiator: 1 x 120mm
- Rear Fan: 1 x 120mm (pre-installed ARGB)
- Top Fan: 3 x 120mm or 3 x 140mm (support)
- Side Fan: 3 x 120mm (pre-installed ARGB)
3. Kurulum Kılavuzu
Follow these steps to properly set up your BitFenix AL118 PC case and install your components.
3.1 Paketin Açılması ve İlk Muayene
- Kutuyu ambalajından dikkatlice çıkarın.
- Inspect the case for any signs of damage during transit. If damaged, contact your retailer immediately.
- Remove the tempered glass side panel by unscrewing the thumb screws (if present) or releasing the latch mechanism. Place it on a soft, flat surface to prevent scratches.
- Kasanın içindeki aksesuar kutusunu bulun; kutuda vidalar, kablo bağları ve diğer montaj malzemeleri bulunur.
3.2 Anakart Kurulumu
- Ensure the correct standoffs are installed for your motherboard form factor (MicroATX, Mini-ITX). Additional standoffs may be in the accessory box.
- G/Ç kalkanını kasanın arka açıklığına takın.
- Anakartınızı dikkatlice desteklerin üzerine yerleştirin ve vida deliklerini hizalayın.
- Anakartı birlikte verilen vidalarla sabitleyin. Çok fazla sıkmayın.

Şekil 3.2.1: Dahili view of the case, highlighting the motherboard tray and various mounting points for fans and components.
3.3 Grafik Kartı (GPU) Kurulumu
- Remove the necessary expansion slot covers from the rear of the case, corresponding to your GPU's size.
- Insert your GPU into the appropriate PCIe slot on the motherboard until it clicks into place.
- GPU'yu vidalarla kasaya sabitleyin.
- Connect the required PCIe power cables from the PSU to the GPU.
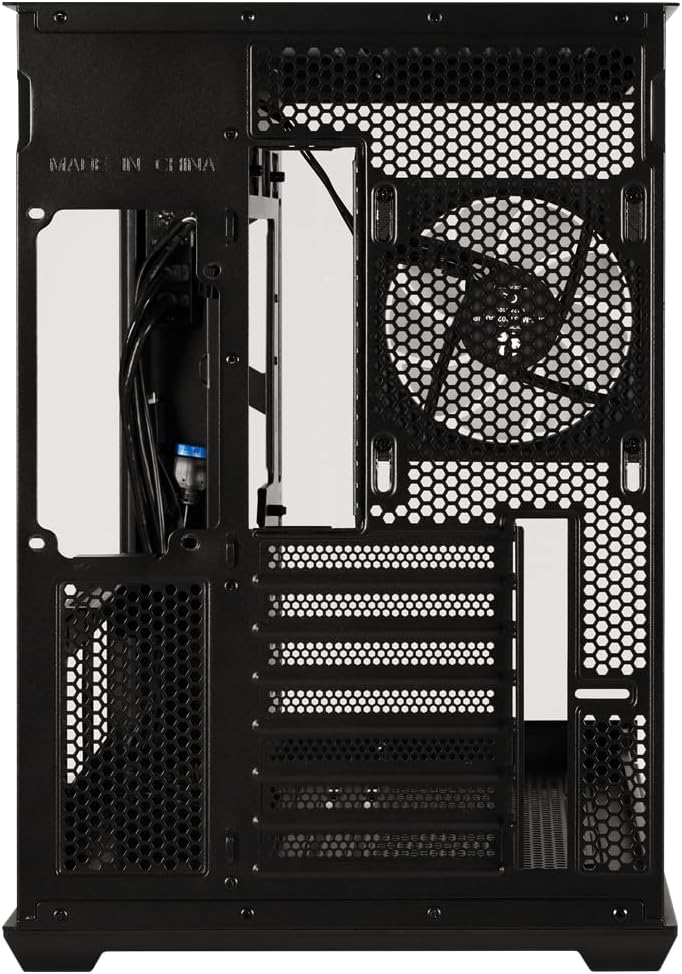
Şekil 3.3.1: Arka view of the case, showing the expansion slots where graphics cards are mounted and the pre-installed rear fan.
3.4 Storage Drive Installation (2.5" SSD/HDD, 3.5" HDD)
- Locate the 2.5" drive mounts (2 available) and 3.5" drive bay (1 available). These are typically found behind the motherboard tray or in a dedicated drive cage.
- For 2.5" drives, secure them to the mounting brackets with screws.
- For 3.5" drives, slide them into the drive cage and secure with screws or tool-less clips if available.
- Connect SATA data cables to the motherboard and SATA power cables from the PSU to each drive.
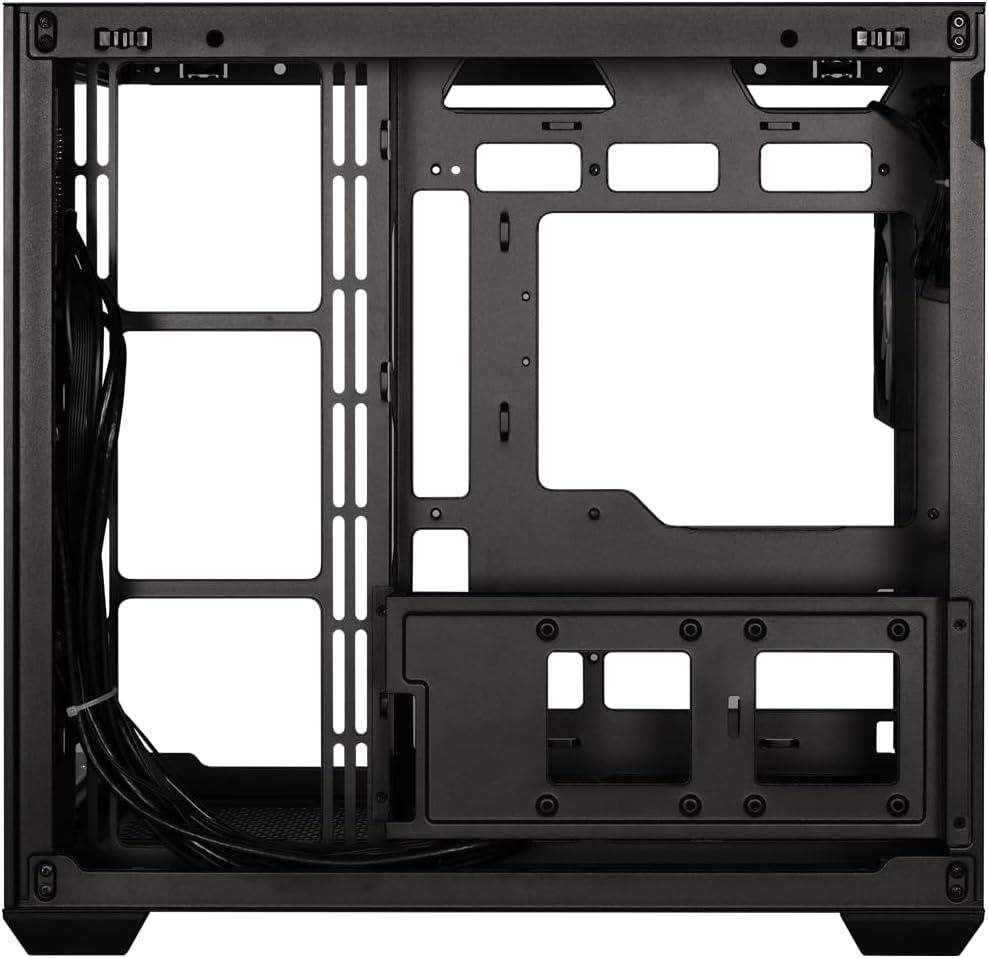
Şekil 3.4.1: View behind the motherboard tray, illustrating the cable management channels and mounting locations for 2.5-inch and 3.5-inch storage drives.
3.5 Power Supply Unit (PSU) Connections
Your BitFenix AL118 case comes with a pre-installed 1000W 80+ Gold Gen5 ATX 3.0 PSU. Ensure all necessary power cables are connected:
- 24-pin ATX Power: Connect to the motherboard.
- 8-pin (4+4) EPS/CPU Power: Connect to the motherboard CPU power header.
- PCIe Gücü: Gerektiği şekilde grafik kartınıza/kartlarınıza bağlanın.
- SATA Gücü: Connect to your storage drives.
- Peripheral/Molex Power: Connect to any other components requiring this type of power.
3.6 Ön Panel Bağlantıları
Connect the front panel cables to the corresponding headers on your motherboard:
- USB 3.2 Tip-C: Connect the internal USB-C header cable to your motherboard's USB 3.2 Gen2 Type-C header.
- USB 3.0: Connect the internal USB 3.0 header cable to your motherboard's USB 3.0 header.
- HD Ses: Connect to your motherboard's audio header.
- Power SW, Reset SW, HDD LED, Power LED: Connect these small connectors to the front panel header pins on your motherboard according to your motherboard manual.

Şekil 3.6.1: Dahili view showing the pre-installed ARGB fans and the routing of front panel I/O cables, including USB 3.2 Type-C and USB 3.0 connections.
3.7 Kablo Yönetimi
Utilize the cable routing cutouts and tie-down points behind the motherboard tray to manage cables. Proper cable management improves airflow and aesthetics.
- Route main power cables (24-pin, EPS) through the largest cutouts.
- Use cable ties or Velcro straps (included in accessory box) to bundle and secure cables.
- Kabloların fan kanatlarını veya hava akış yollarını engellemediğinden emin olun.
4. Kullanım Talimatları
4.1 Sisteminizin Çalıştırılması
- Once all components are installed and cables connected, replace the tempered glass side panel.
- AC güç kablosunu güç kaynağına ve ardından duvardaki prize bağlayın.
- PSU'nun arkasındaki güç anahtarını 'AÇIK' konumuna getirin.
- Press the power button on the front panel of your case.
4.2 ARGB Aydınlatma Kontrolü
The BitFenix AL118 features Addressable RGB (ARGB) lighting. The control method depends on how the ARGB components are connected:
- Anakart Senkronizasyonu: If the ARGB cables are connected to a compatible 3-pin 5V ARGB header on your motherboard, you can control the lighting effects using your motherboard's RGB software (e.g., ASUS Aura Sync, MSI Mystic Light, Gigabyte RGB Fusion, ASRock Polychrome Sync).
- Entegre Kontrol Cihazı: If the case includes a built-in ARGB controller (often connected to a reset button or dedicated ARGB button), you can cycle through pre-programmed lighting modes by pressing that button. Refer to the specific controller's instructions if applicable.
5. Bakım
Düzenli bakım, PC bileşenlerinizin optimum performans ve uzun ömürlü olmasını sağlamaya yardımcı olur.
- Toz Filtreleri: The case is equipped with dust filters (e.g., top, front, bottom). Regularly remove and clean these filters with water and mild soap, or by vacuuming/brushing them. Ensure they are completely dry before re-installing.
- İç Temizlik: Periodically use compressed air to blow dust out of the case interior, especially from fan blades, heatsinks, and vents. Ensure the system is powered off and unplugged before cleaning.
- Temperli Cam: Clean the tempered glass panel with a microfiber cloth and a non-abrasive glass cleaner. Avoid harsh chemicals.
6. Sorun Giderme
If you encounter issues with your PC build, refer to the following common troubleshooting steps:
- No Power / System Not Starting:
- Ensure the PSU power switch is in the 'ON' position.
- Check that the AC power cord is securely connected to both the PSU and the wall outlet.
- Verify all PSU cables (24-pin, EPS, PCIe) are firmly connected to the motherboard and components.
- Confirm the front panel power switch cable is correctly connected to the motherboard header.
- Görüntü Çıkışı Yok:
- Ensure your monitor is connected to the graphics card (GPU) output, not the motherboard's integrated graphics output (unless you are using integrated graphics).
- Ekran kartını PCIe yuvasına tekrar yerleştirin.
- Check that the GPU's power cables are securely connected.
- Fanlar dönmüyor / ARGB çalışmıyor:
- Verify that all fan power cables are connected to the motherboard fan headers or a fan controller.
- Check ARGB cables are connected to a compatible 3-pin 5V ARGB header on the motherboard or an ARGB controller.
- Anakart yazılımı kullanıyorsanız, doğru şekilde yüklendiğinden ve yapılandırıldığından emin olun.
- Aşırı Isınma:
- Ensure all case fans are spinning and oriented correctly for optimal airflow (intake/exhaust).
- Clean dust filters and case interior as described in the Maintenance section.
- İşlemci soğutucusunun ve ekran kartı soğutucusunun doğru şekilde takılıp çalıştığını doğrulayın.
7. Özellikler
| Özellik | Şartname |
|---|---|
| Model Adı | BitFenix AL118 1000W 80+Gold Gen5 ATX 3.0 TemperedGlass ARGB ATX MidTower SiyahKasa BFC-ALB100KKGSK-4A |
| Parça Numarası | BFC-ALB100KKGSK-4A |
| Dava Türü | ATX Orta Kule |
| Anakart Uyumluluğu | MicroATX, Mini-ITX (ATX implied by case type) |
| Güç Kaynağı Ünitesi (PSU) | 1000W 80+ Gold Gen5 ATX 3.0 (Pre-installed) |
| PSU Konumu | Alt |
| Yan Panel | Temperli Cam |
| Ön G / Ç Bağlantı Noktaları | 1 x USB 3.2 Type-C, 2 x USB 3.0 |
| Dahili 2.5" Sürücü Yuvaları | 2 |
| Dahili 3.5" Sürücü Yuvaları | 1 |
| Maksimum GPU Uzunluğu | 400mm |
| Üst Radyatör Desteği | 240mm, 280mm, 360mm |
| Arka Radyatör Desteği | 1x120mm |
| Front Panel Fan Support | None (Side fans are present) |
| Rear Panel Fan Support | 1x120mm |
| Top Panel Fan Support | 3 x 120 mm, 3 x 140 mm |
| Pre-installed Fans (Side) | 3 x 120mm ARGB |
| Pre-installed Fans (Rear) | 1 x 120mm ARGB |
| Ürün Boyutları | 48x45.5x34.5 cm |
| Ürün Ağırlığı | 8 Kilogram |
8. Garanti ve Destek
BitFenix products are manufactured to the highest quality standards. For specific warranty terms and conditions, please refer to the warranty card included with your product or visit the official BitFenix website. If you encounter any issues that cannot be resolved using this manual, please contact BitFenix customer support or your retailer for assistance.
Official BitFenix Webalan: www.bitfenix.com