1. Giriş
Satın aldığınız için teşekkür ederizasing the DEPSTECH DS620-TL Triple Lens Endoscope Camera. This device is designed for visual inspection in hard-to-reach areas, featuring a 1080P triple-lens camera, a 5-inch IPS monitor, and an IP67 waterproof semi-rigid cable. This manual provides essential information for safe and effective use of your endoscope camera.
2. Ürün Bittiview
2.1 Temel Özellikler
- 1080P Triple Lens Camera: Equipped with three cameras (front, side B, side C) for multi-angle inspection.
- 5 inç IPS Monitör: Provides clear, real-time images with excellent color reproduction.
- IP67 Su Geçirmez Prob: The 7.9mm diameter semi-rigid cable is waterproof, suitable for wet environments.
- Ayarlanabilir LED Işıklar: Features 8+1+1 high-brightness LED chips with adjustable intensity for optimal illumination.
- 5M Semi-Rigid Cable: Offers flexibility and durability for navigating various spaces.
- Şarj Edilebilir Pil: Built-in battery provides approximately 2-3 hours of continuous operation.
2.2 Paket İçeriği
Paketin içerisinde tüm ürünlerin mevcut olduğundan emin olun:
- DEPSTECH DS620-TL Endoscope Camera
- C Tipi Şarj Kablosu
- Hook and Magnet Attachments
- Storage Drawstring Bag
- Kullanıcı Kılavuzu

Şekil 2.2: Dahil edilen aksesuarlar ve ana ünite.
3. Güvenlik Bilgileri
- Cihazı yanıcı veya patlayıcı gazların bulunduğu ortamlarda kullanmayın.
- Cihazınızı güçlü elektromanyetik alanlardan uzak tutun.
- Kamera lensinin güçlü ışık kaynaklarına doğrudan maruz kalmasından kaçının.
- Cihazı sökmeye veya üzerinde değişiklik yapmaya çalışmayın. Onarımlar yalnızca yetkili personel tarafından yapılmalıdır.
- İnceleme sırasında kesintileri önlemek için, cihazı kullanmadan önce tamamen şarj ettiğinizden emin olun.
- Clean the probe and lens after each use, especially after contact with liquids or corrosive substances.
4. Kurulum
4.1 Cihazı Şarj Etme
Connect the provided Type-C charging cable to the device's charging port and a suitable USB power adapter (not included). The charging indicator will show the charging status. A full charge typically takes 2-3 hours.
4.2 Mikro SD Kartın Takılması
To save photos and videos, a Micro SD card (Class 10/Class 10 or higher, 8-32GB) is required (not included). Locate the Micro SD card slot on the side of the monitor unit and insert the card until it clicks into place.
4.3 Aksesuarların Takılması
The endoscope comes with hook and magnet attachments. These can be screwed onto the tip of the camera probe for retrieving small objects or maneuvering in tight spaces.

Figure 4.3: Magnet and hook attachments for the probe.
5. Kullanım Talimatları
5.1 Açma/Kapatma
Press and hold the power button (usually located on the side or front panel) for a few seconds to turn the device on. The screen will display the DEPSTECH logo. To power off, press and hold the power button again.

Figure 5.1: Monitor button layout and functions.
5.2 Switching Lenses
The DS620-TL features a triple-lens system. Press the lens switch button (often labeled with a camera icon or 'M') to cycle between Front Camera A, Side Camera B, and Side Camera C. This allows for comprehensive viewing without repositioning the probe.

Figure 5.2: Triple lens camera detail.
5.3 LED Parlaklığının Ayarlanması
Use the up/down arrow buttons on the monitor to adjust the brightness of the LED lights on the camera probe. There are multiple levels of brightness to suit different inspection environments.
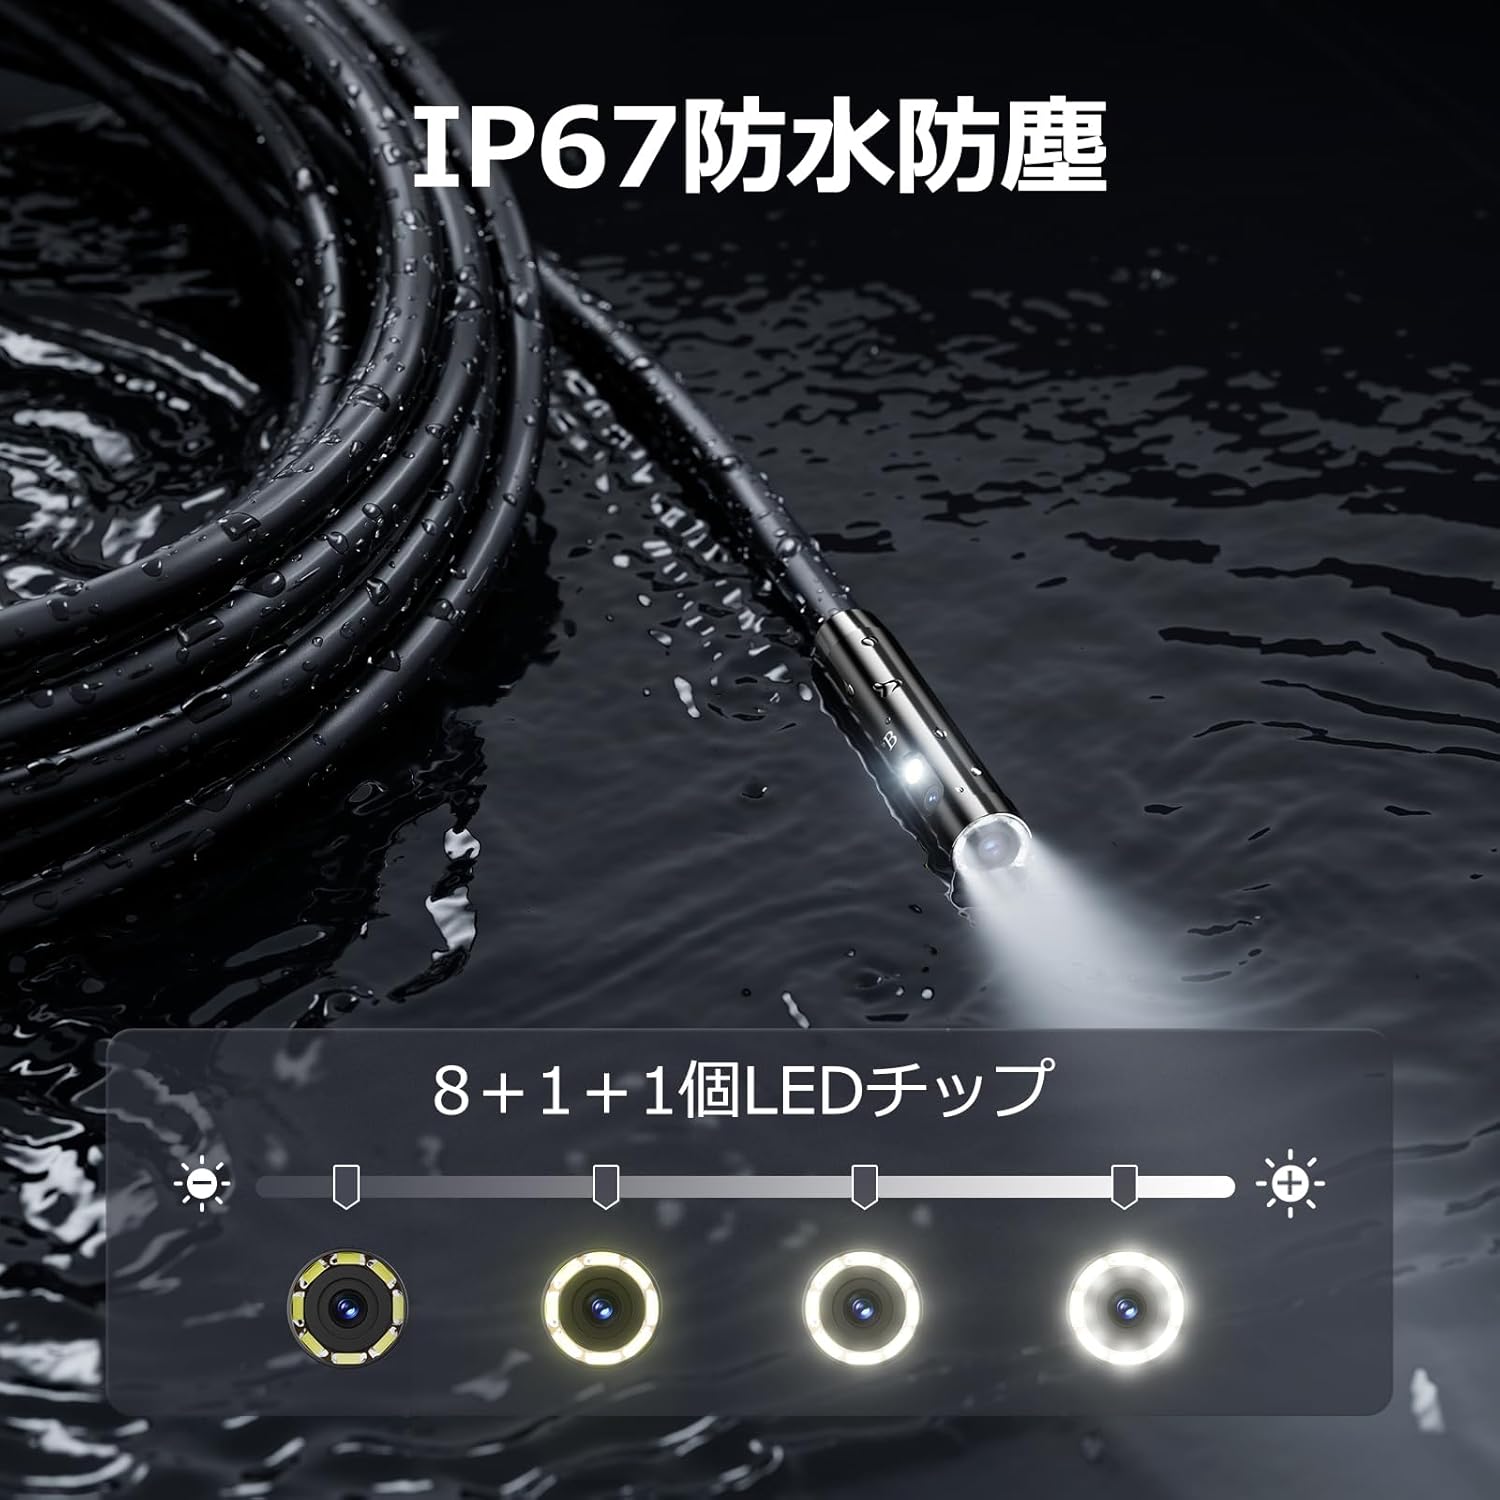
Figure 5.3: IP67 waterproof probe with adjustable LED illumination.
5.4 Fotoğraf Çekme ve Video Kaydetme
Press the photo/video button (usually a camera icon) to capture a still image. To record video, press and hold the photo/video button; press again to stop recording. Ensure a Micro SD card is inserted to save your media.

Figure 5.4: Monitor interface for photo and video capture.
5.5 Ekran Döndürme
Press the screen rotation button (often a circular arrow icon) to rotate the image on the monitor by 180 degrees. This is useful when the probe is in an inverted position.
5.6 Practical Applications
The DS620-TL is suitable for various tasks including home appliance maintenance, pipe inspection, wall wiring checks, and automotive repairs.

Figure 5.6: Various inspection scenarios for the endoscope.
5.7 Ürün Tanıtım Videosu
Video 5.7: A demonstration of the DEPSTECH DS620-TL endoscope camera in use, showcasinÖzellikleri ve uygulamaları.
6. Bakım
6.1 Probun ve Merceğin Temizlenmesi
After each use, especially in dirty or wet conditions, gently wipe the camera probe and lens with a soft, dry cloth. For stubborn dirt, a slightly damp cloth can be used, followed by drying. Do not use abrasive cleaners or solvents.
6.2 Depolama
Store the endoscope camera in a cool, dry place, away from direct sunlight and extreme temperatures. Use the provided drawstring bag for protection. Ensure the cable is coiled neatly without sharp bends.
6.3 Pil Bakımı
To prolong battery life, avoid fully discharging the device frequently. If storing for an extended period, charge the battery to approximately 50% every three months.
7. Sorun Giderme
7.1 Ekranda Görüntü Yok
- Cihazın açık ve tam şarjlı olduğundan emin olun.
- Check if the camera cable is securely connected to the monitor unit.
- İnceleme alanında yeterli aydınlatma sağlamak için LED parlaklığını ayarlayın.
7.2 Cannot Record Photos/Videos
- Verify that a compatible Micro SD card (Class 10/Class 10 or higher, 8-32GB) is inserted correctly.
- Mikro SD kartta yeterli boş alan olup olmadığını kontrol edin.
- Ensure the Micro SD card is not locked (read-only).
- Try formatting the Micro SD card (this will erase all data).
7.3 Cihaz Şarj Olmuyor
- Ensure the Type-C charging cable is properly connected to both the device and the power source.
- Try using a different USB power adapter or charging cable.
- Şarj bağlantı noktasında herhangi bir kalıntı veya hasar olup olmadığını kontrol edin.
If you encounter issues not listed here or if the problem persists, please contact DEPSTECH customer support.
8. Özellikler
| Özellik | Şartname |
|---|---|
| Marka | DEPSTEK |
| Model Adı | DS620TL-JP |
| Renk | Siyah |
| Su geçirmezlik seviyesi | IP67 |
| Medya Türü | SD Memory Card (8-32GB, Class 10/Class 10 or higher recommended) |
| File Biçim | MP4, MOV, AVI, JPEG, RAW |
| Video Yakalama Formatı | MP4 |
| Viewbulucu Türü | IPS |
| Sensör Tipi | CMOS |
| Foto Sensör Çözünürlüğü | 2.1 MP |
| Odaklanma Fonksiyonu | Sabit Odak |
| Otomatik Odaklama | HAYIR |
| Pilin Ortalama Ömrü | 2 Saat |
| Dahil Bileşenler | Type-C Cable, Attachments, Storage Drawstring Bag |
| Üretici Garantisi | 2 Yıl |
| Menşei ülke | Çin |
9. Garanti ve Destek
9.1 Üretici Garantisi
The DEPSTECH DS620-TL comes with a 24-month manufacturer warranty. Your order number serves as proof of purchase for warranty claims.
9.2 Müşteri Desteği
For any inquiries, technical assistance, or warranty claims, please contact our dedicated support team:
- E-posta: destek@depstech.com
- Yanıt Süresi: We aim to respond to all inquiries within 24 hours. For requests submitted on weekends or holidays, a response will be provided on the next business day.

Figure 9.2: DEPSTECH support details.