
1. Giriş
This manual provides detailed instructions for the safe installation, operation, and maintenance of your Philips LED 4-Inch Slim Downlight. This product features a canless design, dimmable functionality, and offers five selectable color temperatures (CCTs) to suit various lighting needs. Please read this manual thoroughly before installation and retain it for future reference.

Figure 1: Philips LED 4-inch slim downlight showing its canless design, dimmable function, 5 CCT options, and suitability for damp Konumlar.
2. Güvenlik Bilgileri
UYARI: Yangın veya Elektrik Çarpması Riski.
- Kurulum veya bakım işlemlerinden önce daima devre kesiciden elektriği kesin.
- Bu ürün, ürünün yapısı ve işletimi ile ilgili tehlikeleri bilen bir kişi tarafından geçerli kurulum koduna uygun olarak kurulmalıdır.
- Tüm elektrik bağlantılarının güvenli olduğundan ve yerel yönetmelik ve yönetmeliklere uygun olduğundan emin olun.
- Kabloları değiştirmeyin, yerini değiştirmeyin veya çıkarmayın.amp holders, or other electrical components.
- d için uygunduramp locations. Do not use in areas with direct water exposure.
- Yalıtımla doğrudan temas için IC olarak derecelendirilmiştir.
3. Paket İçeriği
Kuruluma başlamadan önce tüm bileşenlerin mevcut olduğundan emin olun:
- Philips LED 4-Inch Slim Downlight (quantity as per pack)
- Junction Box (one per downlight)
- Kullanım Kılavuzu (bu belge)
4. Kurulum Talimatları
- Gücü Kapatın: İşe başlamadan önce, kurulum yapılacak alana giden elektriğin devre kesiciden kapatıldığından emin olun.
- Tavan Açıklığını Hazırlayın: Cut a circular hole in the ceiling at the desired location. Refer to the product specifications for the exact hole size (typically 4.25 inches or 108 mm for a 4-inch downlight). Ensure there are no obstructions behind the ceiling before cutting.
-
Bağlantı kutusunun kablolarını bağlayın: Open the junction box cover. Connect the household electrical wires (live, neutral, ground) to the corresponding wires inside the junction box using the provided screwless connectors. Ensure all connections are secure. Close the junction box cover.

Figure 2: Screwless junction box wiring for easy connection.
-
Renk Sıcaklığını (CCT) Seçin: Before inserting the downlight into the ceiling, locate the CCT selection switch on the side of the junction box or the downlight itself. Choose your desired color temperature (2700K, 3000K, 3500K, 4000K, or 5000K) by sliding the switch to the appropriate setting.

Figure 3: CCT selection switch on the junction box.
- Spot ışığını bağlantı kutusuna bağlayın: Plug the downlight's connector cable into the corresponding receptacle on the junction box. Ensure a firm connection.
-
Downlight'ı Takın: Gently push the spring clips on the downlight upwards and insert the downlight into the prepared ceiling opening. The clips will secure the fixture in place. Ensure the downlight is flush with the ceiling surface.
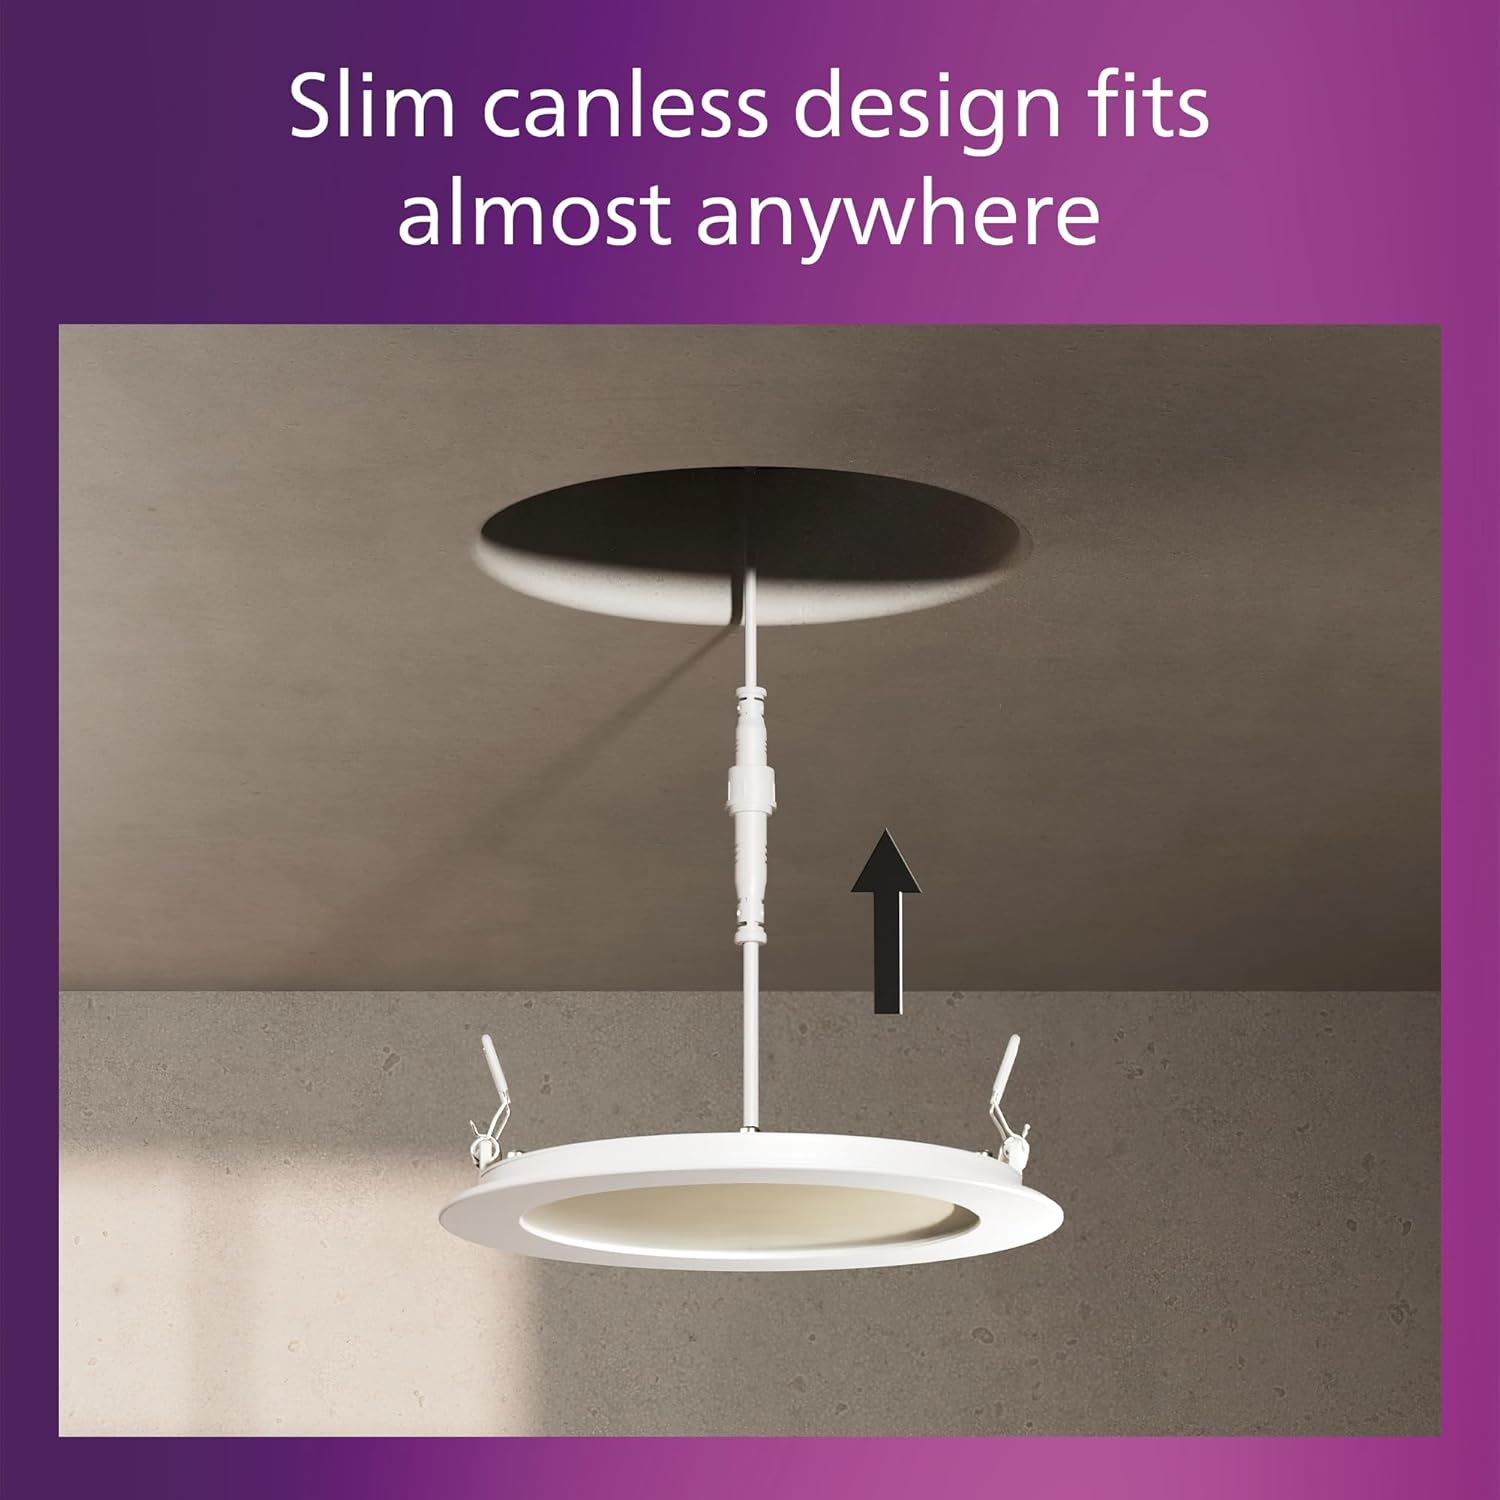
Figure 4: Installing the slim canless downlight into the ceiling.
- Gücü Geri Yükle: Kurulum tamamlandıktan sonra devre kesiciden gücü geri yükleyin.
The Philips LED Slim Downlight is IC rated, meaning it is suitable for direct contact with insulation, providing safe installation in various ceiling types.

Figure 5: IC rated for safe installation in insulated ceilings.
5. Kullanım Talimatları
The Philips LED Slim Downlight is designed for simple operation:
- Güç Açma/Kapatma: Use your standard wall switch to turn the downlight on or off.
-
Karartma: This downlight is dimmable from 100% down to 5% brightness. Use a compatible dimmer switch (sold separately) to adjust the light output to your preferred level. Refer to the troubleshooting section for dimmer compatibility information.

Figure 6: Smooth dimming capability from 100% to 5% brightness.
- Renk Sıcaklığı: The color temperature is set during installation using the switch on the junction box. It cannot be changed during normal operation without accessing the junction box.
6. Bakım
The Philips LED Slim Downlight requires minimal maintenance:
- Temizlemeden önce gücün kapalı olduğundan emin olun.
- Armatürü yumuşak, kuru veya hafif nemli bir bezle silin.amp bezle silin. Aşındırıcı temizleyiciler veya çözücüler kullanmayın.
- No user-serviceable parts inside. Do not attempt to open or repair the fixture.
7. Sorun Giderme
| Sorun | Olası Neden | Çözüm |
|---|---|---|
| Işık açılmıyor. |
|
|
| Işık düzgün yanmıyor veya titreyerek sönüyor. |
|
|
| Yanlış renk sıcaklığı. |
|
|
Dimmer Uyumluluk Tablosu
For optimal dimming performance, use dimmers listed in the compatibility chart below. Performance may vary with other dimmer models.

Figure 7: Dimmer compatibility chart.
8. Özellikler
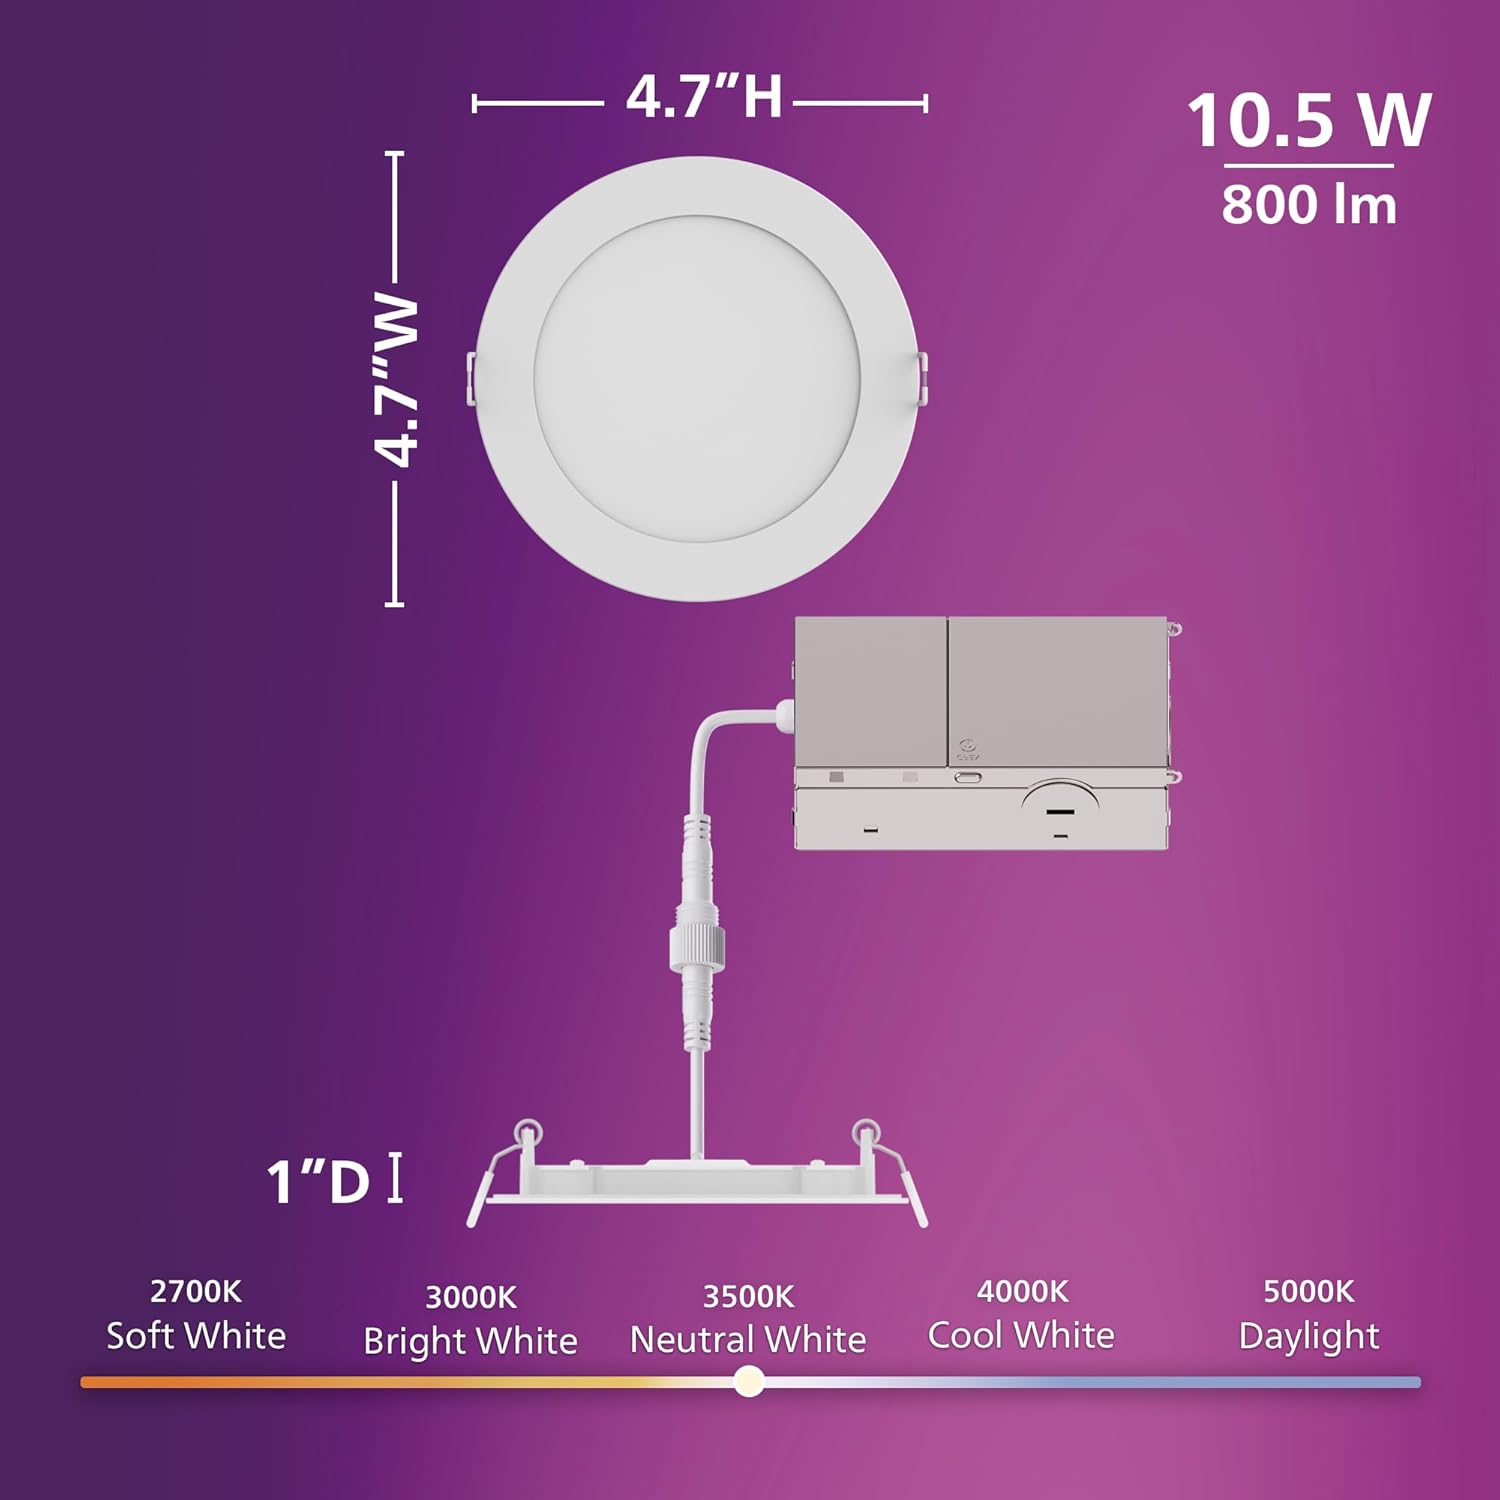
Figure 8: Product dimensions and CCT switch location.
| Özellik | Detay |
|---|---|
| Model Numarası | 608869 |
| Marka | PHILIPS |
| Işık kaynağı | NEDEN OLMUŞ |
| Netage | 10.5 watt |
| Parlaklık | 800 lümen |
| Cilttage | 120 volt |
| Renk Sıcaklığı (CCT) | 2700K, 3000K, 3500K, 4000K, 5000K (seçilebilir) |
| Kısılabilir | Evet (%5'a kadar) |
| Yaşam Saatleri | 25,000 saat |
| Kurulum Türü | Flush Mount, Canless Design |
| Oda Tipi | Kapalı |
| Malzeme | Plastik |
| Ürün Boyutları | 11.9L x 11.9W x 11.9H centimetres (approx. 4.7 x 4.7 x 4.7 inches) |
| Su Direnç Seviyesi | Water Resistant (Suitable for damp konumlar) |
| Sertifikalar | IC Rated, ETL, FCC certified |
9. Garanti Bilgileri
This Philips LED 4-Inch Slim Downlight is covered by a 2 Yıllık Üretici Garantisi Satın alma tarihinden itibaren geçerlidir. Bu garanti, normal kullanım koşullarındaki malzeme ve işçilik kusurlarını kapsar. Garanti talepleriniz için lütfen satın alma belgenizi saklayın.
The warranty does not cover damage caused by improper installation, misuse, abuse, accidents, or unauthorized modifications.
10. Müşteri Desteği
If you have any questions, require technical assistance, or need to make a warranty claim, please contact Philips customer support. Refer to the product packaging or the official Philips webEn güncel iletişim bilgileri için sitemizi ziyaret edin.
Daha fazla bilgi için şu adresi ziyaret edin: www.philips.com