
1. Giriş
This manual provides essential information for the safe and efficient operation, assembly, and maintenance of your Geemax Electric Tricycle, model DDSLC002. Please read this manual thoroughly before using the tricycle to ensure proper function and to prevent injury or damage.
The Geemax Electric Tricycle is designed for adult use, featuring 20-inch by 4.0-inch fat tires, a 36V 350W motor, and a 13Ah lithium battery. It is suitable for various terrains including urban roads, beaches, and light snow.

Figure 1.1: Geemax Electric Tricycle DDSLC002
This image shows the Geemax Electric Tricycle, model DDSLC002, in white. It features large 20-inch fat tires, a comfortable seat with a backrest, and a spacious rear cargo basket. The design highlights its robust construction suitable for various terrains.

Figure 1.2: Versatile Terrain Capability
This image demonstrates the tricycle's adaptability to various environments, showcasing it on a paved road, a sandy beach, a snowy path, and a grassy field, emphasizing its fat tire design for multi-terrain use.
2. Güvenlik Bilgileri
Your safety is paramount. Adhere to all warnings and instructions in this manual.
- Sürüş sırasında daima kask takın ve uygun güvenlik ekipmanlarını kullanın.
- Her sürüşten önce tüm bileşenlerin güvenli bir şekilde sabitlendiğinden emin olun.
- Alkol veya uyuşturucu etkisi altındayken üç tekerlekli bisikleti kullanmayın.
- Tüm yerel trafik kanunlarına ve düzenlemelerine uyun.
- Avoid riding in adverse weather conditions, such as heavy rain or ice, unless the tricycle is specifically designed and equipped for such conditions.
- The maximum load capacity for this tricycle is 350 lbs (158 kg). Do not exceed this limit.
- Keep hands and feet away from moving parts during operation.
- Regularly inspect brakes, tires, and battery for wear and damage.
3. Paket İçeriği
Upon unpacking, verify that all components are present and undamaged. If any parts are missing or damaged, contact customer support immediately.
- Geemax Electric Tricycle (partially assembled)
- 36V 13Ah Lityum Pil
- Pil Şarj Cihazı
- Arka Saklama Sepeti
- Montaj Aletleri
- Kullanıcı Kılavuzu
4. Bileşen Tanımlaması
Familiarize yourself with the various parts of your Geemax Electric Tricycle using the diagram below.
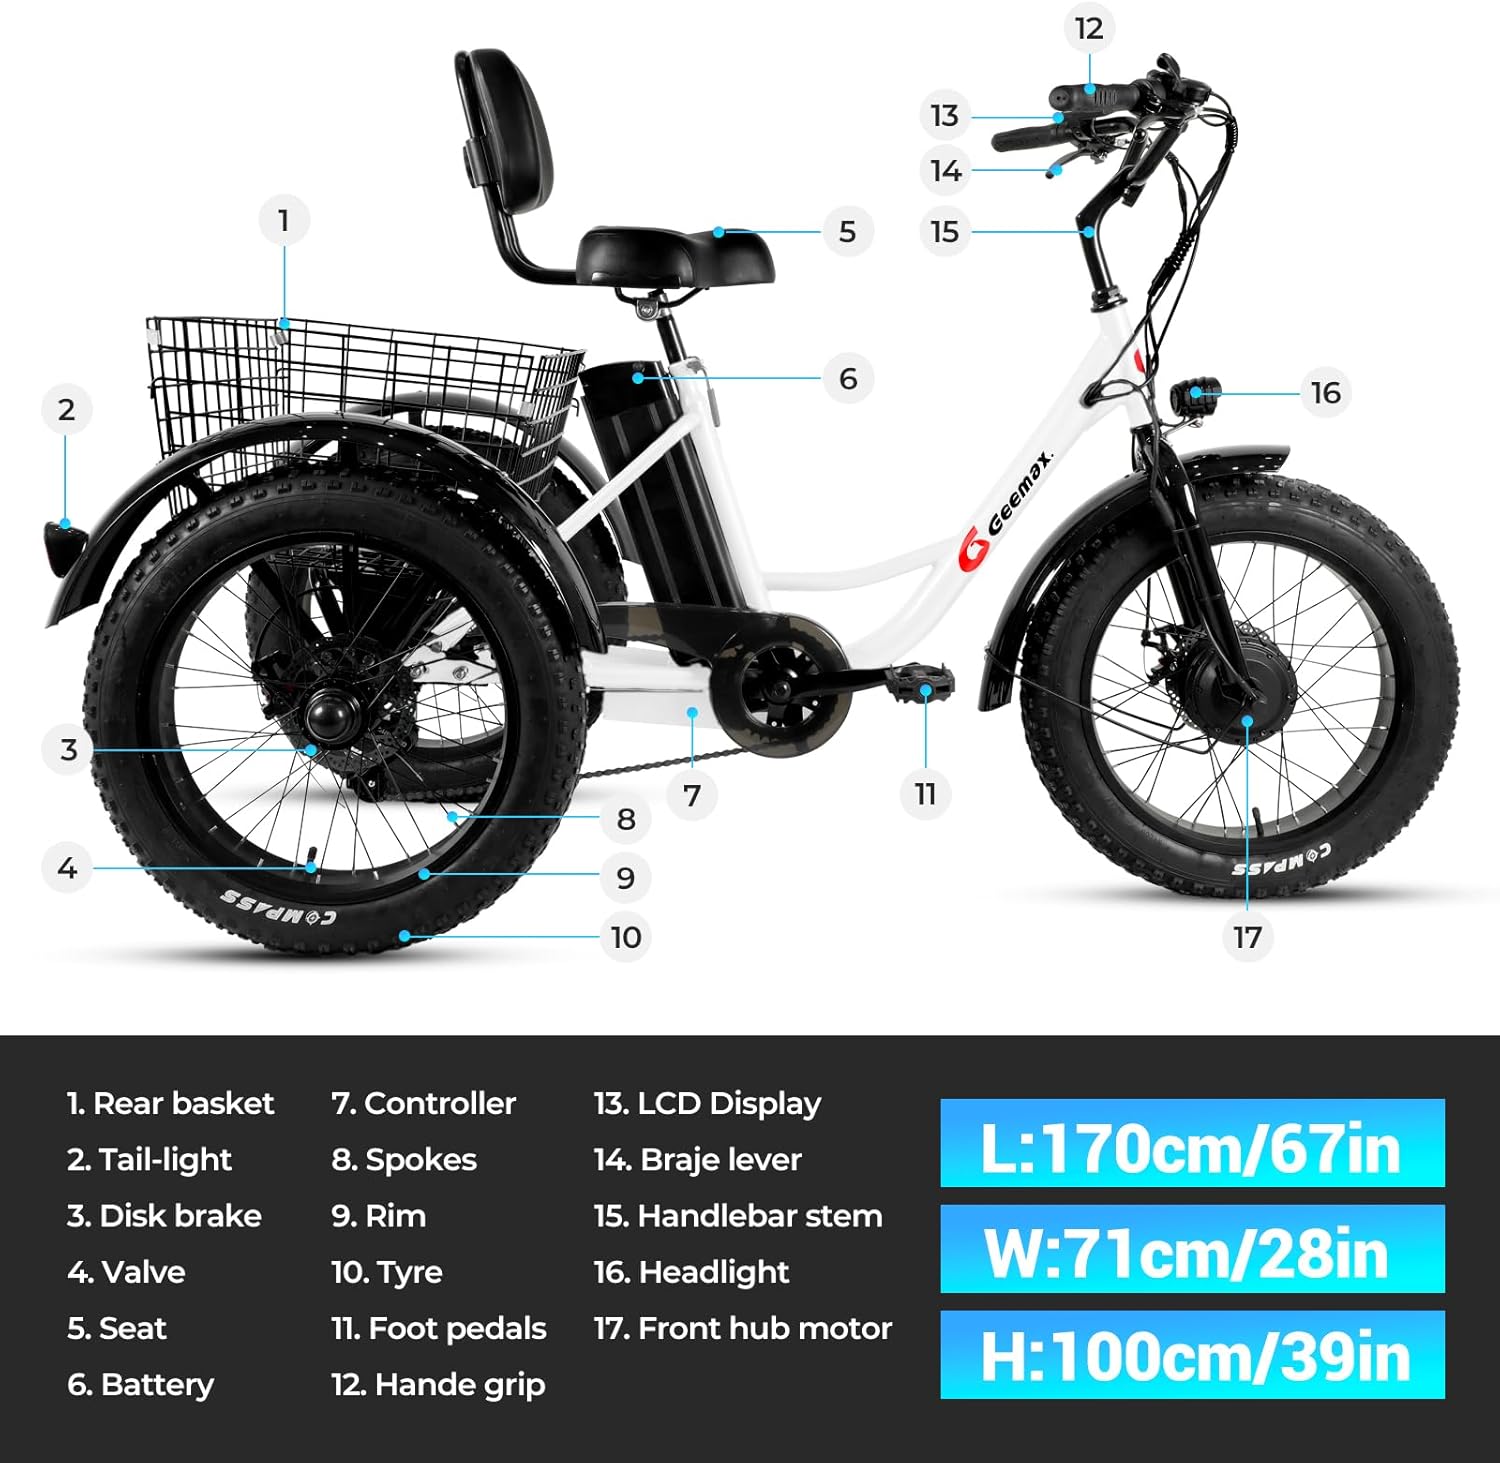
Figure 4.1: Tricycle Component Diagram
This image displays a detailed diagram of the Geemax Electric Tricycle, highlighting its key components with numbered labels for easy identification. The diagram includes the rear basket, tail-light, disk brake, valve, seat, battery, controller, spokes, rim, tire, foot pedals, handle grip, LCD display, brake lever, handlebar stem, headlight, and front hub motor. Dimensions are also provided: Length 170cm/67in, Width 71cm/28in, Height 100cm/39in.
- arka sepet
- Stop lambası
- Disk fren
- Vana
- Koltuk
- Pil
- Kontrolör
- Konuşmacılar
- Jant
- Yorulmak
- Ayak pedalları
- Sap kavrama
- LCD Ekran
- Fren kolu
- Gidon sapı
- Far
- Ön göbek motoru
5. Kurulum ve Montaj
The Geemax Electric Tricycle arrives approximately 50% assembled. Follow these steps for final assembly.
5.1 Paketin açılması
- Tüm bileşenleri dikkatlice ambalajından çıkarın.
- Tüm parçaları temiz ve düz bir yüzeye yerleştirin.
- Verify all parts are present against the package contents list.
5.2 Gidon Kurulumu
- Loosen the bolts on the handlebar stem.
- Gidonu gidon boğazına yerleştirin ve ortalanmış ve hizalanmış olduğundan emin olun.
- Cıvataları güvenli bir şekilde sıkın.
5.3 Seat and Backrest Adjustment
Adjust the seat height and backrest for optimal comfort and riding posture.

Figure 5.1: Adjustable Seat and Backrest
This image illustrates the adjustable mechanism for the tricycle's seat and backrest, allowing riders to customize their seating position for comfort and ergonomics.
- Loosen the quick-release lever or bolt for the seat post.
- Adjust the seat to a comfortable height where your feet can touch the ground.
- Securely tighten the quick-release lever or bolt.
- Adjust the backrest angle for lumbar support.
5.4 Rear Basket Attachment
Attach the rear basket to the designated mounting points on the tricycle frame.

Figure 5.2: Rear Storage Basket
This image shows the spacious rear basket of the tricycle, demonstrating its capacity by being filled with various groceries, highlighting its utility for carrying items.
- Align the basket with the mounting holes on the rear frame.
- Use the provided bolts and nuts to secure the basket firmly.
- Ensure the basket is stable and does not wobble.
5.5 Headlight and Taillight Installation
Install the headlight and taillight for improved visibility and safety.

Şekil 5.3: Ön Far
This image focuses on the tricycle's bright LED headlight, demonstrating its illumination capability for nighttime riding or low-light conditions.
- Mount the headlight to the front of the tricycle, typically on the handlebars or front fork.
- Mount the taillight to the rear of the tricycle, usually on the rear fender or basket.
- Connect the lights to the tricycle's electrical system as per the wiring instructions (refer to detailed wiring diagram if provided separately).
5.6 Son Kontroller
- Ensure all bolts and fasteners are tightened.
- Lastik basıncını kontrol edin.
- Test brake functionality.
- Verify the battery is fully charged and properly installed.
6. Pil Bilgileri
The Geemax Electric Tricycle is powered by a 36V 13Ah Lithium Battery, UL Certified for safety.

Figure 6.1: 36V 13Ah Lithium Battery
This image displays the 36V 13Ah lithium battery pack, highlighting its internal cell structure and UL certification, indicating its safety and quality standards. The battery provides an electric range of 28-35 miles and an assist range of 35-45 miles.
6.1 Pilin Şarj Edilmesi
- Şarj cihazını standart bir duvar prizine bağlayın.
- Connect the charger output to the battery charging port.
- Şarj cihazındaki gösterge ışığı şarj durumunu gösterecektir (örneğin, şarj oluyorsa kırmızı, tamamen şarj olduysa yeşil).
- Aküyü aşırı şarj etmeyin. Şarj işlemi tamamlandıktan sonra şarj cihazını çıkarın.
- Tam şarj için şarj süresi genellikle 4-6 saat arasında değişir.
6.2 Pilin Takılması ve Çıkarılması
- To install: Slide the battery into its designated slot on the tricycle frame until it clicks securely into place. Ensure the battery is locked to prevent theft.
- To remove: Unlock the battery with the provided key, then slide it out of the frame.
7. Kullanım Talimatları
7.1 Açma/Kapatma
- To power on: Press and hold the power button on the LCD display.
- To power off: Press and hold the power button again.
7.2 LCD Ekran İşlevleri
LCD ekran, sürüşünüzle ilgili gerçek zamanlı bilgiler sağlar.

Figure 7.1: LCD Display Interface
This image shows the multi-function LCD display (S866 model) mounted on the handlebars. It clearly indicates current speed, battery level, distance covered, and the selected pedal assist level (0-5). The display also features power and mode buttons.
- Hız: Güncel sürüş hızını gösterir.
- Pil Seviyesi: Kalan pil şarjını gösterir.
- Mesafe: Shows trip distance or total odometer reading.
- Pedal Destek Seviyesi: Displays the current assist level (0-5).
7.3 Riding Modes and Speed Assist
Your tricycle offers three riding modes and five levels of pedal assist.

Figure 7.2: Speed Assist Controls
This close-up image shows the LCD display and the control buttons (+, -, power) on the handlebar, used to adjust the pedal assist level from 1 to 5, and to power the system on or off.
- Electric Tricycle Mode (e-trike): Provides full motor power without pedaling.
- Assisted Tricycle Mode: The motor provides assistance as you pedal. Use the '+' and '-' buttons on the display to adjust the assist level from 1 (minimal assistance) to 5 (maximum assistance).
- Normal Üç Tekerlekli Bisiklet Modu: The motor is off, and you pedal manually like a traditional tricycle.
7.4 Fren Sistemi
The tricycle is equipped with disc brakes for reliable stopping power.

Figure 7.3: Disc Brake System
Bu görüntü yakın çekim sağlar view of the disc brake system on the tricycle's wheel, showing the rotor and caliper mechanism, which ensures effective and responsive braking.
- Squeeze the brake levers on the handlebars to engage the brakes.
- Apply both front and rear brakes simultaneously for balanced stopping.
- Ani ve sert frenlemelerden, özellikle yüksek hızlarda veya kaygan yüzeylerde kaçının.
8. Bakım
Düzenli bakım, üç tekerlekli bisikletinizin uzun ömürlü olmasını ve güvenli bir şekilde çalışmasını sağlar.
8.1 Temizlik
- Çerçeveyi reklamla silinamp Kumaş. Elektrikli bileşenlerin üzerine doğrudan yüksek basınçlı yıkama makinesi kullanmaktan kaçının.
- Clean the chain and lubricate it regularly.
8.2 Lastik Bakımı
- Maintain recommended tire pressure (refer to tire sidewall for specifications).
- Her sürüşten önce lastiklerde aşınma, delinme veya hasar olup olmadığını kontrol edin.
- The 4-inch wide fat tires provide excellent traction across various terrains.
8.3 Fren Muayenesi
- Check brake pads for wear and replace them if necessary.
- Ensure brake levers are responsive and cables are not frayed.
8.4 Pil Bakımı
- Kullanılmadığı zaman pili serin ve kuru bir yerde saklayın.
- Charge the battery at least once every two months, even if not used, to maintain its health.
- Pilin sık sık tamamen boşaltılmasından kaçının.
9. Sorun Giderme
| Sorun | Olası Neden | Çözüm |
|---|---|---|
| Üç tekerlekli bisiklet çalışmıyor. | Battery not charged or improperly installed; loose electrical connection. | Ensure battery is fully charged and securely seated. Check all visible connections. |
| Motor yardımcı olmuyor | Pedal assist level set to 0; brake levers engaged; motor or controller issue. | Increase pedal assist level on LCD. Release brake levers. If problem persists, contact support. |
| Frenler zayıf hissediliyor | Aşınmış fren balataları; gevşek fren telleri; hidrolik sistemde hava (varsa). | Fren balatalarını kontrol edin ve gerekirse değiştirin. Fren kablosu gerginliğini ayarlayın. Hidrolik fren sorunları için bir uzmana danışın. |
| Sürüş sırasında alışılmadık sesler | Loose components; dry chain; tire rubbing. | Check all fasteners. Lubricate chain. Inspect for tire rubbing against frame or fenders. |
10. Özellikler
Detailed technical specifications for the Geemax Electric Tricycle DDSLC002.

Figure 10.1: Rider Height and Load Capacity
This image illustrates the recommended rider height range of 5'2" to 6'4" and the maximum load capacity of 350 lbs for the Geemax Electric Tricycle. It also shows the adjustable seat height from 30.5 inches to 38.5 inches.

Figure 10.2: Tricycle Dimensions
This image provides the overall dimensions of the tricycle: Length 170cm (67in), Height 100cm (39in), and Width 71cm (28in). It also reiterates the recommended rider height and maximum load capacity.
| Özellik | Şartname |
|---|---|
| Model Adı | DDSLLC002 |
| Bisiklet Türü | Elektrikli Üç Tekerlekli Bisiklet |
| Yaş Aralığı | Yetişkin |
| Motor | 36V 350W Brushless High-Speed Motor |
| Pil | 36V 13Ah Lithium Battery (UL Certified) |
| Maksimum Hız | 20 mil/saate (32 km/saate) kadar |
| Range (Assist Mode) | 40 mil (64 km)'ye kadar |
| Range (Electric Mode) | 28 mil (45 km)'ye kadar |
| Lastikler | 20" x 4.0" Puncture-Resistant Fat Tires |
| Çerçeve Malzemesi | Karbon Çeliği / Alaşımlı Çelik |
| Fren Stili | Disk Frenler |
| Süspansiyon Tipi | Katı |
| Hız Sayısı | 20 (implied by product data, likely referring to gear combinations or assist levels) |
| Özel Özellik | LCD Ekran |
| Dahil Bileşenler | Sepet |
| Maksimum Yük Kapasitesi | 350 lbs (158 kg) |
| Önerilen Binici Boyu | 140-175 cm |
| UPC | 760762256946 |
11. Garanti ve Destek
11.1 Garanti Bilgileri
The Geemax Electric Tricycle DDSLC002 comes with a One Year Warranty from the date of purchase. This warranty covers manufacturing defects in materials and workmanship. It does not cover damage due to misuse, accidents, normal wear and tear, or unauthorized modifications.
11.2 Müşteri Desteği
For technical assistance, warranty claims, or replacement parts, please contact Geemax customer support. Refer to your purchase documentation for specific contact details or visit the official Geemax webalan.