
1. Giriş
This manual provides detailed instructions for the installation, operation, and maintenance of your plplaaoo 100A MPPT Solar Charge Controller. This advanced controller is designed to optimize energy harvest from your solar panels and manage battery charging efficiently for 12V, 24V, 36V, and 48V solar power systems. Please read this manual thoroughly before installation and use to ensure proper function and safety.
2. Güvenlik Talimatları
Kurulum ve çalıştırma sırasında lütfen aşağıdaki güvenlik önlemlerine uyun:
- Ensure all wiring is correctly connected and securely fastened to prevent loose connections and overheating.
- Kontrol cihazını kurmadan veya ayarlamadan önce daima güneş panelinin ve akü gücünün bağlantısını kesin.
- Use appropriate tools and wear protective gear, including eye protection, during installation.
- Install the controller in a well-ventilated area, away from flammable gases and liquids.
- Kumanda cihazını kendiniz sökmeyin veya tamir etmeye çalışmayın. Servis için yetkili personele başvurun.
- Ensure the battery bank is properly sized and compatible with the controller's voltage ve mevcut derecelendirmeler.
- Avoid short-circuiting the solar panel, battery, or load terminals.
3. Ürün Özellikleri
- Maksimum Güç Noktası Takibi (MPPT): Achieves up to 98% conversion efficiency by intelligently tracking the maximum power point of solar panels under varying conditions.
- Otomatik Sestage Uyarlama: Automatically detects and adapts to 12V, 24V, 36V, or 48V battery systems.
- Multifunctional Control: Supports various operating modes including PWM charging, constant current output, and voltage düzenleme.
- Integrated USB and DC Outputs: Features dual 5V 1A USB ports and a 2A DC output for charging external devices.
- Kapsamlı Koruma: Includes safeguards against overvoltage, overcurrent, overtemperature, overload, short circuits, and reverse polarity.
- Kullanıcı Dostu Arayüz: Equipped with a backlit LCD display for real-time monitoring and intuitive buttons for configuration.
- Dayanıklı Yapı: Features an aluminum heatsink for efficient cooling and robust design for harsh environments (0°C to 60°C).
- Pil Uyumluluğu: Compatible with gel, sealed lead-acid, and lithium batteries.
4. Paket İçeriği
- 1 x plplaaoo 100A MPPT Solar Charge Controller
- 1 x Kullanım Kılavuzu
5. Ürün Bittiview ve Bileşenler
Familiarize yourself with the main components and interface of the solar charge controller.

Şekil 5.1: Ön view of the solar charge controller, highlighting the LCD screen and various connection terminals.
The controller features an intuitive LCD display and clearly labeled ports for easy connection. The display provides real-time information about the system's status.
Şekil 5.2: Ayrıntılı view of the controller's connection ports.

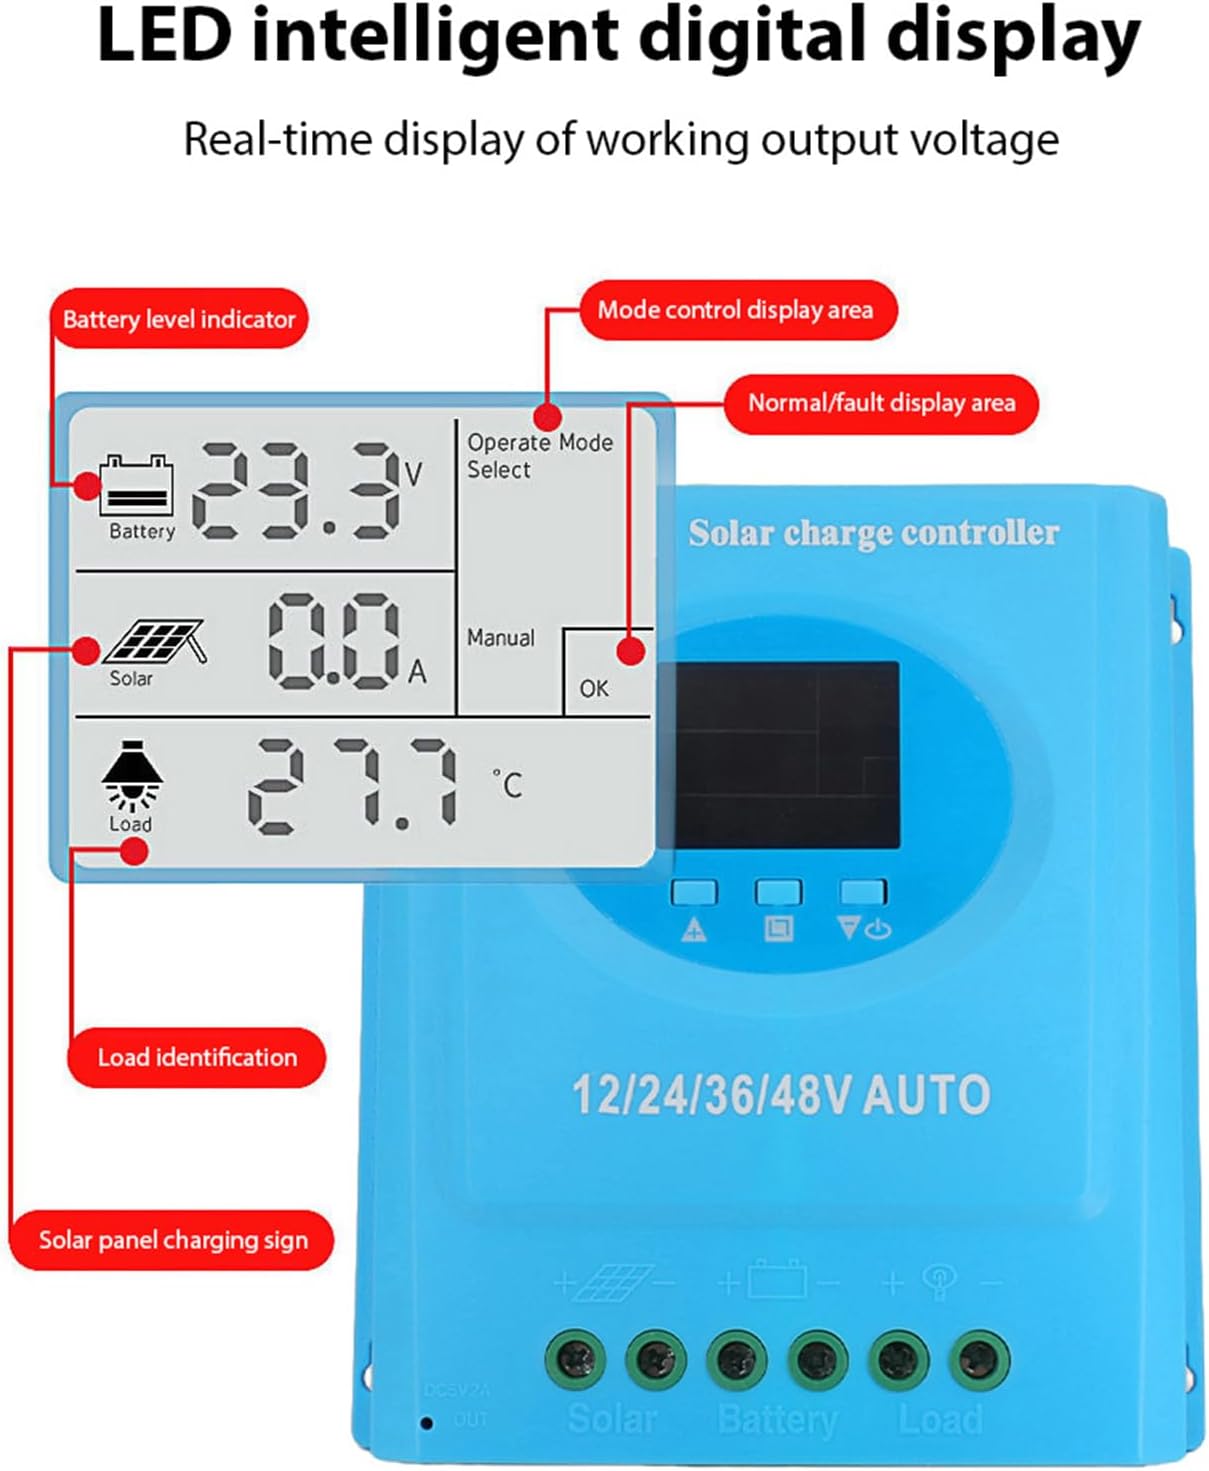
Şekil 5.3: Ayrıntılı view of the LCD display, indicating battery level, solar panel charging sign, load identification, operating mode, and real-time voltage.
5.1. Connection Ports
- Dual USB Interface: Two 5V 1A USB ports for charging mobile devices.
- Güneş Paneli Bağlantı Noktası: Connects to your solar panels (positive and negative).
- Pil Bağlantı Noktası: Connects to your battery bank (positive and negative).
- DC Load Port: Connects to your DC loads (positive and negative).
- DC Çıkış Bağlantı Noktası: Additional DC output.
6. Kurulum ve Kurulum
Follow these steps for proper installation of the solar charge controller. Ensure all power sources are disconnected before beginning.
6.1. Kablolama Yöntemi
Hasar oluşmasını önlemek için parçaları aşağıdaki sırayla bağlayın:
- Pili bağlayın: Connect the battery to the controller's battery terminals (positive to positive, negative to negative). The controller will automatically detect the battery voltage.
- Güneş Panelini Bağlayın: Connect the solar panel to the controller's solar panel terminals (positive to positive, negative to negative).
- DC yükü bağlayın: Connect the DC load to the controller's load terminals (positive to positive, negative to negative).
Önemli: Önce pili, sonra güneş panelini ve son olarak da yükü bağlayın. Bağlantıyı kesme işlemi ise ters sırada yapılmalıdır.

Şekil 6.1: Solar energy system wiring diagram. Note the correct polarity for all connections.
6.2. Montaj
Mount the controller vertically on a flat surface in a well-ventilated area, ensuring adequate clearance for air circulation around the heatsink. Avoid direct sunlight, high temperatures, and humid environments.
7. Kullanım Talimatları
Once installed, the controller will automatically begin operating. The LCD display provides real-time system status.
7.1. LCD Ekran Bilgileri
The LCD screen displays various parameters:
- Pil Seviyesi Göstergesi: Shows the current charge status of the battery.
- Solar Panel Charging Sign: Indicates when the solar panels are actively charging the battery.
- Load Identification: Shows the status of the connected DC load.
- Operating Mode Display Area: Displays the current operating mode (e.g., manual, automatic).
- Normal/Fault Display Area: Indicates normal operation or displays error codes if a fault occurs.
- Real-time Working Output Voltage: Mevcut hacmi gösterirtagsistemin e.
7.2. Düğme Fonksiyonları
The controller typically features multiple buttons for navigation and setting adjustments:
- Menü Düğmesi: Used to enter and exit the menu settings.
- Yukarı/Aşağı Düğmeleri: Used to navigate through menu options and adjust parameter values.
- Tamam Düğmesi: Used to confirm selections and save settings.
Refer to the on-screen menu for specific parameter adjustments such as battery type, load control mode, and charging thresholds.
8. Bakım
Düzenli bakım, güneş enerjisi şarj kontrol cihazınızın optimum performansını ve uzun ömrünü sağlar.
- Temizlik: Kontrol ünitesinin dış yüzeyini periyodik olarak kuru bir bezle silerek toz ve kirden arındırın. Havalandırma açıklıklarının açık olduğundan emin olun.
- Bağlantı Kontrolü: Tüm kablo bağlantılarının sıkılığını ve korozyon olup olmadığını yıllık olarak kontrol edin. Gerekirse yeniden sıkın.
- Çevre Kontrolü: Ensure the installation environment remains within the specified operating temperature range and is free from excessive moisture or dust.
- Pil Denetimi: Regularly check the battery terminals for corrosion and ensure the battery is in good condition.
9. Sorun Giderme
Güneş enerjisi şarj kontrol cihazınızla ilgili sorunlarla karşılaşırsanız, aşağıdaki yaygın sorunlar ve çözümlere bakın:
| Sorun | Olası Neden | Çözüm |
|---|---|---|
| Kumanda açılmıyor / LCD ekran boş |
|
|
| Pil şarj olmuyor |
|
|
| Yükleme çalışmıyor. |
|
|
| Görüntülenen hata kodu | Belirli sistem hatası. | Refer to the controller's display for the specific error code and consult the full product documentation or contact support for detailed interpretation and resolution. |
10. Özellikler
| Parametre | Değer |
|---|---|
| Örnek | plplaaoozi6egog4wm-0A |
| Marka | lütfen |
| Anma Akımı | 100A |
| Sistem Hacmitage | 12V / 24V / 36V / 48V Automatic Adaptation |
| Şarj Tipi | MPPT (Maksimum Güç Noktası Takibi) |
| Dönüşüm Verimliliği | %98'ye kadar |
| USB Çıkışı | Dual 5V 1A ports |
| DC Çıkış | 2A |
| Çalışma Sıcaklığı | 0°C ila 60°C |
| Boyutlar (Yaklaşık) | 19.5 cm x 18.3 cm x 6.8 cm (7.7 inç x 7.2 inç x 2.7 inç) |

Şekil 10.1: Approximate dimensions of the solar charge controller.
11. Garanti ve Destek
Garanti bilgileri, teknik destek veya servis talepleriniz için lütfen perakendecinizle veya doğrudan üreticiyle iletişime geçin. Satın alma belgenizi saklayın.