1. Giriş
This manual provides essential information for the safe and efficient operation of your GROWNEER 12 Inch Shutter Exhaust Fan with Temperature Humidity Controller. This fan is designed to improve air quality and regulate environmental conditions in various spaces such as greenhouses, garages, and sheds.
The fan features a 1200 CFM airflow capacity, capable of ventilating areas up to 1400 sq. ft. It includes an intelligent remote control for convenient adjustment of temperature, humidity, and fan speed settings.
2. Güvenlik Bilgileri
Kurulum ve çalıştırmadan önce lütfen tüm güvenlik talimatlarını dikkatlice okuyun. Bu talimatlara uyulmaması elektrik çarpmasına, yangına veya ciddi yaralanmalara neden olabilir.
- Güç kaynağının fanın hacmiyle uyumlu olduğundan emin oluntage gereksinimleri (120 Volt AC).
- Disconnect power before installing, cleaning, or performing any maintenance.
- Fanı hasarlı kablo veya fişle çalıştırmayın.
- Çalışma sırasında ellerinizi, saçınızı ve bol giysilerinizi hareketli parçalardan uzak tutun.
- Install the fan in a location where it is protected from direct water exposure, unless specifically designed for such conditions. The fan is designed to resist moisture intrusion, but proper installation is key.
- Bu cihaz, fiziksel, duyusal veya zihinsel yetenekleri kısıtlı olan veya deneyim ve bilgi eksikliği bulunan kişiler (çocuklar dahil) tarafından, güvenliklerinden sorumlu bir kişi tarafından cihazın kullanımıyla ilgili olarak gözetim veya talimat sağlanmadığı sürece kullanılmak üzere tasarlanmamıştır.
3. Paket İçeriği
Paketin tüm bileşenlerinin mevcut olduğunu doğrulayın:
- 12 İnç Kepenkli Egzoz Fanı
- Sıcaklık Nem Kontrol Cihazı
- Kurulum Kılavuzu
- Expansion bolts (5 pieces, 4 required + 1 spare)

Şekil 3.1: Contents of the GROWNEER 12 Inch Shutter Exhaust Fan package.
4. Özellikler
| Özellik | Şartname |
|---|---|
| Marka | YETİŞTİRİCİ |
| Model Numarası | AX252303002 |
| Ürün Boyutları (D x G x Y) | 14.96"D x 14.96"G x 7.48"Y |
| Cilttage | 120 Volt |
| Netage | 30 watt |
| Hava Akış Kapasitesi | Dakikada 1200 Feet Kübik (CFM) |
| Gürültü Seviyesi | 50 Desibel |
| Hız Sayısı | 10 |
| Kontrol Yöntemi | Uzaktan kumanda |
| Malzeme | Alaşımlı Çelik |
| İç/Dış Mekan Kullanımı | İç mekan, dış mekan |

Şekil 4.1: Ürün boyutları ve temel özellikleri.
5. Kurulum ve Kurulum
The GROWNEER Shutter Exhaust Fan is designed for straightforward installation in various locations such as attics, sheds, or walls. Ensure you have the necessary tools and follow local electrical codes.
5.1 Fanın Montajı
- Konum seç: Select a suitable location for the fan, ensuring adequate space for airflow and access for maintenance.
- Açılışı Hazırlayın: Create an opening in the wall or structure that matches the fan's dimensions.
- Güvenli Fan: Mount the fan securely using the provided expansion bolts. Ensure the fan is level and firmly attached to prevent vibration and noise.
- Güç Bağlantısı: Plug the fan into a compatible 120V AC power outlet. The fan comes with a 2-meter long power cord for flexible placement.

Şekil 5.1: Example installation and remote control range.
5.2 Uzaktan Kumandayı Eşleştirme
The fan operates wirelessly with the included temperature and humidity controller. Follow these steps to pair the controller with the fan:
- Uzaktan kumandaya pilleri takın (dahil değildir).
- Ensure the fan is plugged into a power source.
- Press the power button on the remote control. The fan should respond by turning on. If not, ensure the remote is within the 20-meter operating range and try again.
Not: There is no manual switch on the fan unit itself. All operations are controlled via the wireless remote. If pairing issues persist, ensure batteries are correctly inserted and fully charged, and that there are no significant obstructions between the remote and the fan.
Video 5.1: Demonstration of fan installation and remote control pairing and operation.
6. Kullanım Talimatları
The intelligent remote control allows for precise management of your exhaust fan. Familiarize yourself with the control panel layout:
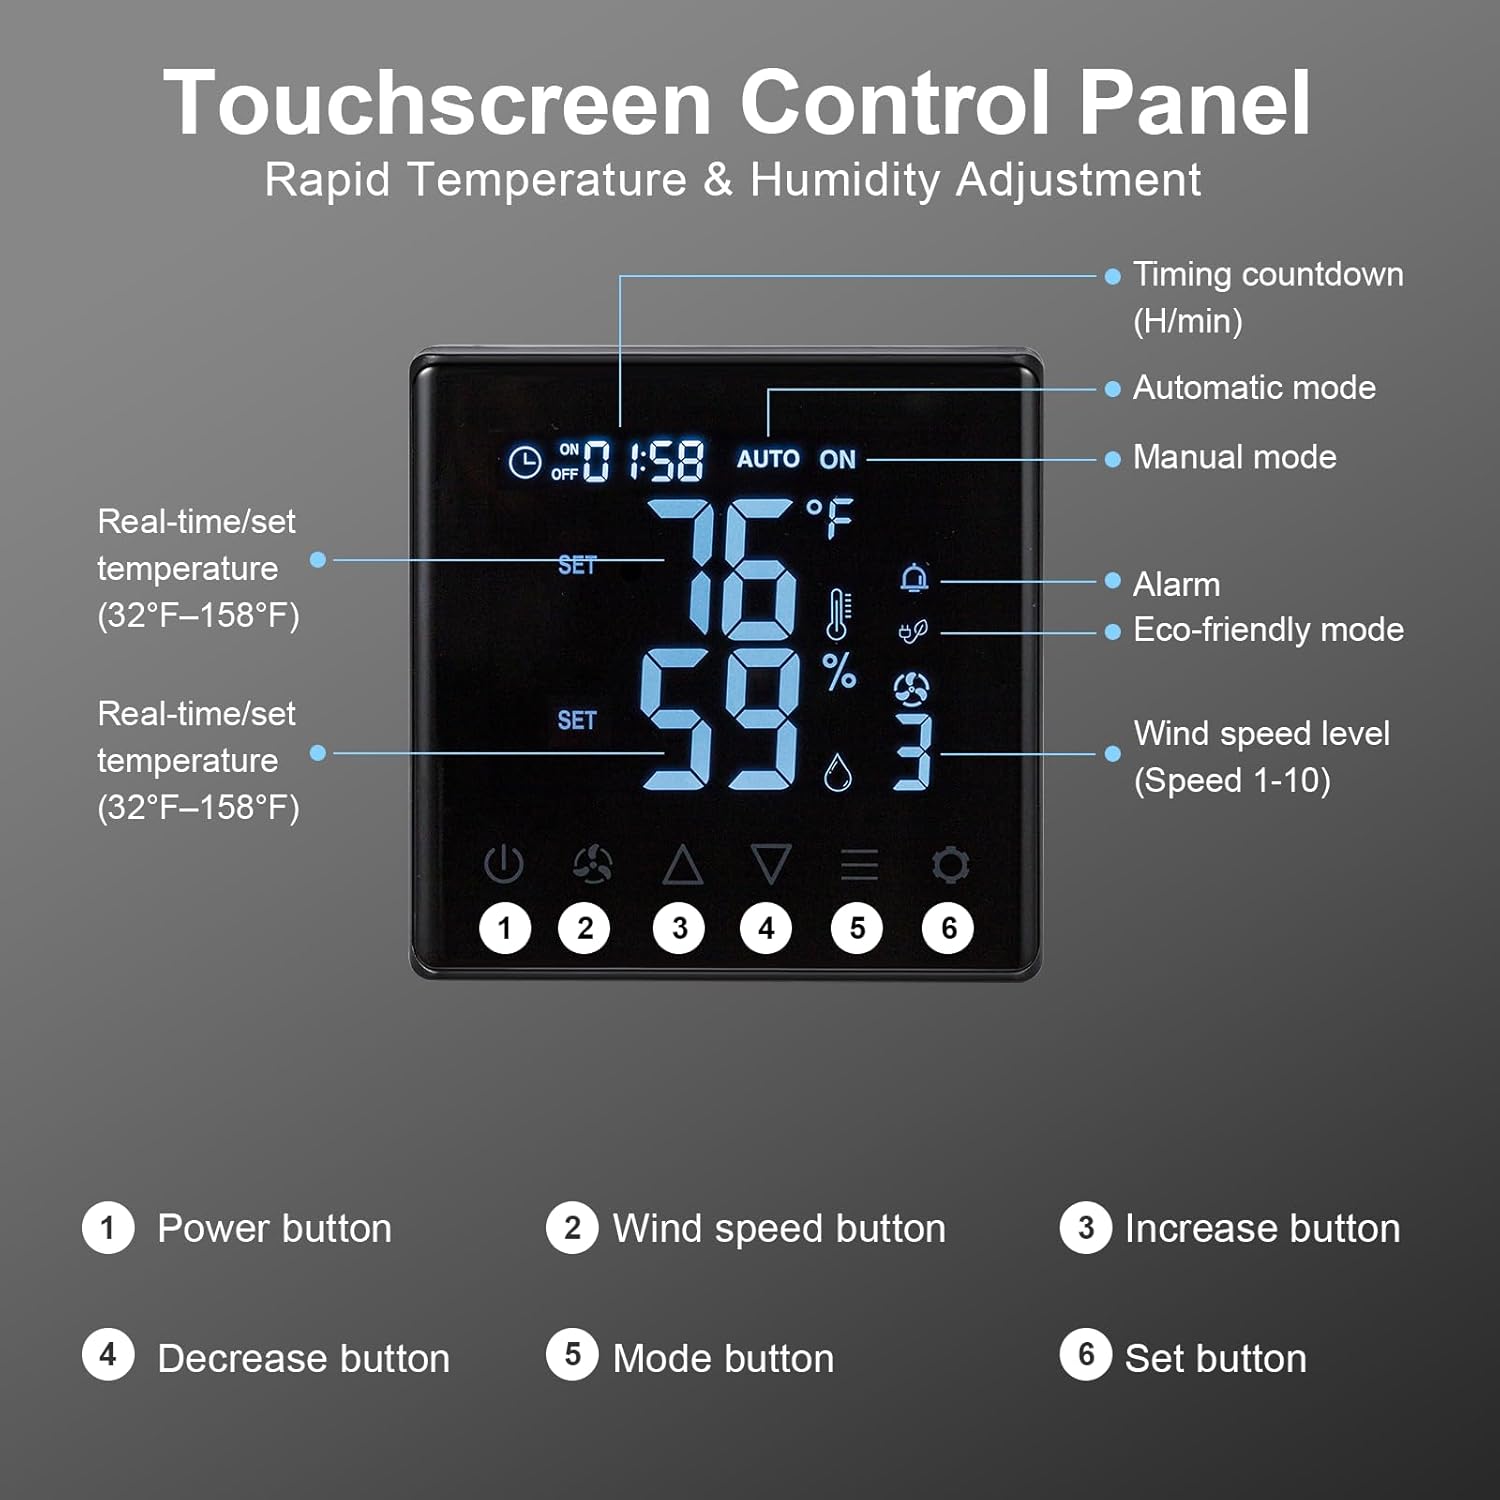
Şekil 6.1: Touchscreen Control Panel overview.
- Güç Düğmesi: Vantilatörü açar veya kapatır.
- Rüzgar Hızı Düğmesi: Cycles through 10 adjustable fan speeds.
- Arttırma/Azaltma Butonları: Adjust temperature, humidity, or timer settings upwards or downwards.
- Mod Düğmesi: Selects between operating modes:
- Manuel Mod: Fan operates continuously at the set speed.
- Otomatik mod: Fan automatically turns ON/OFF based on set temperature and humidity thresholds.
- Eco-friendly Mode: Optimizes fan operation for energy efficiency based on environmental conditions.
- Ayarlama düğmesi: Confirms selected settings for temperature, humidity, or timer.
To set desired temperature and humidity, enter Auto mode, then use the Increase/Decrease buttons to adjust the target values, and the Set button to confirm.

Şekil 6.2: Fan operating with 10-level wind control.
7. Bakım
Düzenli bakım, egzoz fanınızın optimum performans göstermesini ve uzun ömürlü olmasını sağlar.
- Temizlik: Periodically clean the fan blades and housing to prevent dust and debris buildup, which can reduce efficiency and increase noise. Temizlemeden önce daima gücü kesin. Yumuşak bir d kullanınamp bezle silin. Aşındırıcı temizleyiciler kullanmayın.
- Shutter Inspection: Check the automatic gravity shutters for smooth operation. Ensure they open and close freely without obstruction to protect the fan from rain and debris when off.
- Güç Kablosu: Inspect the power cord for any signs of damage. If damaged, contact customer support for replacement.

Şekil 7.1: Automatic gravity shutters protecting the fan from elements.
8. Sorun Giderme
If you encounter issues with your GROWNEER exhaust fan, refer to the following common problems and solutions:
| Sorun | Olası Neden | Çözüm |
|---|---|---|
| Fan çalışmıyor. | No power; Remote not paired; Dead remote batteries. | Check power connection. Ensure remote batteries are fresh and correctly inserted. Re-attempt pairing as described in Section 5.2. |
| Uzaktan kumanda yanıt vermiyor. | Out of range; Obstruction; Low/dead batteries. | Move closer to the fan (within 20m). Remove any large obstructions. Replace remote batteries. |
| Low airflow or unusual noise. | Fan blades or shutters obstructed; Dust buildup. | Disconnect power and inspect fan blades and shutters for obstructions. Clean any dust or debris. |
| Automatic mode not activating. | Temperature/humidity settings not met; Sensor issue. | Verify the set temperature and humidity thresholds. Ensure the sensor on the remote is not covered or obstructed. |
9. Garanti ve Destek
GROWNEER products are manufactured to high-quality standards. For warranty information, technical support, or replacement parts, please contact GROWNEER customer service. Keep your purchase receipt as proof of purchase.
For further assistance, visit the official GROWNEER store: GROWNEER Store on Amazon


