1. Giriş
This manual provides detailed instructions for the installation, operation, and maintenance of your JOYING Android 13 Car Stereo Head Unit (Model JY-HT145N8). This unit is designed to integrate seamlessly with Honda Civic models from 2016 to 2021, offering advanced features such as CarPlay, Android Auto, GPS navigation, and enhanced audio capabilities.
Please read this manual thoroughly before installation and use to ensure proper functionality and to prevent damage to the unit or your vehicle.

Resim: Üzeriview of the JOYING Android 13 Car Stereo Head Unit highlighting key features.
2. Güvenlik Bilgileri
- Always ensure the vehicle's ignition is off before performing any installation or wiring.
- Disconnect the vehicle's battery to prevent electrical shorts or damage.
- Consult a professional installer if you are unsure about any steps.
- Cihazı sürüşünüzü engelleyecek şekilde kullanmayın.
- Ensure all connections are secure to prevent intermittent issues or hazards.
3. Paket İçeriği
Aşağıda listelenen tüm öğelerin paketinizde bulunduğunu doğrulayın:
- 9" radio x1
- Single Din Cage x1
- Left & Right Bracket x1
- Wi-Fi Anteni x1
- GPS Anteni x1
- 4G Anten x2
- Harici Mikrofon x1
- USB Kablosu x2
- AR Cable x1
- Screen Ribbon Cable x1
- Güç Kablosu x1
- Kullanıcı Kılavuzu x1

Image: All components included in the JOYING Android 13 Car Stereo package.
4. Kurulum ve Kurulum
The JOYING head unit is designed for a plug-and-play installation, supporting factory reverse camera, steering wheel controls, USB, and lanewatch camera. Follow these general steps for installation:
- Remove Original Dashboard Components: Carefully remove the side panel trims and the original radio unit from your vehicle's dashboard.
- Kablo demetlerini bağlayın: Connect the provided wiring harnesses to the new head unit and your vehicle's existing connectors. Ensure all compatible plugs are securely connected. Some plugs may not be used depending on your vehicle's configuration.
- Antenleri Bağlayın: Attach the WiFi, GPS, and 4G antennas to their respective ports on the head unit.
- USB Kablolarını Bağlayın: Plug in the USB cables for data transfer and charging.
- Connect Camera Inputs: Connect your reverse camera to the "CAM IN" port.
- CAN Bus Setting: If your vehicle is equipped with a CAN bus, ensure the communication protocol (white button) on the head unit is set to the right side (CAN).
- Radyo Anten Adaptörü: For sedan 4-door Honda Civic models, you may need to remove the rear passenger seat panel trim to access and bypass the HD radio box using the included green and gray cables.
- Test İşlevselliği: Before fully reassembling the dashboard, loosely fit the head unit and test all functions (power, audio, navigation, camera, steering wheel controls) to ensure everything is working correctly.
- Gösterge Panelini Yeniden Birleştirin: Tüm fonksiyonlar doğrulandıktan sonra, gösterge paneli bileşenlerini dikkatlice yeniden birleştirin.

Image: JOYING head unit seamlessly integrated into a Honda Civic dashboard.

Image: Purchase guide illustrating different wiring harnesses (A, B, C) based on OEM radio type.

Image: Important note on setting the CAN bus communication protocol.
Kurulum Videoları:
Video: Detailed installation guide for an Android 13 car stereo in a Honda Civic (from Dasaita Offical Store). This video provides comprehensive steps for removing the old unit and connecting the new one.
Video: Installation steps for a new radio in a Honda Civic (from Dasaita Offical Store). This video focuses on the initial removal and wiring process.
Video: Wiring installation guide (from Jingelsye-US). This video demonstrates the connection of various cables to the head unit.
5. Kullanım Talimatları
5.1 Temel Fonksiyonlar
- Güç Açma/Kapatma: The unit will typically power on with the vehicle's ignition. A fast boot feature allows it to start in 2 seconds after the initial 30-40 second boot.
- Ses Kontrolü: Use the physical volume knob or on-screen controls to adjust audio levels.
- Android OS Navigation: Navigate through the Android 13 interface using the touchscreen.
5.2 Bağlantı Özellikleri
- CarPlay ve Android Auto: Connect your mobile phone via USB cable or Bluetooth to mirror apps, access navigation, make calls, and listen to music on the larger screen.
- Bluetooth 5.0: Eller serbest görüşme ve ses akışı için.
- Built-in 4G Module: Insert a SIM card for internet access (does not support phone calls or SMS). Supports FDD-LTE: B2/B4/B5/B7/B12/B13/B14/B17/B25/B26/B38/B66/B71 and TDD-LTE: B41.
- WiFi Sinyali: Independent WiFi antenna ensures stable 2.4GHz/5GHz internet access.
- USB Bağlantı Noktaları: Three USB ports are available for various connections.
- Mikro SD Kart Yuvası: Ek depolama alanı için.

Image: Demonstration of Built-in CarPlay and Android Auto connectivity.

Image: Illustration of the upgraded WiFi signal with an independent antenna.
5.3 Gezinme ve Multimedya
- GPS navigasyon: Precise GPS engines with included GPS antennas for accurate positioning and faster real-time navigation. Supports offline maps.
- FM/AM Radyo: Built-in FM RDS tuner radio for selecting your favorite radio stations.
- DSP Sound: TDA7851 chip, 48-band graphic equalizer, and 4x50W max output power for high-quality sound. Supports aftermarket amplifiers via optical fiber and coaxial digital output.
- Split-screen Multitasking: Ekranda aynı anda iki uygulama çalıştırın.
- HDMI Çıkışı: Full digital image and sound-sending interface for projection screen display or on-screen display (1080P clear picture, zero delays). HDMI cable not included.

Image: High-quality sound enjoyment features including DSP chip and graphic equalizer.
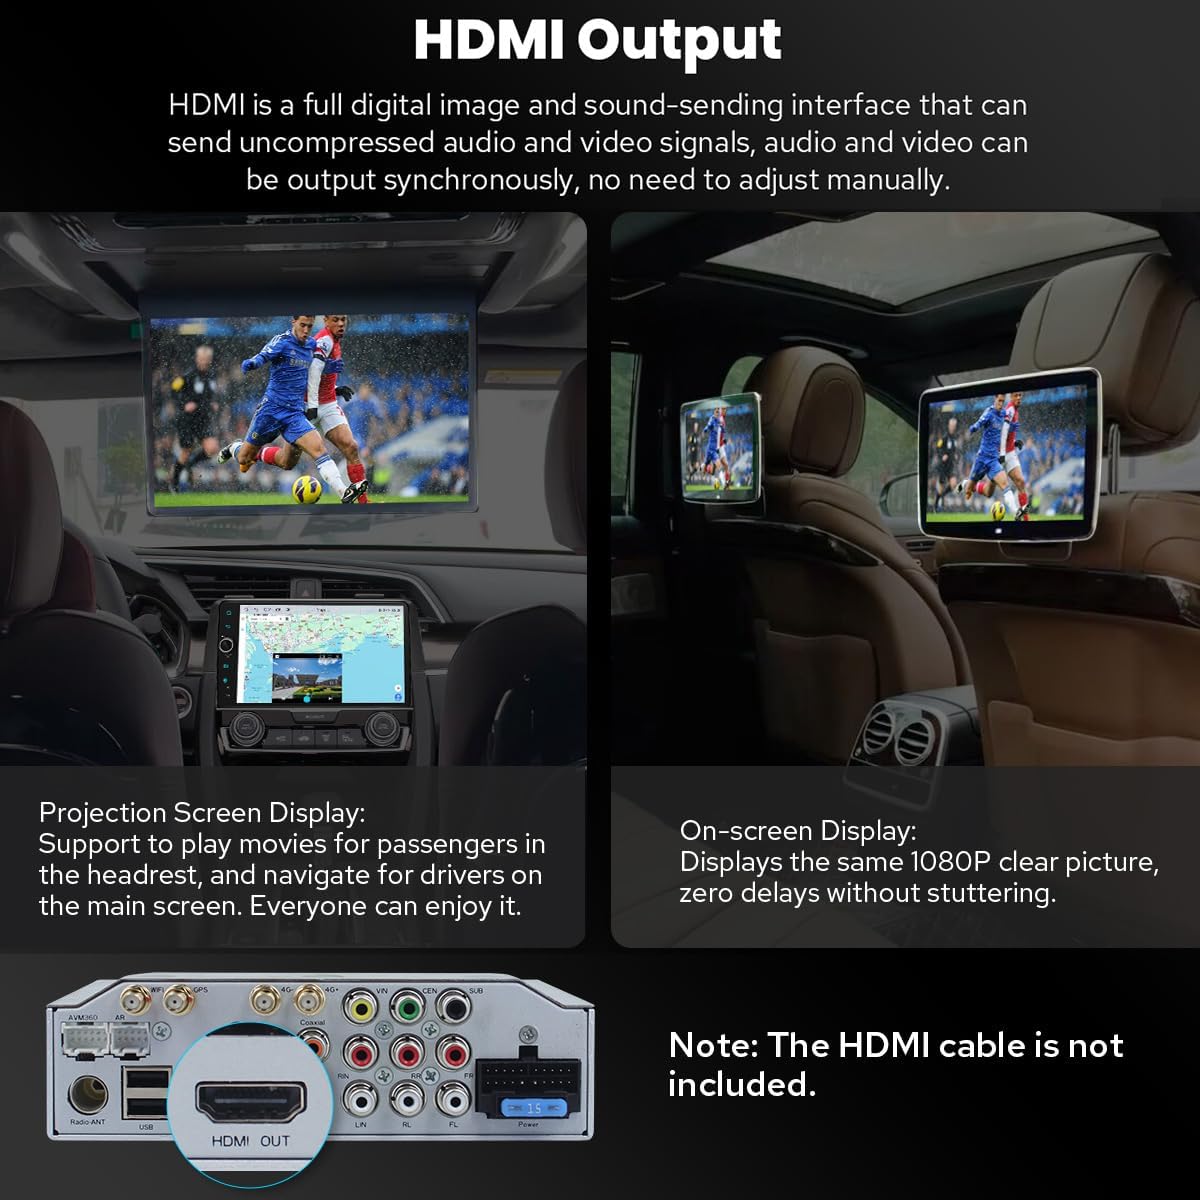
Image: HDMI output for connecting external displays.

Image: Demonstration of split-screen multitasking on the head unit.
5.4 Personalization and Other Features
- Kişiselleştirilmiş Ayarlar: Customize car boot logo, wallpapers, and changeable button colors. Adjustable screen brightness.
- Soğutma Sistemi: Dual heat sink design for superior heat dissipation and temperature control. Fan automatically turns on if CPU temperature or radio volume exceeds a warning value.
- Opsiyonel Aksesuarlar: Supports external OBD2 (for real-time data and trouble codes), AR Front Camera (records front road), and AR Rear Camera (switches automatically when reversing).

Image: Personalized settings for the head unit interface.

Image: Illustration of the upgraded dual heat sink cooling system.

Image: Optional accessories that can be integrated with the head unit.
6. Bakım
- Temizlik: Ekranı ve cihazı temizlemek için yumuşak, kuru bir bez kullanın. Aşındırıcı temizleyicilerden veya çözücülerden kaçının.
- Yazılım Güncellemeleri: Periodically check for software updates via the system settings. Updates can improve performance and add new features.
- Sıcaklık Kontrolü: The dual heat sink design helps manage temperature. Ensure proper ventilation around the unit.
7. Sorun Giderme
Sorunlarla karşılaşırsanız aşağıdaki genel sorun giderme ipuçlarına bakın:
- Güç Yok: Tüm güç kablosu bağlantılarını kontrol edin. Aracın kontak anahtarının açık olduğundan emin olun.
- Ses Yok: Verify audio cable connections (RR, RL for touring amp). Check volume levels and DSP settings.
- Reverse Camera Not Working: Ensure the "CAM IN" cable is properly connected. Check factory settings for reversing camera (Setting > Factory settings > Others > Prohibit reverse and set "Enable").
- Direksiyon Kontrolleri Çalışmıyor: Check factory settings (Setting > Car > Factory settings > Canbus > Canbus Select and choose NO.21).
- GPS Sinyal Sorunları: GPS anteninin güvenli bir şekilde bağlı olduğundan ve net bir bağlantıya sahip olduğundan emin olun. view gökyüzünün.
- Wi-Fi/4G Connectivity Problems: Check antenna connections and ensure correct SIM card insertion (for 4G). Verify network settings.
- Yavaş Performans: Ensure the unit's cooling system is functioning. Close unnecessary background applications.
8. Özellikler
| Ürün Ağırlığı | 6 pound |
| Paket Boyutları | 12.6 x 9.06 x 7.68 inç |
| Ürün Model Numarası | JY-HT145N8 |
| Ekran Boyutu | 9 inç |
| Sesli Komut | Dokunmatik ekran |
| Araç Servis Tipi | Araba |
| Özel Özellik | Bluetooth, Dokunmatik Ekran |
| Bağlantı Teknolojisi | Bluetooth, Ethernet, USB, Wi-Fi |
| Harita türü | Kuzey Amerika |
| Ses Çıkışı Modu | Stereo |
| Montaj Tipi | Kontrol Paneli Montajı |
| İşletim Sistemi | Android |
9. Garanti ve Destek
9.1 Garanti Bilgileri
The JOYING Android 13 Car Stereo Head Unit comes with a 2 Yıl GarantiLütfen garanti talepleriniz için satın alma belgenizi saklayın.
9.2 Ürün Desteği
For technical assistance, troubleshooting, or warranty inquiries, please contact JOYING customer support through the Amazon platform or visit the official JOYING website. Refer to the included warranty card for specific contact details.
İade politikasi: This product is eligible for a 30-day refund/replacement policy from the date of purchase, subject to Amazon's return guidelines.