1. Ürün Bittiview
This manual provides instructions for the safe and proper installation, operation, and maintenance of the Generic Sewing Machine Lead Power Cord. This power cord (Part Number: 660-5) is designed for use with 158 Series and older rotary flat bed sewing machines, providing the necessary electrical connection for your sewing equipment.
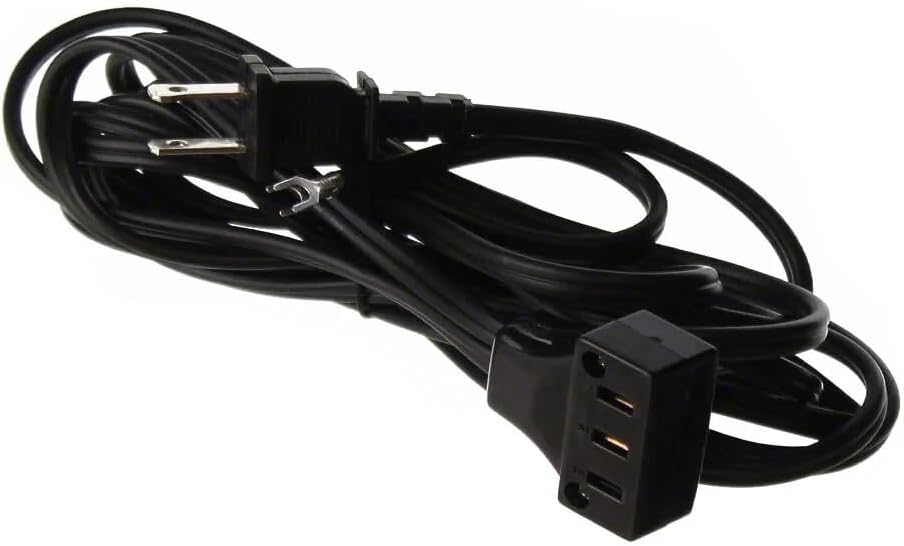
Şekil 1: Tam dolu view of the Generic Sewing Machine Lead Power Cord. This image displays the entire length of the black power cord, coiled, with the two distinct ends visible: the spade connectors and the female receptacle.
2. Güvenlik Bilgileri
Please read and understand all safety instructions before installing or using this product. Failure to follow these instructions may result in electric shock, fire, or personal injury.
- Gücü Kesin: Always ensure the sewing machine is unplugged from the wall outlet before installing or removing the power cord.
- Kabloyu inceleyin: Before each use, inspect the power cord for any signs of damage, such as cuts, frayed wires, or exposed conductors. Do not use a damaged cord.
- Doğru Bağlantı: Ensure all connections are secure and fully inserted. Loose connections can cause overheating or electrical arcing.
- Kuru Ortam: Use the power cord in a dry environment. Avoid contact with water or other liquids.
- Kullanım Amacı: This power cord is specifically designed for compatible sewing machines. Do not use it for other appliances or purposes.
- Çocuklar ve Evcil Hayvanlar: Keep the power cord out of reach of children and pets.
3. Kurulum ve Kurulum
Follow these steps to properly install the power cord:
- Prepare the Sewing Machine: Ensure your sewing machine is turned off and unplugged from any power source.
- Identify Cord Ends: The power cord has two distinct ends:
- Maça Konektörleri: These are two metal fork-shaped terminals designed to connect to the internal wiring or motor terminals of your sewing machine.
- Female Receptacle: This is a three-hole socket designed to accept the male plug of your sewing machine's existing power cord or foot pedal cord.

Şekil 2: Spade Connectors. This image shows a detailed view of the two metal fork-shaped terminals at one end of the power cord, designed for internal machine connection.

Şekil 3: Female Receptacle. This image provides a close-up of the three-hole socket at the other end of the power cord, where the sewing machine's foot pedal or power plug connects.
- Connect Spade Terminals: Carefully connect the two spade connectors to the corresponding terminals on your sewing machine's motor or internal wiring. Refer to your sewing machine's original manual for specific connection points. Ensure a firm and secure connection.
- Connect Machine Plug: Insert the male plug of your sewing machine's foot pedal or existing power cord firmly into the female receptacle of this new lead power cord.
- Duvar Prizine Bağlayın: Finally, plug the male end of the lead power cord into a standard, grounded electrical wall outlet.
Önemli: If you are unsure about connecting the spade terminals, consult a qualified technician or refer to your sewing machine's specific service manual.
4. Kullanım Talimatları
Once the power cord is securely installed as described in Section 3:
- Ensure all connections are tight and there are no exposed wires.
- Turn on your sewing machine using its power switch.
- Operate your sewing machine as usual.
If the machine does not power on, refer to the Troubleshooting section.
5. Bakım
Proper maintenance ensures the longevity and safe operation of your power cord:
- Düzenli Muayene: Periodically inspect the entire length of the cord, including the plugs and connectors, for any signs of wear, damage, or discoloration.
- Temizlik: If necessary, gently wipe the cord with a dry, soft cloth. Do not use liquid cleaners or immerse the cord in water.
- Depolamak: When not in use, store the cord neatly coiled in a dry place, away from extreme temperatures or direct sunlight. Avoid kinking or bending the cord sharply.
- Aşırı Yüklemeden Kaçının: Ensure the sewing machine's power requirements do not exceed the cord's capacity.
6. Sorun Giderme
If your sewing machine is not receiving power after installing the cord, consider the following:
- Güç Yok:
- Check if the lead power cord is firmly plugged into the wall outlet.
- Verify that the sewing machine's plug is fully inserted into the lead power cord's female receptacle.
- Ensure the spade connectors are securely attached to the sewing machine's terminals.
- Test the wall outlet with another appliance to confirm it is functional.
- Check the sewing machine's power switch to ensure it is in the "ON" position.
- Aralıklı Güç:
- This often indicates a loose connection. Re-check all connections for tightness.
- Inspect the cord for any visible damage that might cause intermittent contact. If damaged, replace the cord immediately.
If troubleshooting steps do not resolve the issue, discontinue use and contact the seller or a qualified technician.
7. Özellikler
| Özellik | Detay |
|---|---|
| Parça Numarası | 660-5 |
| Uyumluluk | 158 Series, Older Rotary Flat Bed Sewing Machines |
| Bağlayıcı Tip 1 | Spade Connectors (Fork Terminals) |
| Bağlayıcı Tip 2 | Female Receptacle (3-hole) |
| Marka | Genel |
8. Garanti ve Destek
For warranty information or technical support regarding this Generic Sewing Machine Lead Power Cord, please refer to the seller or retailer from whom the product was purchased. Keep your purchase receipt as proof of purchase.
If you have questions about installation or compatibility, it is recommended to consult with a qualified sewing machine technician or the seller directly.


