1. Giriş
Thank you for choosing the HUPEJOS V30-4CH Dash Cam. This device is designed to provide comprehensive surveillance for your vehicle with its 4-channel recording capabilities, offering a 360-degree field of view. It features 2K Full HD recording, built-in WiFi for app control, voice command functionality, advanced night vision with WDR technology, and a 24/7 parking mode for continuous protection. This manual will guide you through the installation, operation, and maintenance of your dash cam to ensure optimal performance.
2. Kutuda Neler Var?
Lütfen aşağıda listelenen tüm öğelerin paketinizde yer aldığından emin olun:
- 1 x V30-4CH Dash Cam (Main Unit)
- 1 x 1080P Rear Camera (Waterproof)
- 1 x Tip-C Güç Kablosu
- 1 x 19.6 ft Arka Kamera Kablosu
- 2 x Elektrostatik Etiket
- 1 x 64GB SD Kart
- 1 x Vakumlu Montaj
- 1 x Araba Kablo Kesme Aleti
- 1 x Paketleme Kutusu
- 1 x Kullanım Kılavuzu

Image: All components included in the HUPEJOS V30-4CH Dash Cam package.
3. Temel Özellikler
3.1. 4-Channel 360° View
The V30-4CH Mini Dash Cam provides a 150°*4 super wide-angle field of view. The left and right cameras can be rotated to adjust the angle, ensuring 360° all-around protection. It offers two main recording modes:
- 2K Ön + 1080P Arka
- 1080P Front + 2560x720P Left/Right + 720P Rear
The left and right lens footage is stitched together into a single frame for easy viewing, capturing every detail seamlessly.
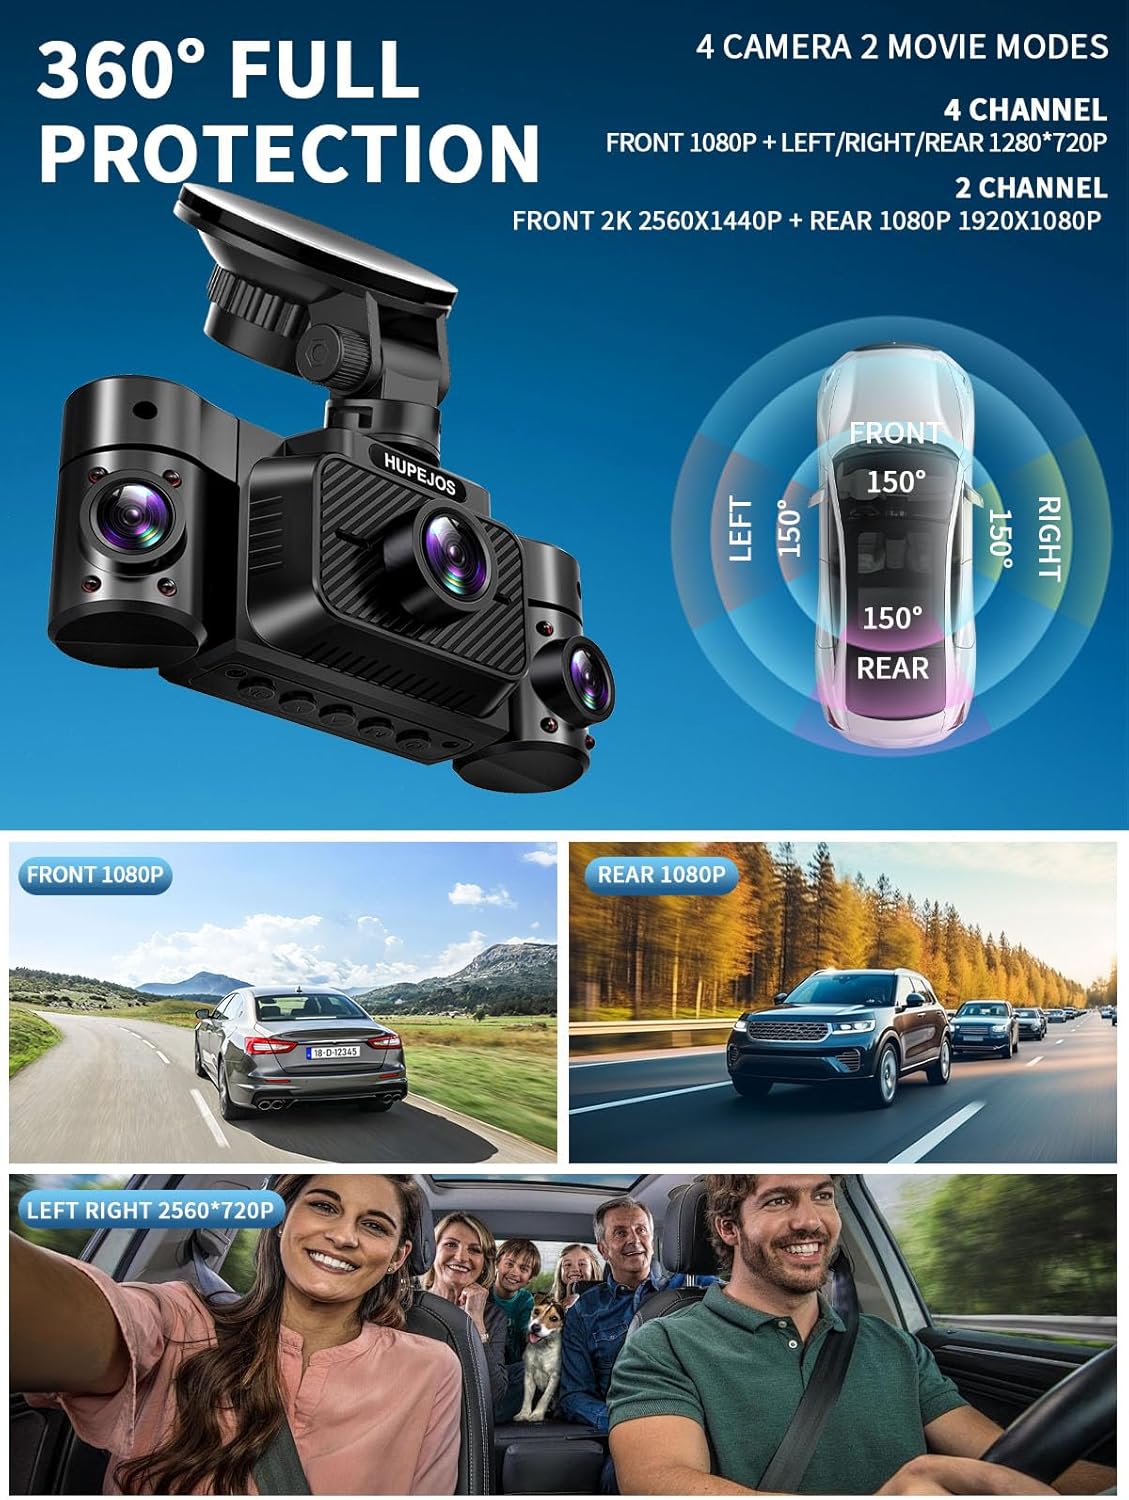
Image: Visual representation of the 360-degree full protection provided by the 4-channel dash cam.
3.2. Döngüsel Kayıt ve G-Sensörü
The dash cam supports loop recording, overwriting the oldest videos when the included 64GB SD card (maximum support 256GB) is full. Recording segments are typically 3 minutes long. The built-in sensitivity G-sensor automatically detects sudden shakes or collisions, locking the footage to prevent it from being overwritten during loop recording, ensuring critical event data is preserved.

Image: Loop recording mechanism, illustrating how the dash cam manages storage by overwriting old files.

Image: G-sensor automatically locking emergency recordings during an impact.
3.3. 24 Saat Park Modu
When your vehicle is parked and turned off, the dash cam automatically switches to parking mode. This feature provides 24/7 surveillance. The time-delay recording function allows continuous recording with low power consumption and a low frame rate, offering 360° protection. To enable this feature, a hardwire kit (ASIN: B0DBR2SLFH) must be purchased separately and connected.

Image: Radar intelligent monitoring system for 24-hour parking mode, detecting objects within 3-4 meters.
3.4. Super Night Vision with WDR Technology
Equipped with a large F/1.8 aperture and 6 layers of optical lenses, the dash camera utilizes HDR/WDR technology to automatically balance light and dark areas in the video. This ensures clear capture of details like license plates, day or night. The IR LED can be manually turned ON or OFF via the dash camera Menu, or set to automatic.

Image: Super Night Vision with WDR technology, enhancing clarity in low-light conditions.
3.5. Built-in WiFi & App Control
The integrated WiFi allows you to connect your smartphone to the dash cam via a dedicated app. Through the app, you can instantly view, manage, and download recorded videos. This enables easy sharing of footage with friends and family on social media platforms. The WiFi range is approximately 6-7 meters from the dash cam. Note that this is not a cloud dash cam, and real-time remote viewing beyond this range is not supported; videos must be downloaded to your phone's album.

Image: App control interface for viewing, managing, and sharing dash cam videos via WiFi.
3.6. Ses Kontrolü
Control your dash cam hands-free using simple English voice commands. This feature allows you to operate the device while keeping your focus on driving safely. Supported commands include:
- "Fotoğraf Çek"
- "Videoyu Başlat"
- "Stop Video"
- "Sesi Aç" / "Sesi Kapat"
- "Turn On WiFi" / "Turn Off WiFi"
- "Ekranı Aç" / "Ekranı Kapat"
- "Ön Kamerayı Göster"
Note: Only the voice options available in the dash camera menu are supported.

Image: Smart voice control feature, enabling hands-free operation of the dash cam.
3.7. Süper Kapasitör
The dash cam is equipped with a super capacitor, providing reliable and long-lasting performance even in extreme temperatures, enhancing durability and safety.

Image: Super capacitor benefits, highlighting durability and temperature resistance.
4. Kurulum ve Kurulum
Before permanent installation, it is recommended to test the dash cam's functionality. Ensure all cables are connected correctly and the device powers on.

Image: Visual guide for the installation process of the dash cam.
- Adım 1: Ön camı hazırlayın. Find a suitable spot on the front windshield, ideally near the rearview görüşünüzü engellemeyen ayna view. Thoroughly clean the windshield surface using water or alcohol, then wipe it dry with a clean cloth. Peel off the electrostatic sticker from its cellophane backing and transfer it to the desired location. Eliminate any air bubbles. It is recommended to let the sticker set for at least half an hour to ensure strong adhesion.
- Step 2: Attach Suction Mount. Attach the suction mount to the camera's mount connector, pushing it in until it clicks. Clean the suction mounting pad. Securely attach the suction mount to the electrostatic sticker on the windshield. Rotate the locking clamp on the mount 90° upward until it clicks into place, ensuring a firm grip.
- Adım 3: Güç Kablosunu Yönlendirin. Carefully route the Type-C power cable around the windshield and tuck it under the trim using the provided car wire trim tool. Connect the other end to your car's cigarette lighter socket or a hardwire kit (if installed).
- Step 4: Rear Camera Installation. We recommend positioning the rear camera in the center of your rear windshield, avoiding the defogging lines to prevent interference with video quality. Remove the protective film from the sticky pad and the camera lens. Fix the rear camera in the selected position. Adjust the angle as needed. Connect the rear camera cable to the main front camera unit. (NOTE: The rear camera is waterproof.)
5. Kullanım Talimatları
5.1. Güç Açma/Kapatma
- Otomatik: Araç kamerası, aracınızın motoru çalıştırıldığında otomatik olarak açılır ve kayda başlar. Motor kapatıldığında ise otomatik olarak kapanır.
- Manuel: Press and hold the power button for a few seconds to manually turn the device on or off.
5.2. Menü Navigasyonu
Araç içi kameranın üzerindeki fiziksel düğmeleri kullanarak menü seçenekleri arasında gezinin. Genellikle Menü, Yukarı, Aşağı, Tamam/Onayla ve Mod düğmeleri bulunur. Belirli işlevler için ekrandaki talimatlara bakın.
5.3. Ses Kontrolü
Once enabled in the settings, simply speak the supported commands (listed in Section 3.6) clearly to control the dash cam without touching it.
5.4. Mobile App Control (WiFi)
- Download the dedicated HUPEJOS app from your smartphone's app store.
- Turn on WiFi on your dash cam (via voice command or menu).
- Connect your smartphone to the dash cam's WiFi network (SSID and password usually displayed on the dash cam screen or in the manual).
- Uygulamayı şunun için açın: view canlı footage, kaydedilmiş videoları inceleyin, indirin files ve ayarları yapın.
5.5. Adjusting Camera Angles
The left and right cameras on the main unit can be manually rotated to achieve the desired viewing angle for interior or side coverage.
6. Bakım
- Lens Temizliği: Net video kalitesi sağlamak için kamera lenslerini düzenli olarak yumuşak, tüy bırakmayan bir bezle temizleyin. Aşındırıcı malzemelerden kaçının.
- SD Kart Yönetimi: Format the SD card periodically (e.g., once a month) to maintain optimal performance and prevent data corruption. This can usually be done through the dash cam's menu settings. Back up any important footagBiçimlendirmeden önce e.
- Donanım Yazılımı Güncellemeleri: Check the official HUPEJOS website or app for any available firmware updates. Keeping your dash cam's firmware up-to-date can improve performance and add new features.
- Sıcaklık: Avoid exposing the dash cam to extreme temperatures for prolonged periods when not in use. The super capacitor provides resilience, but prolonged exposure to very high or low temperatures can still affect electronic components.
7. Sorun Giderme
- Dash Cam Açılmıyor:
- Ensure the power cable is securely connected to both the dash cam and the car's power source.
- Check the car's cigarette lighter socket or hardwire kit for power.
- Mümkünse farklı bir güç kaynağı veya kablo deneyin.
- Videotage is Unclear/Blurry:
- Fotoğraf makinesinin lenslerini yumuşak bir bezle temizleyin.
- Ensure the protective film has been removed from all lenses.
- Kameranın monte edildiği ön cam bölgesinin temiz olup olmadığını kontrol edin.
- Verify that the video resolution settings are set to the highest quality.
- SD Card Error/Recording Issues:
- Format the SD card through the dash cam's menu.
- Ensure the SD card is a high-speed (Class 10 or U3) card from a reputable brand, with a maximum supported capacity of 256GB.
- Kart arızasını elemek için farklı bir SD kart deneyin.
- App Connection Issues (WiFi):
- Araç içi kamerada Wi-Fi'nin etkinleştirildiğinden emin olun.
- Confirm your phone is connected to the dash cam's specific WiFi network.
- Hem araç kameranızı hem de akıllı telefonunuzu yeniden başlatın.
- Ensure you are within the 6-7 meter WiFi range.
- Ses Kontrolü Yanıt Vermiyor:
- Araç kamerasına doğru net ve doğrudan konuşun.
- Ensure the voice control feature is enabled in the dash cam's settings.
- Araçtaki arka plan gürültüsünü azaltın.
- Park Modu Aktif Değil:
- Confirm that the hardwire kit is correctly installed and connected. Parking mode requires a continuous power supply.
- Araç içi kamera menüsünden park modu ayarlarını kontrol edin.
8. Özellikler
| Özellik | Şartname |
|---|---|
| Model Adı | V30-4CH |
| Ürün Boyutları | 1.76 x 4.8 x 1.8 inç |
| Ürün Ağırlığı | 1.43 pound |
| Bağlantı Teknolojisi | USB, Wi-Fi |
| Video Yakalama Çözünürlüğü | 2K Front + 1080P Rear; 1080P Front + 2560*720P Left/Right + 720P Rear |
| Özel Özellikler | 2" IPS Screen, 360 Degree Protection, G-Sensor Lock, Loop Recording, App Control, Audio Recording, Built-In WiFi, Super Night Vision, WDR, 24/7 Radar Parking Mode, Voice Control |
| SD kart dahildir. | 64GB (Max support 256GB) |
| Montaj Tipi | Ön Cam Bağlantısı |
| Kontrol Yöntemi | Uygulama, Ses |
| Üretici | HÜPEJOS |
9. Garanti ve Destek
The HUPEJOS V30-4CH Dash Cam typically comes with a 2-year warranty from the date of purchase, covering manufacturing defects. Please retain your proof of purchase for warranty claims.
For technical support, troubleshooting assistance, or warranty inquiries, please contact HUPEJOS customer service via email. Refer to the contact information provided on the product packaging or the official HUPEJOS webalan.