
1. Giriş
This manual provides detailed instructions for the assembly, operation, and maintenance of your SHINYSNAKE L300 Mesh Mini-ITX Gaming PC Case. The L300 is an ultra-compact 8.5L vertical ITX chassis designed to maximize desk space while accommodating dual-slot GPUs up to 325mm. It features advanced mesh cooling and expandable I/O for a high-performance, portable mini-ITX build.
Neler Dahildir:
- 1 x SHINYSNAKE L300 ITX Chassis
- 1 x PCI-e 3.0 Riser Cable
- 1 x DP 1.4 Cable (4K@120Hz)
- 1 x Steel Handle
- 1 x Kurulum Kılavuzu

Figure 1.1: SHINYSNAKE L300 package contents.
2. Güvenlik Bilgileri
Always exercise caution when handling computer components. Disconnect the power supply from the wall outlet before performing any installation or maintenance. Wear an anti-static wrist strap to prevent electrostatic discharge (ESD) damage to sensitive components. Keep small parts away from children. Refer to individual component manuals for specific safety guidelines.
3. Kurulum ve Kurulum
Follow these steps to assemble your SHINYSNAKE L300 PC case. It is recommended to lay the case flat on a stable, non-conductive surface during assembly.
3.1 Kasa Sökme İşlemi
- Remove the screws securing the side panels.
- Carefully slide and remove both mesh side panels.
- Remove any internal brackets (e.g., fan bracket, PSU bracket) as needed for component installation.
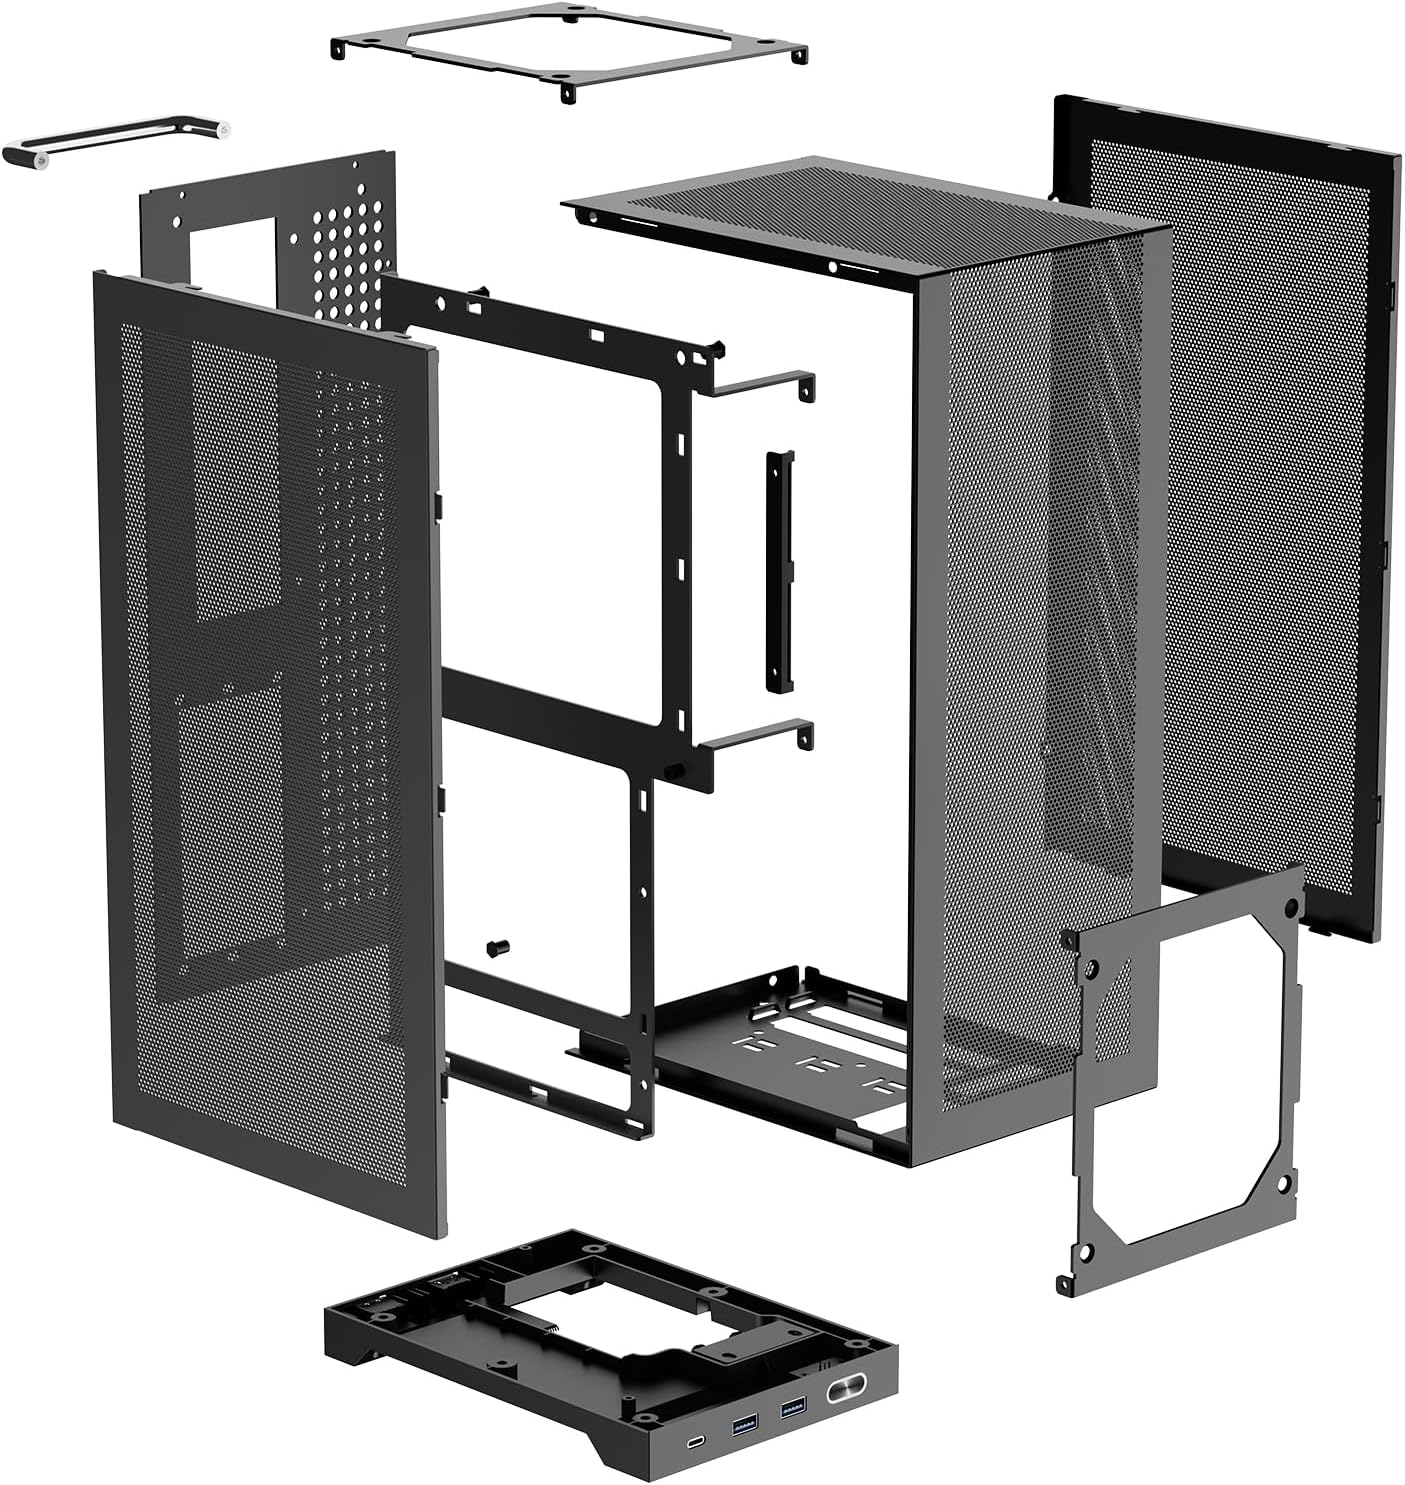
Şekil 3.1: Patlatılmış view of the L300 chassis.
3.2 Anakart ve İşlemci Kurulumu
- Install your Mini-ITX motherboard with CPU, CPU cooler (max 120mm compatible), and RAM outside the case first.
- Pre-install any necessary fan splitter cables and connect CPU power cables to the motherboard.
- Install the motherboard I/O shield into the case.
- Carefully place the assembled motherboard into the chassis, aligning it with the standoffs. Secure with screws.
3.3 PSU and Cable Management
- Install the SFX/SFX-L power supply into its designated bay. Ensure modular cables are connected before securing the PSU.
- Route the 8-pin CPU power cable from the top of the motherboard towards the PSU compartment.
- Connect the 24-pin and other necessary power cables to the motherboard.
- Connect front panel I/O cables (USB 3.0, Type-C, Power Switch, Audio) to the motherboard headers.
- Use cable ties to manage and secure all cables for optimal airflow and aesthetics.
3.4 GPU Kurulumu
- Install the included dual reverse PCIe 3.0 riser cable into the motherboard's PCIe slot. Secure it with screws.
- Pre-route GPU power cables from the PSU compartment to the GPU area.
- Connect the GPU power cables to your graphics card.
- Carefully insert the graphics card into the riser cable slot.
- Secure the GPU to the chassis using the provided PCI-e bracket and screws.
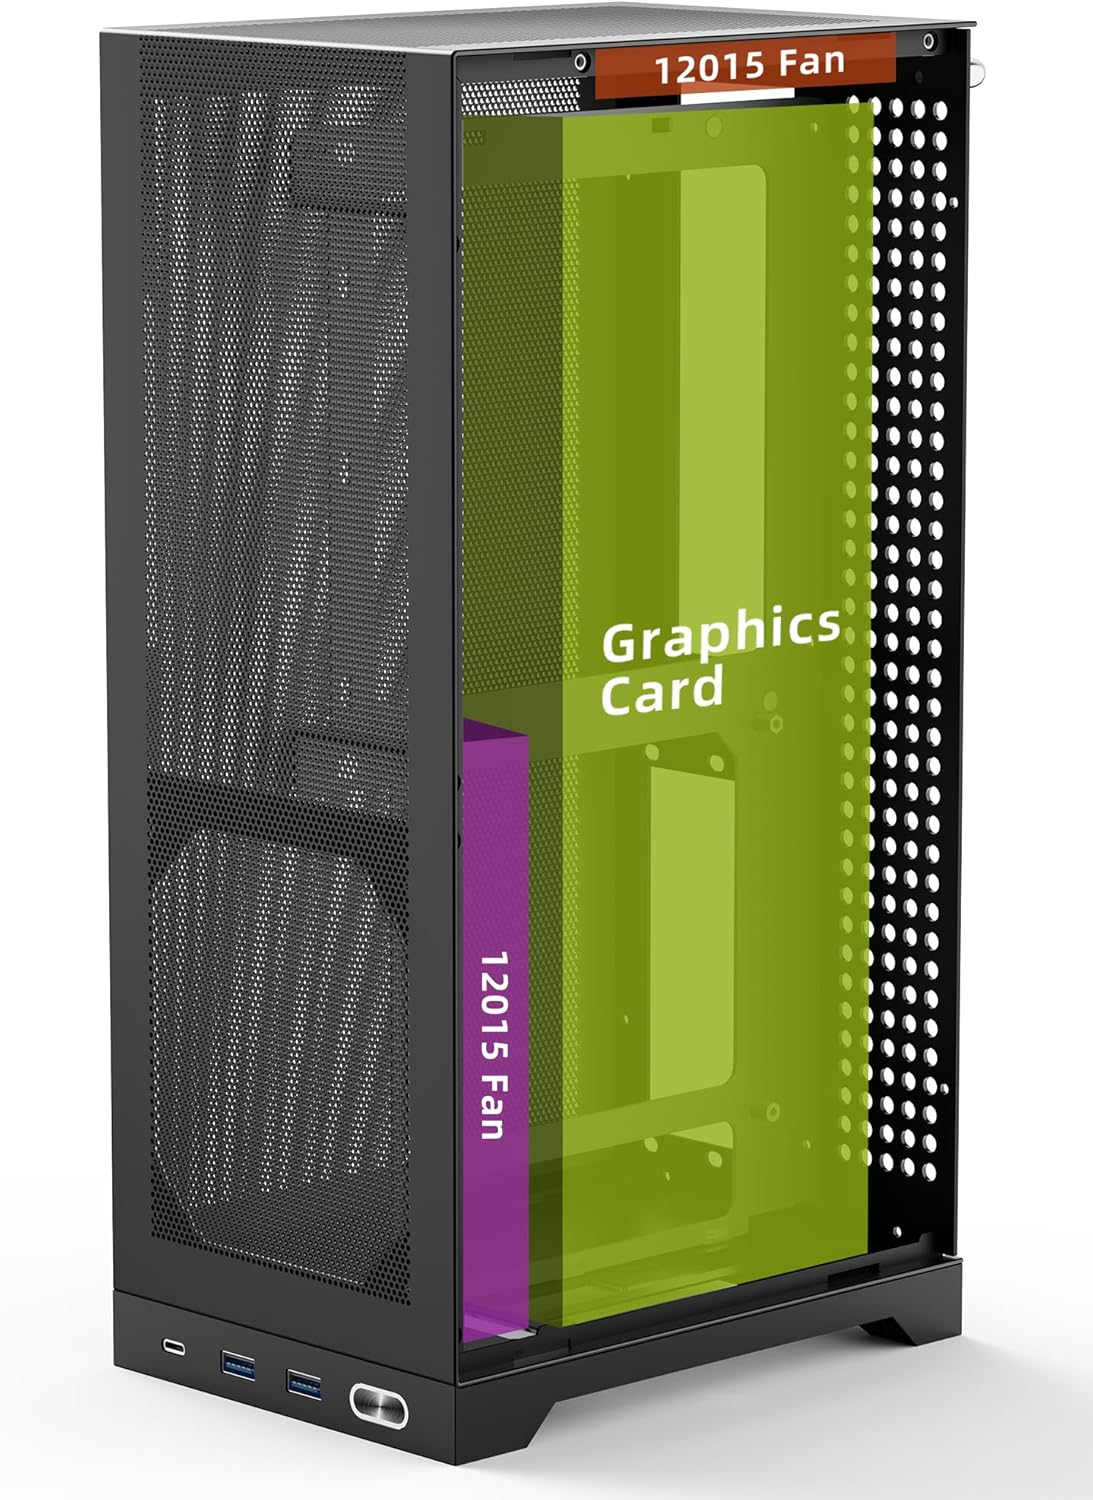
Figure 3.2: Vertical GPU mounting in the L300 chassis.
3.5 Nihai Montaj
- Install the steel handle onto the top of the case, securing it with screws.
- Reattach the mesh side panels and secure them with their respective screws.
- Connect the complimentary 90-degree curved DP 1.4 cable to your GPU.
Video 3.1: Detailed installation guide for the SHINYSNAKE L300 PC case, demonstrating component placement and cable management.
4. Kullanım Talimatları
4.1 Güç Açma/Kapatma
Press the power button located on the front panel to turn your PC on or off. A short press will initiate shutdown or sleep mode, while a long press (typically 5-10 seconds) will force a shutdown.
4.2 Ön Panel G/Ç
Ön panel, çeşitli bağlantı noktalarına kolay erişim sağlar:
- 1x Type-C (10Gbps): For rapid file transfers and connecting modern peripherals.
- 2x USB 3.0 (5Gbps): For connecting USB devices such as keyboards, mice, and external drives.
- Güç Düğmesi: To control the power state of your PC.

Figure 4.1: Front panel I/O ports.
5. Bakım
5.1 Temizlik
The L300 case features full-perforation steel mesh side panels designed for optimal airflow and dust filtration. Regularly clean the mesh panels to maintain airflow and prevent dust buildup inside the case. Use a soft brush or compressed air to gently remove dust from the mesh and internal components. Ensure the PC is powered off and unplugged before cleaning.
6. Sorun Giderme
6.1 Güç Yok
- Güç kablosunun hem PSU'ya hem de duvar prizine güvenli bir şekilde bağlandığından emin olun.
- PSU anahtarının 'AÇIK' konumunda olduğundan emin olun.
- Check all internal power connections (24-pin, 8-pin CPU, GPU power) to the motherboard and components.
- Confirm the front panel power switch cable is correctly connected to the motherboard header.
6.2 Görüntü Çıkışı Yok
- Ensure your monitor is connected to the graphics card (GPU) output, not the motherboard's integrated graphics ports.
- Verify the DP 1.4 extension cable is securely connected at both ends.
- Check that the GPU is properly seated in the PCIe riser cable and that the riser cable is correctly installed in the motherboard.
- If using PCIe 3.0 riser, ensure your motherboard BIOS is manually set to Gen3 for stable performance.
6.3 Aşırı Isınma Sorunları
- Ensure all cooling fans (CPU, chassis) are properly installed and spinning.
- Verify that thermal paste is correctly applied to the CPU cooler.
- Check for any obstructions to airflow within the case, especially around the mesh panels.
- Ensure proper cable management to avoid impeding airflow.
7. Özellikler
| Özellik | Şartname |
|---|---|
| Marka | SHINYSNAKE |
| Model Adı | L300 |
| Dava Türü | Mini-Tower (8.5L Ultra-Compact) |
| Anakart Uyumluluğu | Mini ITX |
| Ürün Boyutları (UxGxY) | 7.4 x 5.3 x 14 inç (188 x 135 x 356 mm) |
| Ürün Ağırlığı | 5.29 pound (2.4 kg) |
| GPU Uzunluk Desteği | 12.8 inçe (325 mm) kadar |
| PSU Uyumluluğu | SFX / SFX-L |
| Soğutma Yöntemi | Air (Dual 120x15mm ultra-slim fans compatible) |
| Ön G / Ç Bağlantı Noktaları | 1x Type-C (10Gbps), 2x USB 3.0 (5Gbps) |
| Malzeme | High-density steel, Acrylonitrile Butadiene Styrene (ABS), SPCC |

Figure 7.1: L300 chassis dimensions.
8. Garanti ve Destek
For warranty information, technical support, or compatibility guidance, please refer to the official SHINYSNAKE webSite üzerinden satın alabilir veya doğrudan müşteri hizmetleriyle iletişime geçebilirsiniz. Garanti talepleriniz için satın alma fişinizi saklayın.