
1. Giriş
This manual provides comprehensive instructions for the Fuers H.265+ 8-Channel 5MP Lite Hybrid DVR with 500GB HDD. This DVR is designed for surveillance systems, offering compatibility with various camera types and advanced features for reliable security monitoring.
Temel özellikler şunlardır:
- 6-in-1 Hybrid Capability: Supports TVI, AHD, CVI, XVI, CVBS, and IP cameras.
- H.265+ Video Sıkıştırma: Efficiently records, plays back, and stores footage, saving up to 50% storage space compared to H.264.
- Yapay Zeka İnsan Tespiti: Advanced algorithms detect unusual activity and send real-time notifications.
- Uzaktan İzleme: Access your system via a mobile app for live viewoynatma ve oynatma.
- Pre-installed 500GB HDD: Ready for immediate recording.
2. Ürün Bittiview
2.1 Paket İçeriği
Paketinizde tüm öğelerin mevcut olduğundan emin olun:
- 1x A6908-5MP 8CH DVR
- 1x 500G Hard Drive (Pre-installed on DVR)
- 1 adet DVR Güç Kaynağı
- 1x USB Fare
- 1x Kullanım Kılavuzu
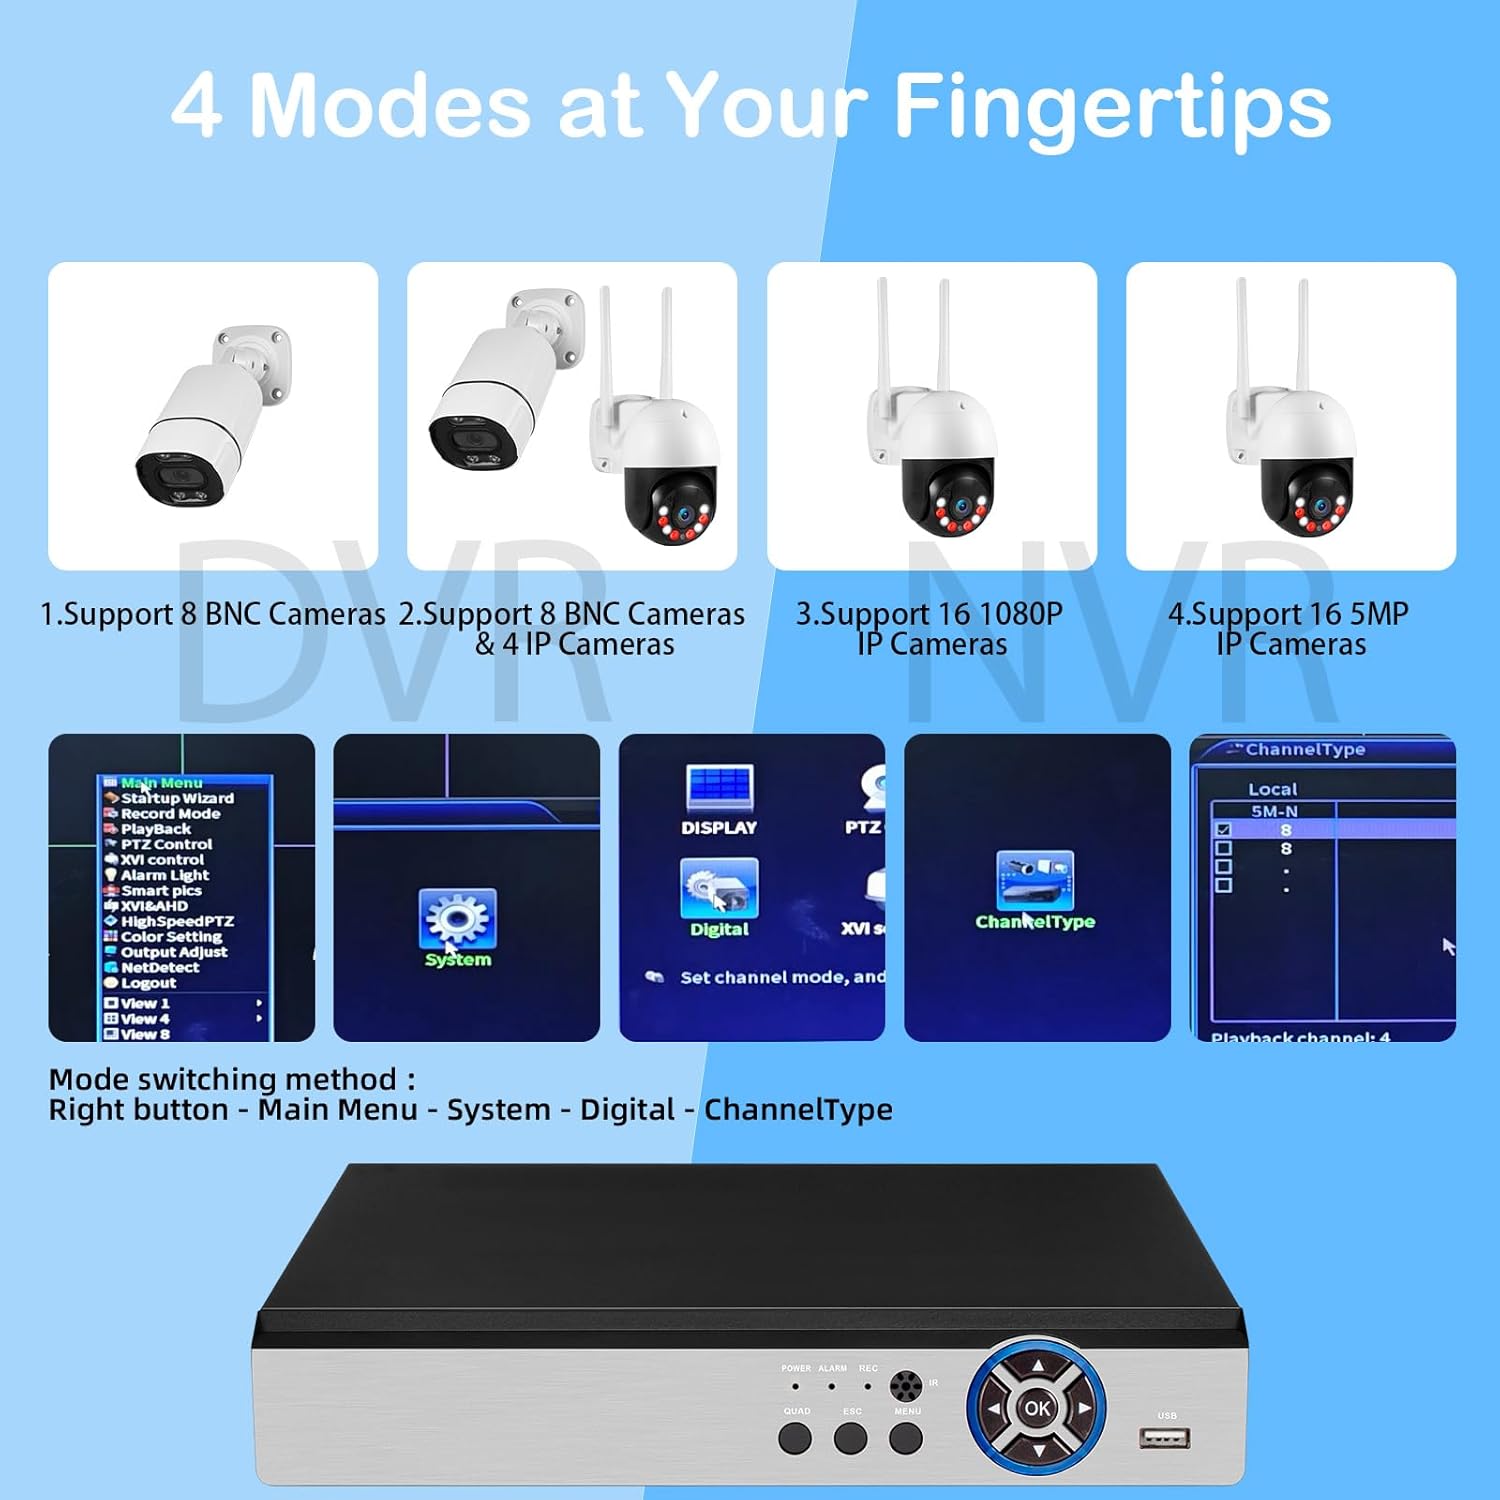
Figure 2.1: What's in the Box? The image displays the DVR unit, a 500GB hard drive, a power supply, a USB mouse, and the user manual, illustrating all components included with the product.
2.2 DVR Interfaces
Familiarize yourself with the ports and indicators on your DVR unit:
- Video Girişi (BNC): En fazla 8 adet güvenlik kamerasını bağlayabilirsiniz.
- Ses Girişi/Çıkışı (RCA): Ses girişi ve çıkışı için.
- VGA Çıkışı: Connect to a PC monitor.
- HDMI Çıkışı: Connect to a TV or monitor for high-definition display.
- USB Bağlantı Noktaları: For connecting the USB mouse and external storage.
- Ağ (RJ45): Connect to your router for internet access and remote viewIng.
- DC 12V Güç Girişi: Connect the DVR power supply.
- Ön Panel Kontrolleri: Power, Alarm, Record, Quad, Esc, Menu, OK buttons.

Figure 2.2: DVR Introduction. This image provides a detailed view of the DVR's front and rear panels, labeling all connection points and control buttons for easy identification.
3. Kurulum
3.1 İlk Donanım Bağlantısı
DVR sisteminizi bağlamak için şu adımları izleyin:
- Connect the HDMI or VGA cable from the DVR to your monitor or TV.
- Plug the USB mouse into one of the DVR's USB ports.
- Connect your surveillance cameras to the BNC video input ports on the DVR. Ensure proper connections for both video and power (camera cables are not included).
- Connect the DVR power supply to the DC 12V input and plug it into a power outlet.
- The system will power on and display the startup wizard on your monitor.
Video 3.1: 8 Channel CCTV DVR Recorder Setup. This video demonstrates the step-by-step process of connecting the DVR to a monitor, mouse, cameras, and power supply, followed by the initial system boot-up and interface navigation.
3.2 Network Connection and Remote Access
Uzaktan etkinleştirmek için viewing and alerts, connect your DVR to the internet:
- DVR'ın ağ bağlantı noktasından yönlendiricinize bir Ethernet kablosu bağlayın.
- Download the iCSee mobile application on your smartphone. You can find the app on the Google Play Mağazası for Android or the Apple Uygulama Mağazası iOS için.
- Open the iCSee app and follow the instructions to add your DVR. This typically involves scanning a QR code displayed on the DVR's monitor (Main Menu > Info > Version).
- Bağlandıktan sonra, yapabilirsiniz view canlı footage, play back recordings, and receive alerts directly on your mobile device.

Figure 3.1: Mobile Remote Access. This image illustrates the process of connecting the DVR to a network and setting up the iCSee mobile application for remote monitoring.
4. Kullanım Talimatları
4.1 DVR Interface Navigation
Use the included USB mouse to navigate the DVR's graphical user interface (GUI). The main menu provides access to various settings and functions, including recording configuration, alarm settings, system information, and network services.

Figure 4.1: 4 Modes at Your Fingertips. This image displays the DVR's menu for switching between different camera input modes, such as 8 BNC cameras, 8 BNC + 4 IP cameras, 16 1080P IP cameras, or 16 5MP IP cameras.
4.2 Camera Compatibility and Modes
The DVR supports a 6-in-1 hybrid capability, allowing connection of various camera types:
- CVBS (Analog)
- AHD (Analog Yüksek Çözünürlük)
- TVI (Transport Video Interface)
- CVI (Composite Video Interface)
- XVI (Extended Video Interface)
- IP (Internet Protocol) cameras
The DVR can operate in different modes to accommodate various camera configurations. To switch modes, right-click on the interface, go to Main Menu > System > Digital > ChannelType.

Figure 4.2: Hybrid Capability 6-in-1 DVR. This image visually represents the DVR's ability to connect with six different types of security cameras, offering versatile surveillance options.
4.3 Video Kaydı ve Oynatma
The DVR utilizes H.265+ video compression, which provides significant advantagTürkçe:
- Reduced Storage: Saves up to 50% of storage space compared to H.264, allowing for longer recording times on the 500GB HDD.
- Daha pürüzsüz ViewTürkçe: Enables fast and smooth streaming without latency.
- Faster Downloads: Improves efficiency when accessing recorded footage.
To access recordings, navigate to Main Menu > Record > Playback. You can search for motion-triggered events, images, or specific dates and times to review videolar.

Figure 4.3: Advanced H.265+ Video Compression. This image compares H.265+ and H.264 compression, demonstrating the superior efficiency of H.265+ in terms of storage and bandwidth usage.
4.4 Yapay Zeka Destekli İnsan Tespiti ve Uyarılar
Configure the DVR to detect human movement and send alerts:
- Access the alarm settings via Main Menu > Alarm > Human Detect.
- Define specific detection zones and sensitivity levels for each camera.
- When motion events are detected, the system will push real-time app notifications and email alerts with snapshots to your configured devices.
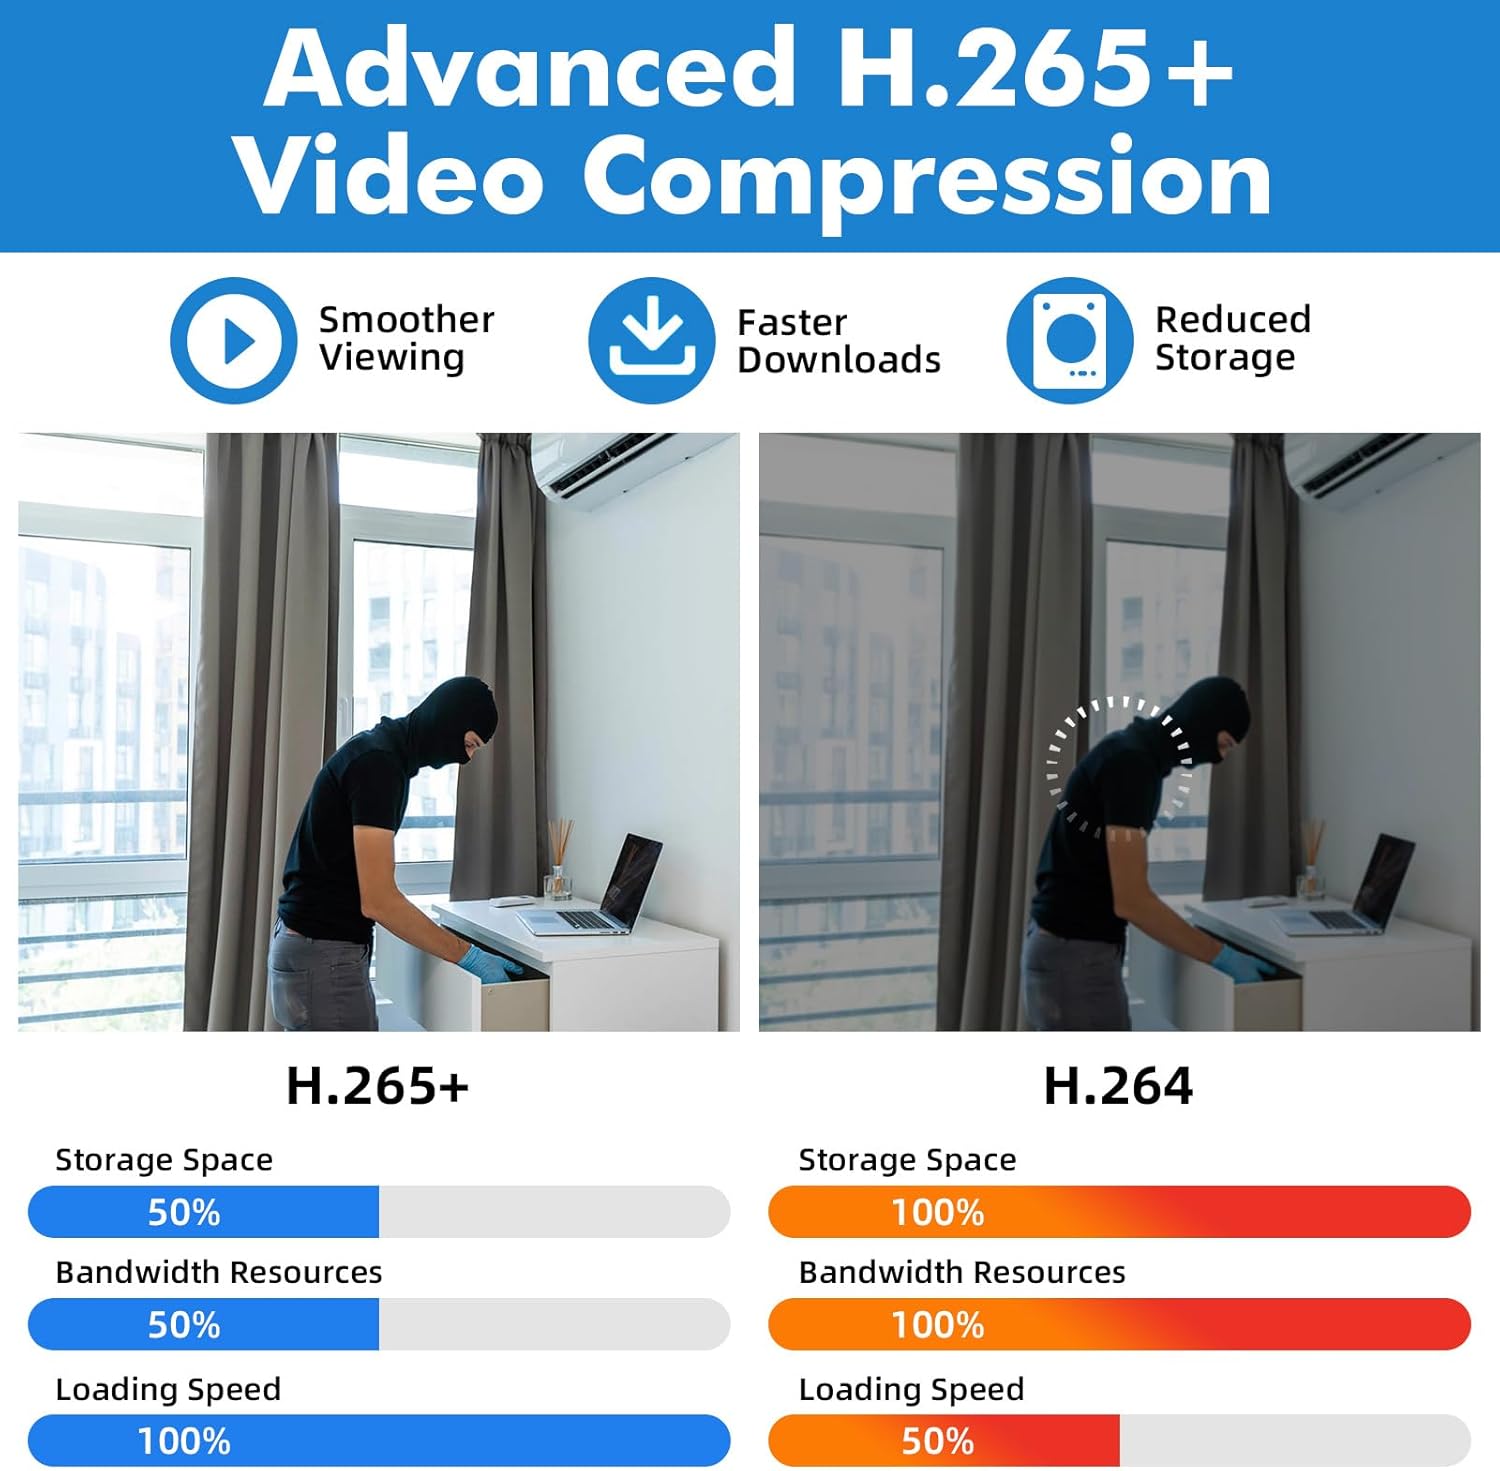
Figure 4.4: DIY Motion Detection. This image demonstrates how users can define specific motion detection zones to minimize false alarms and focus on critical areas.
4.5 Internet-Free Operation
The DVR system can function for local recording and viewing even without an internet connection. Internet access is only required for remote viewing, app notifications, and email alerts.

Figure 4.5: No Monthly Fee, DVR Work Even without Internet. This image highlights the DVR's capability to operate locally without an internet connection, ensuring continuous recording and viewing without recurring fees.
5. Bakım
5.1 Sabit Sürücü Yönetimi
The pre-installed 500GB Hard Disk Drive (HDD) automatically overwrites older recordings with new ones once its storage capacity is full. This ensures continuous recording without manual intervention. The DVR supports expandable storage up to 14TB, though a higher power supply may be required for larger drives.

Figure 5.1: Pre-installed 500G HDD. This image illustrates the DVR's pre-installed 500GB hard drive and its capability to expand storage up to 14TB for extended recording.
6. Sorun Giderme
If you encounter any issues with your DVR security camera system, please refer to the following common solutions or contact customer support.
6.1 Camera Compatibility Issues
Ensure your cameras are compatible with the DVR's specifications. The DVR supports the following parameters:
- Default 5M-N: Supports 8* 5MN@12fps (6-in-1) cameras with frame rates not exceeding 12fps and resolutions not exceeding 5MN.
- 4MN: Supports 8* 4MN@15fps (6-in-1) cameras with frame rates not exceeding 15fps and resolutions not exceeding 4MN.
- 1080P: Supports 8* 1080P@15fps (XVI) cameras with frame rates not exceeding 15fps and resolutions not exceeding 1080P.
If your camera does not display video, verify its resolution and frame rate against these specifications.
6.2 Görüntü Çıkışı Yok
- Check all cable connections (HDMI/VGA, camera BNC, power).
- Monitörün açık olduğundan ve doğru giriş kaynağına ayarlandığından emin olun.
- Verify that the DVR is powered on (check power indicator lights).
6.3 Uzaktan Erişim Sorunları
- Confirm the DVR is connected to your router via an Ethernet cable and has internet access.
- Akıllı telefonunuzun istikrarlı bir internet bağlantısına sahip olduğundan emin olun.
- Re-scan the DVR's QR code in the iCSee app to re-establish the connection.
- Check your router settings for any firewall or port forwarding configurations that might block the connection.
7. Özellikler
| Özellik | Şartname |
|---|---|
| Marka | Fuers |
| Model Numarası | 768904900771 |
| Bağlantı Teknolojisi | HDMI, USB, VGA |
| Uyumlu Cihazlar | Camera, Smartphone, Tablet, Desktop |
| Ürün Boyutları (U x G x Y) | 8.26" x 8.26" x 1.57" |
| Bellek Depolama Kapasitesi | 500 GB |
| Hard-Drive Size | 500 GB |
| Kanal Sayısı | 8 |
| Medya Formatı: Dijital Video | Sabit disk sürücüsü |
| Toplam USB Bağlantı Noktaları | 2 |
| Video Girişi | BNC |
8. Garanti ve Destek
For any quality problems, installation assistance, or connection issues, please contact Fuers customer support. Refer to your purchase documentation for specific warranty details and contact information.