
1. Giriş
This manual provides comprehensive instructions for the Mycket portable DAB/DAB+/FM radio, Model D009. It covers setup, operation, maintenance, and troubleshooting to ensure optimal performance and longevity of your device. Please read this manual carefully before using the product.
The Mycket D009 radio features advanced signal reception technology for clear audio, Bluetooth 5.0 for wireless streaming, USB playback, AUX-in connectivity, a dual alarm clock, and a sleep timer. Its integrated rechargeable battery offers portability for use in various environments.
2. Güvenlik Talimatları
- Cihazı yağmura, neme veya aşırı sıcaklıklara maruz bırakmayın.
- Cihazı düşürmekten veya güçlü darbelere maruz bırakmaktan kaçının.
- Cihazı kendiniz sökmeyin veya tamir etmeye çalışmayın. Tüm servis işlemlerini yetkili personele yaptırın.
- Cihazı radyatör, kalorifer ızgarası, soba veya diğer cihazlar (dahil) gibi ısı kaynaklarından uzak tutun. amp(ısı üreten)
- Use only the specified charging cable and power adapter (5V via USB) to charge the device.
- Cihazın çalışması ve şarj edilmesi sırasında çevresinde yeterli havalandırma olduğundan emin olun.
- Pilleri ve elektronik bileşenleri yerel yönetmeliklere uygun şekilde sorumlu bir şekilde atın.
3. Ürün Bittiview
3.1 Paket İçeriği
- 1 x Mycket Portable DAB Radio (Model D009)
- 1 x USB Şarj Kablosu
- 1 x Kullanım Kılavuzu
3.2 Cihaz Yerleşimi ve Kontrolleri
Familiarize yourself with the main components and controls of your Mycket radio.

Resim 1: Ön view of the Mycket D009 portable DAB radio, showing the speaker grille, LCD display, control buttons (MODE, OK, O/M, FAV, 1-4), and the telescopic antenna extended. The right side shows the DC 5V USB-C port, reset button, and headphone jack.
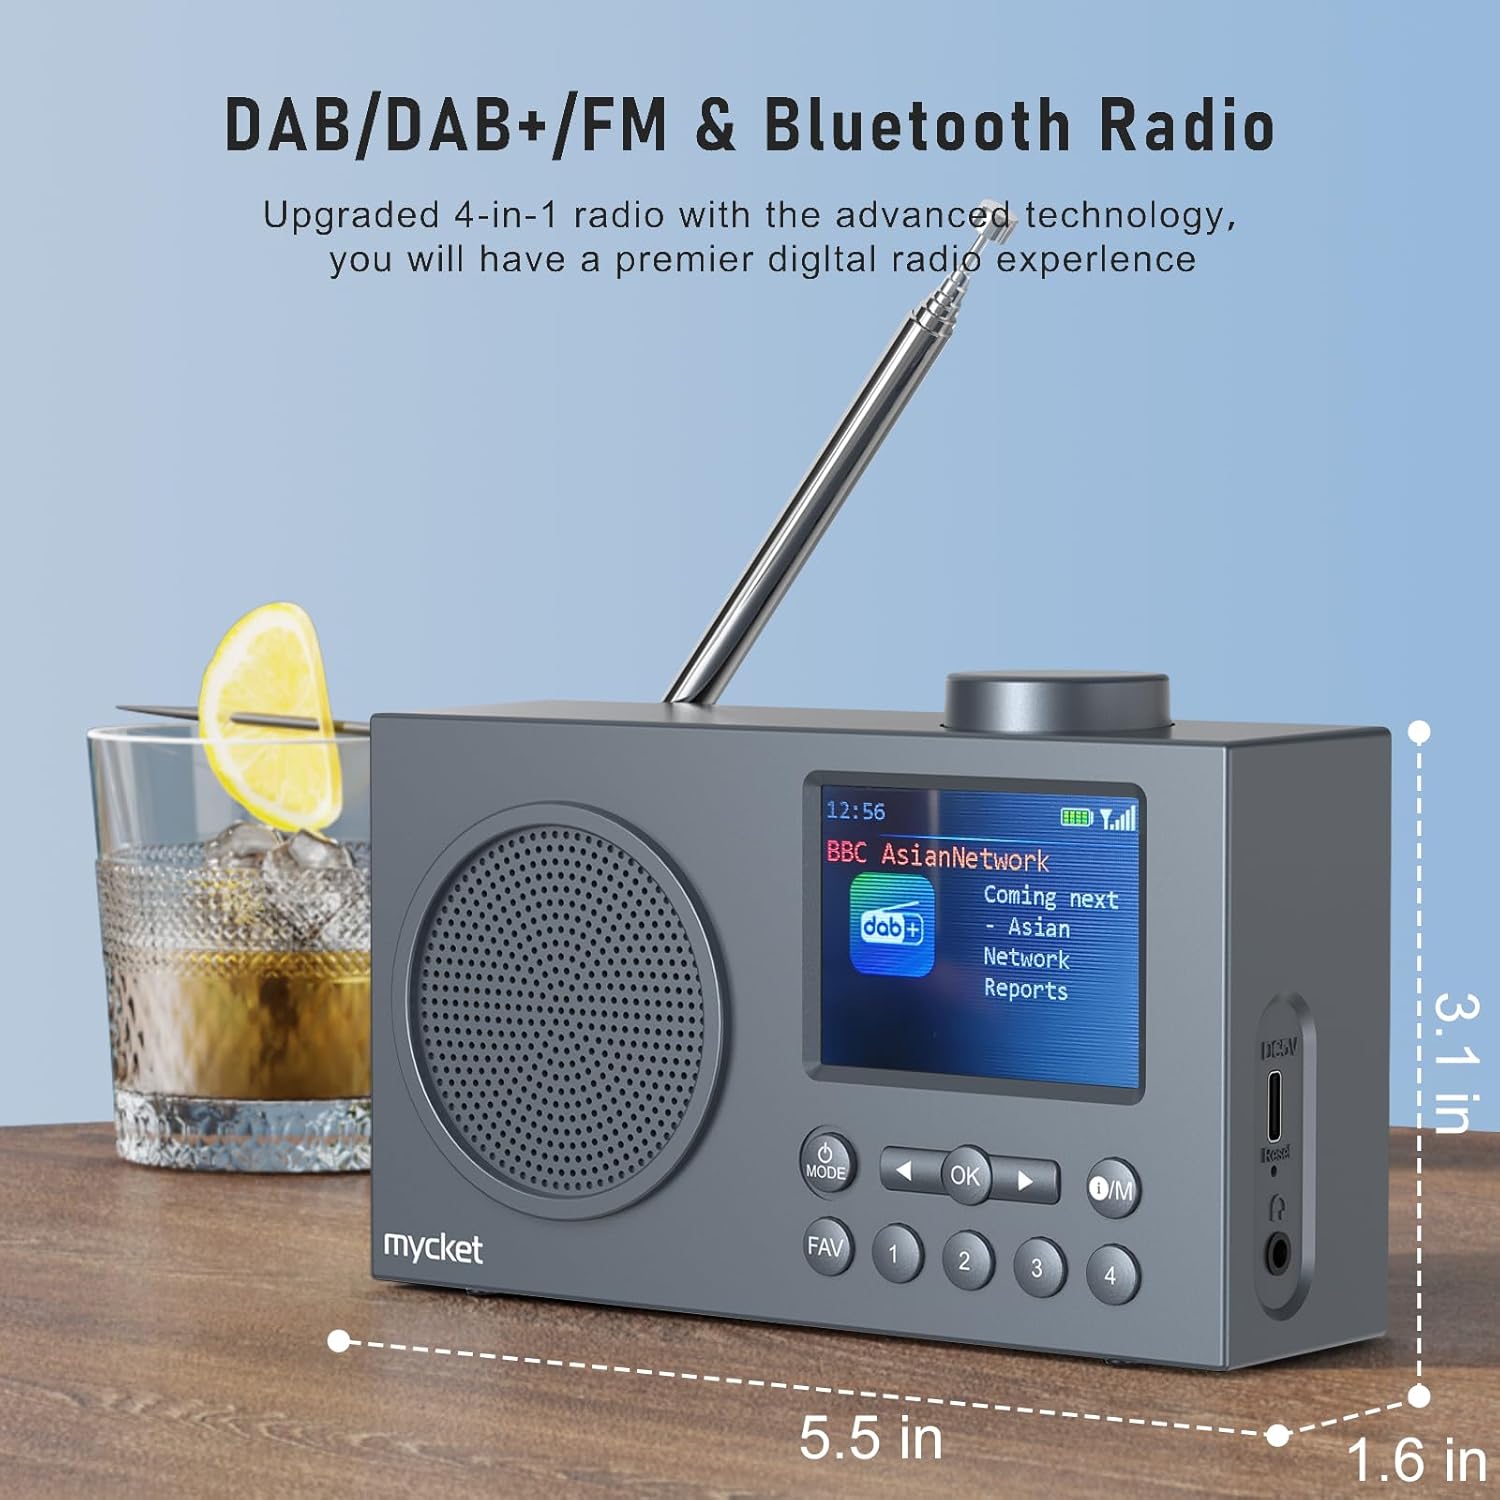
Resim 2: Taraf view of the Mycket D009 radio illustrating its compact dimensions: approximately 5.5 inches (length), 1.6 inches (width), and 3.1 inches (height). The image also highlights its DAB/DAB+/FM and Bluetooth capabilities.
- Görüntülemek: 2.4-inch TFT color display for station information, time, and settings.
- Konuşmacı: Integrated Hi-Fi speaker for audio output.
- Teleskopik Anten: For optimal radio signal reception.
- MOD Düğmesi: Switches between DAB, FM, Bluetooth, USB, and AUX modes.
- Tamam Düğmesi: Seçimleri onaylar veya menülere girer.
- O/M Düğmesi: Power On/Off and Menu access.
- Favori Düğmesi: Accesses favorite presets.
- Sayı Düğmeleri (1-4): Direct access to stored presets.
- Gezinti Düğmeleri (Sol/Sağ): Navigates menus or tunes stations.
- Ses Düğmesi: Ses seviyesini ayarlar.
- DC 5V USB-C Port: Dahili bataryayı şarj etmek için.
- Sıfırlama Düğmesi: Resets the device (use a thin object to press).
- 3.5 mm Kulaklık Girişi: Özel dinleme için.
4. Kurulum
4.1 Pilin Şarj Edilmesi
The radio is equipped with a built-in 2200mAh lithium battery. Before first use, fully charge the device.
- Connect the provided USB charging cable to the DC 5V USB-C port on the side of the radio.
- USB kablosunun diğer ucunu uyumlu bir USB güç adaptörüne (dahil değildir) veya bir bilgisayarın USB portuna bağlayın.
- The charging indicator on the display will show the charging status. A full charge typically takes approximately 2.5 hours and provides up to 12 hours of playback time at 70% volume.

Resim 3: The Mycket D009 radio display showing a full battery indicator, emphasizing its long playback time on a single charge.
4.2 Anten Ayarı
En iyi radyo alımı için teleskopik anteni tamamen açın. En iyi sinyal kalitesi için konumunu ayarlayın.
4.3 İlk Güç Açma
Basılı tutun O/M button to power on the radio. The display will light up, and the device will typically start in the last used mode or initiate a DAB scan if it's the first use.
5. Kullanım Talimatları
5.1 Anahtarlama Modu
Basın MOD button repeatedly to cycle through available modes: DAB, FM, Bluetooth, USB, and AUX.
5.2 DAB/DAB+ Radyo Çalışması
- DAB moduna geçmek için şunu kullanın: MOD düğme.
- The radio will automatically perform a full scan for available DAB/DAB+ stations upon first use or if no stations are found. To initiate a manual scan, press and hold the OK button, then select "Full Scan" from the menu.
- Once the scan is complete, use the navigation buttons (Left/Right) to browse through the list of available stations.
- Basmak OK to select and listen to a station.

Resim 4: The Mycket D009 radio display showing a DAB station and highlighting the auto-scan and 40 preset features (20 DAB & 20 FM).
5.2.1 Storing DAB Presets
The radio supports up to 20 DAB presets.
- Tune to the desired DAB station.
- Press and hold one of the number buttons (1-4) veya FAVORİ button to save the current station to a preset slot. Follow the on-screen prompts to select a slot if using the FAV button.
- To recall a preset, briefly press the corresponding number button or the FAVORİ button and select from the list.
5.3 FM Radyo Çalışması
- FM moduna geçmek için şunu kullanın: MOD düğme.
- FM istasyonlarını otomatik olarak taramak için düğmeye basılı tutun. OK button. The radio will scan and store available stations.
- To manually tune, use the navigation buttons (Left/Right) to adjust the frequency.
- Basmak OK İstasyonu doğrulamak için.
5.3.1 FM Ön Ayarlarını Kaydetme
The radio supports up to 20 FM presets, similar to DAB presets.
- İstediğiniz FM istasyonunu ayarlayın.
- Press and hold one of the number buttons (1-4) veya FAVORİ button to save the current station.
- To recall a preset, briefly press the corresponding number button or the FAVORİ button and select from the list.
5.4 Bluetooth 5.0 Eşleştirme
Connect your smartphone or tablet to the radio via Bluetooth for wireless audio streaming.
- Bluetooth moduna geçmek için şunu kullanın: MOD button. The radio display will show "Bluetooth Pairing" or similar.
- Mobil cihazınızda Bluetooth'u etkinleştirin ve mevcut cihazları arayın.
- Select "Mycket D009" from the list of devices.
- Once paired, the radio will confirm the connection, and you can play audio from your device through the radio.

Resim 5: The Mycket D009 radio displaying "Playing" in Bluetooth mode, next to a smartphone showing "Mycket D009" as a connected Bluetooth device.
5.5 USB Oynatma
MP3 ses çal fileDoğrudan bir USB sürücüsünden.
- MP3 içeren bir USB sürücüsü takın fileUSB bağlantı noktasına takın.
- USB moduna geçmek için şunu kullanın: MOD düğme.
- Radyo, MP3 dosyalarını otomatik olarak algılayacak ve çalmaya başlayacaktır. files. Use the navigation buttons to skip tracks.
5.6 AUX Girişi Bağlantısı
Harici ses cihazlarını 3.5 mm ses kablosu kullanarak bağlayın (kablo dahil değildir).
- Connect one end of a 3.5mm audio cable to the AUX-in port on the radio.
- Diğer ucunu harici cihazınızın kulaklık girişine veya ses çıkışına bağlayın.
- Aşağıdaki komutu kullanarak AUX moduna geçin. MOD düğme.
- Oynatmayı harici cihazınızdan kontrol edin.
5.7 Çalar Saat Fonksiyonu
İki adet bağımsız alarm kurabilirsiniz.
- Basılı tutun O/M Menüye girmek için butona basın.
- Navigate to "Alarm Settings" using the navigation buttons and press OK.
- Alarm 1 veya Alarm 2'yi seçin.
- Set the alarm time, source (DAB, FM, or Buzzer), and volume.
- Ayarları onaylamak için tuşuna basın OK.
5.8 Uyku Zamanlayıcı Fonksiyonu
Radyonun belirli bir süre sonra otomatik olarak kapanmasını ayarlayın.
- Basılı tutun O/M Menüye girmek için butona basın.
- Navigate to "Sleep Timer" and press OK.
- Select the desired duration (e.g., 15, 30, 60 minutes).
- The radio will automatically power off after the set time.
5.9 Kulaklık Kullanımı
Connect 3.5mm headphones to the headphone jack for private listening. The internal speaker will be muted automatically.
6. Bakım
- Temizlik: Radyonun dışını temizlemek için yumuşak ve kuru bir bez kullanın. Aşındırıcı temizleyiciler veya çözücüler kullanmayın.
- Pil Bakım: Pil ömrünü uzatmak için, pili sık sık tamamen boşaltmaktan kaçının. Cihazı uzun süre kullanmasanız bile düzenli olarak şarj edin.
- Depolamak: Radyo cihazınızı serin, kuru ve doğrudan güneş ışığından ve aşırı sıcaklıklardan uzak bir yerde saklayın.
7. Sorun Giderme
| Sorun | Olası Neden | Çözüm |
|---|---|---|
| Elektrik yok / Radyo açılmıyor. | Pil bitmiş. | Radyoyu, kutu içeriğinde bulunan USB kablosuyla şarj edin. |
| Zayıf radyo sinyali (DAB/FM). | Antenna not fully extended or positioned correctly. Weak signal area. | Fully extend and adjust the telescopic antenna. Try moving the radio to a different location. Perform a full scan for stations. |
| Bluetooth eşleştirme başarısız. | Radio not in Bluetooth mode. Device too far. Bluetooth not enabled on external device. | Ensure the radio is in Bluetooth mode. Keep devices within range (approx. 10 meters). Enable Bluetooth on your external device and search for "Mycket D009". |
| Hoparlörden ses gelmiyor. | Ses seviyesi çok düşük. Kulaklık bağlı. | Increase the volume. Disconnect headphones if not intended for private listening. |
| USB üzerinden oynatma çalışmıyor. | USB drive not inserted correctly. Incompatible file Biçim. | USB sürücüsünün tamamen takılı olduğundan emin olun. Kontrol edin ki... fileMP3 formatındadır. |
| Cihaz yanıt vermiyor. | Geçici yazılım hatası. | Press the reset button on the side of the radio using a thin object (e.g., a paperclip). |
8. Özellikler
| Marka | Mycket |
| Örnek | D009 |
| Radyo Modları | DAB, DAB+, FM |
| Bluetooth Sürümü | 5.0 |
| Oynatma Seçenekleri | FM, DAB, DAB+, Bluetooth, USB MP3, AUX-in |
| Hoparlör Çıkış Gücü | 5 Watt |
| Hoparlör Ünitesi | 4 Ω10 W 78 mm x 1 |
| Görüntülemek | 2.4 inç TFT Renkli LCD |
| Ön Ayarlar | 40 (20 DAB, 20 FM) |
| Pil Türü | Built-in Lithium-ion (18650) |
| Pil Kapasitesi | 2200 mAh (3.7V - 2.2 Ah) |
| Oynatma Süresi | Approx. 8-9 hours at 70% volume (up to 12 hours) |
| Şarj Süresi | Yaklaşık 2.5 saat |
| Güç Girişi | USB üzerinden 5V |
| Boyutlar (Ürün) | Yaklaşık 14 cm (U) x 4 cm (G) x 7.8 cm (Y) |
| Çıkış Bağlantıları | 3.5 mm Kulaklık Girişi |
9. Garanti ve Destek
Mycket products are designed for reliability and performance. This product comes with:
- 12-Aylık Garanti: Enjoy a hassle-free 12-month warranty from the date of purchase.
- Müşteri Desteği: For any questions, issues, or support needs, please contact Mycket customer service.
Garanti talepleri için lütfen satın alma belgenizi saklayın.