
giriiş
This manual provides detailed instructions for the installation, operation, and maintenance of your GIGABYTE Z890 AORUS Master AI TOP Motherboard. Designed to support Intel Core Ultra Processors (Series 2), this E-ATX motherboard features DDR5 memory compatibility, multiple M.2 slots, PCIe 5.0 support, Thunderbolt 4, WIFI7, and 10GbE LAN for optimal performance and connectivity. Please read this manual thoroughly before proceeding with installation to ensure proper setup and functionality.

Figure 1: GIGABYTE Z890 AORUS Master AI TOP Motherboard overview.
Temel Özellikler
- İşlemci Desteği: Compatible with Intel Core Ultra Processors (Series 2) for enhanced computing power.
- Hafıza: Four DDR5 DIMM slots with XMP Memory Module Support for high-speed memory configurations.
- Güç Tasarımı: Robust 20+1+2, 110A Smart Power Stage, istikrarlı güç dağıtımı için.
- Isı Yönetimi: Features VRM Thermal Armor Advanced and M.2 Thermal Guard for efficient heat dissipation.
- Bağlantı: Includes PCIe 5.0 slots, four M.2 slots, dual Thunderbolt 4 ports, and a front USB-C port.
- Kullanıcı Dostu Tasarım: Incorporates M.2 EZ-Latch, PCIe EZ-Latch, WIFI EZ-Plug, and EZ-Debug Zone for simplified installation and troubleshooting.
- Ağ oluşturma: Equipped with WIFI7 and 10GbE LAN for high-speed wireless and wired network connections.

Figure 2: GIGABYTE Z890 Motherboards are fully compatible with Intel Core Ultra 200S Plus Processors.
Kurulum ve Yükleme
Follow these steps for proper installation of your GIGABYTE Z890 AORUS Master AI TOP Motherboard and its components.
1. İşlemci Kurulumu
Carefully align your Intel Core Ultra (Series 2) processor with the LGA 1851 socket. Ensure the triangular mark on the CPU matches the mark on the socket. Gently lower the CPU into the socket and secure it with the retention arm.

Şekil 3: Ayrıntılı view of the LGA 1851 processor socket.
2. Bellek (RAM) Kurulumu
Open the clips on both ends of the DDR5 DIMM slots. Align the notch on your DDR5 memory module with the key in the slot. Press down firmly on both ends of the memory module until the clips snap into place, securing the RAM.

Figure 4: DDR5 memory slots for RAM installation.
3. Depolama (M.2 SSD'ler) Kurulumu
The motherboard features four M.2 slots. Remove the M.2 Thermal Guard heatsink. Insert your M.2 SSD into the slot, ensuring it is fully seated. Secure the SSD with the EZ-Latch mechanism, then reattach the Thermal Guard heatsink.
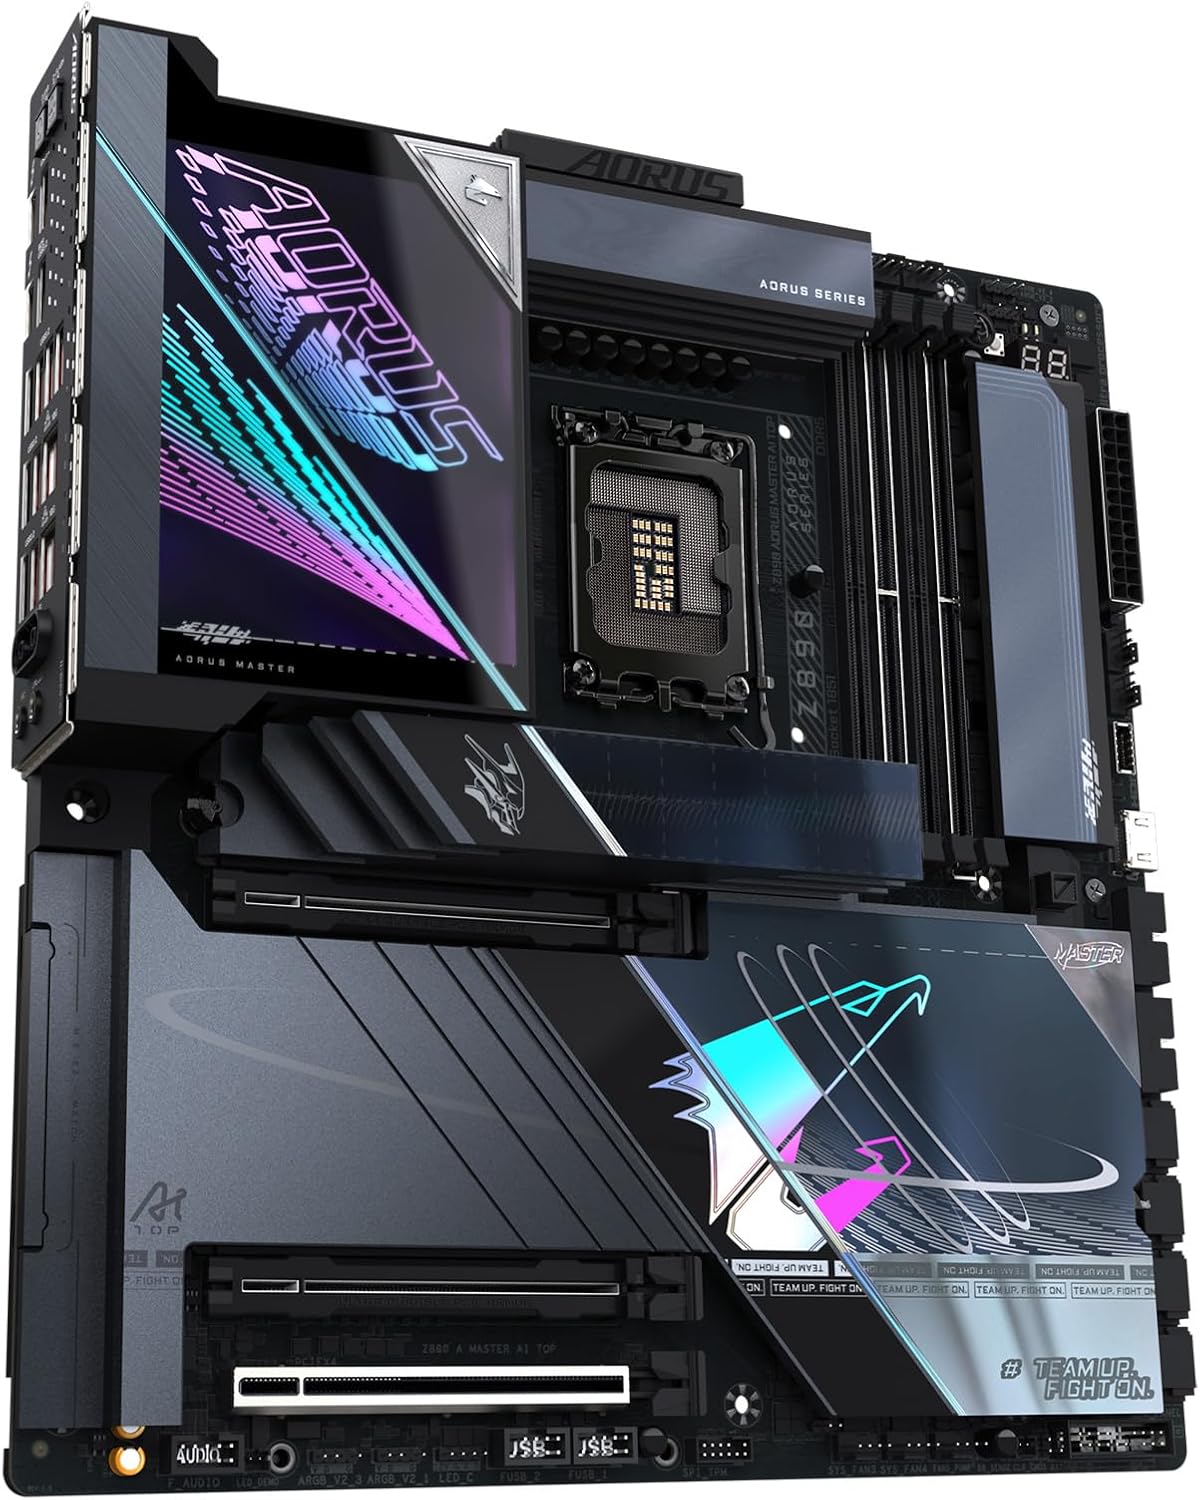
Figure 5: M.2 slots with heatsinks for high-speed storage.
4. Grafik Kartı (PCIe) Kurulumu
Open the PCIe EZ-Latch on the desired PCIe 5.0 x16 slot. Insert your graphics card firmly into the slot until it clicks into place. Ensure any necessary power connectors from your power supply are attached to the graphics card.

Figure 6: PCIe 5.0 slots for graphics cards and expansion.
5. Çevre Birimlerini ve Gücü Bağlama
Connect all necessary power cables from your power supply to the motherboard (24-pin ATX and 8-pin CPU power connectors). Connect your case's front panel connectors, USB ports, and audio jacks. Utilize the various USB, Thunderbolt 4, and LAN ports on the rear I/O panel for external devices.

Figure 7: Rear I/O panel with USB, LAN, and audio ports.

Figure 8: Detailed diagram illustrating various ports and features on the motherboard.
Kurulum Video Kılavuzu
For a visual guide on motherboard installation, refer to the video below. While the video may feature a slightly different model (Z790), the general installation steps for CPU, RAM, and other components are largely similar.
Video 1: Motherboard installation overview. This video demonstrates the general process of installing a GIGABYTE AORUS Master motherboard, including CPU and RAM.
Kullanım Talimatları
After successful hardware installation, connect your display, keyboard, and mouse. Power on your system. The motherboard will initiate the Power-On Self-Test (POST). You may need to access the BIOS/UEFI setup to configure boot order, enable XMP for memory, or adjust other system settings. Refer to the GIGABYTE website for the latest BIOS updates and driver downloads for your operating system (e.g., Windows 11).
- BIOS/UEFI Erişimi: Typically accessed by pressing SİL or F2 during system startup.
- Sürücü Kurulumu: Install all necessary drivers for chipset, audio, LAN, and graphics from the GIGABYTE support website or the included driver disk.
- İşletim Sistemi: Install your preferred operating system, such as Windows 11, following its installation prompts.
Bakım
Düzenli bakım, anakartınızın uzun ömürlü olmasını ve en iyi performansı göstermesini sağlar.
- Toz Giderimi: Anakart ve bileşenlerin tozunu basınçlı hava kullanarak düzenli olarak temizleyin. Temizlemeden önce sistemin kapalı ve fişinin çekilmiş olduğundan emin olun.
- BIOS Güncellemeleri: GIGABYTE'ı kontrol edin website for BIOS updates. Updates can improve stability, compatibility, and performance. Follow the provided instructions carefully when updating the BIOS.
- Sürücü Güncellemeleri: Yeni yazılım ve donanımlarla uyumluluğu ve optimum performansı garantilemek için tüm sistem sürücülerini güncel tutun.
- Kablo yönetimi: Hava akışını iyileştirmek ve paraziti önlemek için tüm kabloların düzgün bir şekilde yönlendirildiğinden emin olun.
Sorun giderme
If you encounter issues, refer to these common troubleshooting steps.
- Güç Yok/POST Yok:
- Verify all power cables are securely connected to the motherboard and components.
- Check the power supply unit (PSU) for proper function.
- CPU ve RAM'in doğru şekilde takıldığından emin olun.
- Utilize the EZ-Debug Zone LEDs on the motherboard to identify the component causing the POST failure.
- Sistem Kararsızlığı/Çökmeler:
- Check RAM for proper installation and run memory diagnostic tools.
- Ensure CPU and GPU temperatures are within normal operating ranges.
- BIOS'unuzu ve tüm sürücülerinizi en son sürümlere güncelleyin.
- Test components individually if possible to isolate the faulty part.
- Çevresel Algılama Sorunları:
- Ensure USB devices are connected to the correct ports.
- Check for updated drivers for the specific peripheral.
- Verify BIOS settings for USB or other port configurations.
Özellikler
| Özellik | Detay |
|---|---|
| Marka | GIGABYTE |
| Model Adı | Z890 AORUS MASTER AI TOP |
| CPU Soketi | Intel LGA1851 |
| Uyumlu İşlemciler | Intel Core Ultra İşlemciler (Seri 2) |
| Yonga Seti Türü | Intel Z890 |
| RAM Bellek Teknolojisi | DDR5 |
| Bellek Saat Hızı | 5600 MHz |
| Mevcut Bellek Yuvaları | 4 |
| Grafik Kartı Arayüzü | PCI Ekspres |
| Total PCIe Ports | 4 |
| Total M.2 Slots | 4 |
| Toplam SATA Bağlantı Noktası Sayısı | 4 |
| Toplam USB Bağlantı Noktaları | 10 (including Thunderbolt 4 and Front USB-C) |
| Ağ oluşturma | WIFI7, 10GbE LAN |
| Platform | Windows 11 |
| Form Faktörü | E-ATX |
Garanti ve Destek
The GIGABYTE Z890 AORUS Master AI TOP Motherboard comes with a 5 Yıllık Üretici Garantisi. For technical support, driver downloads, BIOS updates, and further assistance, please visit the official GIGABYTE support website. You can also refer to the comprehensive online resources and FAQs available there.
For warranty claims, retain your proof of purchase. Contact GIGABYTE customer service for detailed instructions on warranty procedures.