1. Giriş
This manual provides comprehensive instructions for the installation, operation, and maintenance of your NEO Zigbee Contact Sensor (Model NAS-DS09). This device is designed to enhance your home security and automation by detecting the open or closed status of doors and windows.
2. Ürün Bittiview
2.1. Bileşenler
- Ana Sensör Ünitesi
- Auxiliary Unit (Magnet)
- AA Battery (1.5V)
- Yapışkan Pedler
- Kullanım Kılavuzu

Figure 2.1: What's in the box. Includes the main sensor unit, auxiliary magnet, AA battery, and instruction manual.
2.2. Temel Özellikler
- Precise Detection: Maximum effective gap of 20mm between main and auxiliary units for accurate open/close status monitoring.
- Uzun Pil Ömrü: Powered by a single AA battery for extended operation.
- Manual Disable: Features an ON/OFF switch for convenient power management and energy saving.
- Akıllı Ev Entegrasyonu: Compatible with Zigbee hubs and platforms such as SmartThings, Home Assistant, Alexa, and Google Assistant.
- Gerçek Zamanlı Uyarılar: Receive instant notifications on your smart device when a door or window status changes.
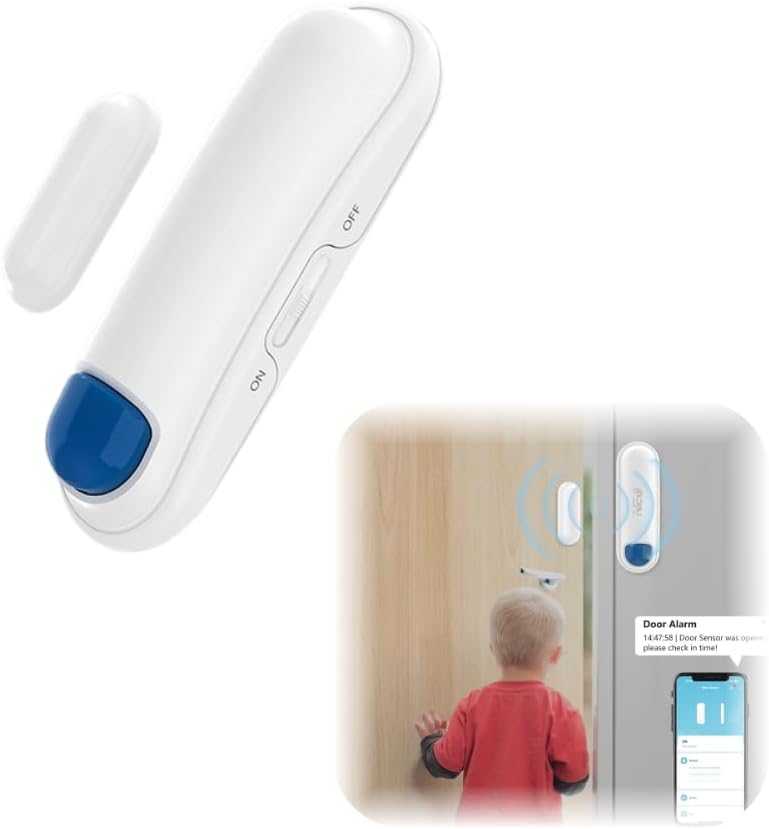
Figure 2.2: The NEO Zigbee Contact Sensor (main unit and auxiliary magnet) and an illustration of its use for door monitoring.
3. Kurulum ve Kurulum
3.1. Ön koşullar
- A compatible Zigbee hub (e.g., SmartThings, Home Assistant).
- A smartphone or tablet with the appropriate smart home application installed.
3.2. Pil Kurulumu
- Gently open the main sensor unit casing.
- Insert one AA LR6 1.5V battery, ensuring correct polarity (+/-).
- c'yi kapatasing güvenli bir şekilde.

Figure 3.1: The main sensor unit showing the ON/OFF switch and the AA battery power supply.
3.3. Sensörün Montajı
- Identify a clean, dry, and flat surface on your door/window frame (for the main unit) and the moving part of the door/window (for the auxiliary unit).
- Clean both surfaces thoroughly to ensure optimal adhesion.
- Attach the main sensor unit to the fixed frame using the provided adhesive pad.
- Attach the auxiliary unit (magnet) to the moving part of the door or window, aligning it with the main sensor unit.
- Ensure the gap between the main unit and the auxiliary unit is no more than 20mm when the door/window is closed.

Figure 3.2: Proper installation of the Zigbee Contact Sensor on a door, with the main unit on the frame and the magnet on the door.

Figure 3.3: Illustration of the sensor detecting open and closed states, highlighting the maximum effective distance.
4. Eşleştirme Talimatları
To integrate your NEO Zigbee Contact Sensor into your smart home system, follow these pairing steps:
- Ensure your Zigbee hub is powered on and connected to your home network.
- Open your smart home application (e.g., SmartThings, Home Assistant) and put your Zigbee hub into pairing or discovery mode. Refer to your hub's specific instructions for this process.
- With the sensor powered on (ON switch position), activate the sensor's pairing mode. This typically involves a specific button press or sequence on the sensor itself. Consult the small instruction leaflet included with your sensor for the exact method.
- Once the sensor is in pairing mode, your Zigbee hub should detect it. Follow the prompts in your smart home application to complete the pairing process.
- After successful pairing, the sensor will appear in your smart home application, and you can assign it to a room or create automation rules.
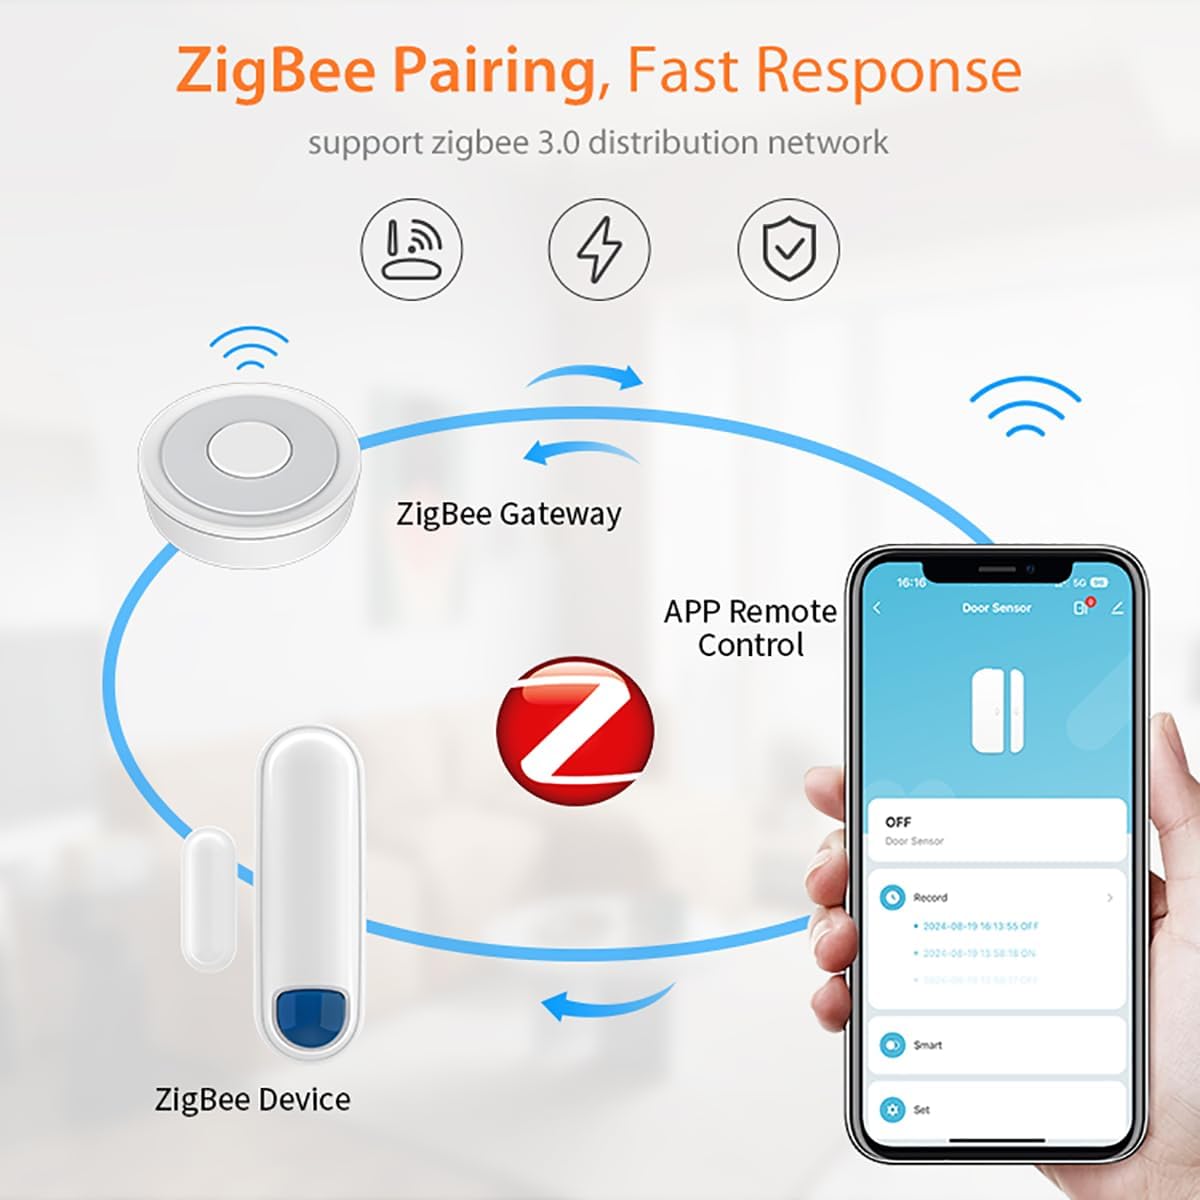
Figure 4.1: Diagram illustrating the Zigbee pairing process between the sensor, a Zigbee gateway, and remote control via a smartphone application.

Figure 4.2: Visual representation of adding the sensor to a Zigbee network, showing the router, gateway, and sensor connection.
5. Operasyon
5.1. Status Monitoring
Once paired, the sensor will continuously monitor the open/close status of the door or window it is installed on. This status is reported to your Zigbee hub and displayed in your smart home application.

Figure 5.1: Remote control of the sensor via a smartphone application, allowing monitoring from anywhere.
5.2. Real-time Alerts and Notifications
Configure your smart home application to receive instant alerts and notifications on your smartphone or tablet whenever the sensor detects a change in status (e.g., a door opening). This feature is crucial for security monitoring.

Figure 5.2: A smartphone displaying a real-time notification indicating a door or window has been opened.
5.3. Automation and Voice Control
Leverage the sensor's compatibility with platforms like SmartThings, Home Assistant, Alexa, and Google Assistant to create automation routines. For examptarih:
- Turn on lights when a door opens (requires a smart plug or smart lighting).
- Receive voice announcements when a window is opened.
- Integrate with other security devices.

Şekil 5.3: Ör.ample of a linkage alarm system where a door sensor triggers a smart power plug via a gateway to turn on a light.
5.4. Manual Disable Feature
The sensor includes an ON/OFF switch. Set the switch to "OFF" to temporarily disable the sensor, which can be useful during maintenance or when you do not require active monitoring, helping to conserve battery life.
6. Bakım
6.1. Pil Değişimi
When the battery level is low, your smart home application may notify you. To replace the battery:
- Set the sensor's ON/OFF switch to "OFF".
- Gently open the main sensor unit casing.
- Remove the old AA LR6 1.5V battery.
- Insert a new AA LR6 1.5V battery, ensuring correct polarity.
- c'yi kapatasing güvenli bir şekilde.
- Set the ON/OFF switch back to "ON".
Eski pilleri yerel yönetmeliklere uygun şekilde atın.
7. Sorun Giderme
- Sensor not pairing with hub:
- Ensure the Zigbee hub is in pairing mode.
- Verify the sensor has a fresh battery and is powered ON.
- Bring the sensor closer to the Zigbee hub during the pairing process.
- Try resetting the sensor (refer to the small instruction leaflet for reset procedure).
- Inaccurate open/close detection:
- Check the alignment of the main unit and auxiliary magnet. They should be parallel.
- Measure the gap between the two units when closed. It must be within the 20mm effective distance.
- Ensure the mounting surfaces are stable and not allowing movement that affects alignment.
- Kısa pil ömrü:
- Ensure the sensor's ON/OFF switch is set to "OFF" when not in use for extended periods.
- Verify the battery type is AA LR6 1.5V and is new.
- Aşırı sıcaklıklar pil performansını etkileyebilir.
- No alerts or notifications:
- Check your smart home application's notification settings for the sensor.
- Ensure your smartphone/tablet has notifications enabled for the smart home app.
- Verify the sensor is still paired and reporting status correctly in the app.
8. Özellikler
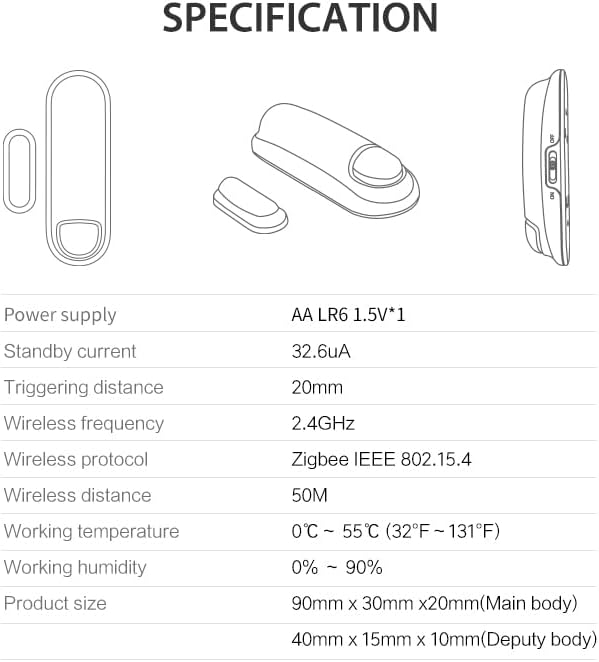
Figure 8.1: Technical specifications of the NEO Zigbee Contact Sensor.
| Güç Kaynağı | AA LR6 1.5V * 1 |
| Bekleme Akımı | 32.6uA |
| Triggering Distance | 20mm |
| Kablosuz Frekans | 2.4 GHz |
| Kablosuz İletişim Kuralı | Zigbee IEEE 802.15.4 |
| Kablosuz Mesafe | 50M |
| Çalışma Sıcaklığı | 0°C ~ 55°C (32°F ~ 131°F) |
| Çalışma Nemi | %0 ~ %90 |
| Ana Gövde Boyutları | 90mm x 30mm x 20mm |
| Auxiliary Body Dimensions | 40mm x 15mm x 10mm |
| Uyumlu Cihazlar | Home Assistant, SmartThings, Alexa, Google Assistant |
9. Garanti ve Destek
For warranty information and customer support, please refer to the documentation provided at the point of purchase or visit the official NEO webalan. Garanti talepleri için satın alma makbuzunuzu saklayın.


