
1. Ürün Bittiview
The Riokko YM119 OBD2 Scanner is a diagnostic tool designed for car owners to easily read and clear engine fault codes. It provides real-time data, freeze frame information, and supports various diagnostic functions for OBDII/EOBD compliant vehicles manufactured since 1996. Its intuitive interface and compact design make it suitable for both professional technicians and home users.

Figure 1.1: Riokko YM119 OBD2 Scanner. This image shows the main diagnostic tool with its color screen, control buttons, and the attached OBDII connector cable.
2. Kurulum ve İlk Kullanım
2.1 Paket İçeriği
- Riokko YM119 OBD2 Scanner Unit
- Kullanım Kılavuzu (bu belge)
2.2 Tarayıcının Bağlanması
- Aracın Veri Bağlantı Konnektörünü (DLC) bulun. Bu genellikle sürücü tarafındaki gösterge panelinin altında bulunur.
- Ensure the vehicle's ignition is turned ON (engine can be off or running, depending on the test).
- Plug the OBDII connector of the YM119 scanner firmly into the vehicle's DLC. The scanner will power on automatically.
2.3 Dil Seçimi
The YM119 supports 13 national languages. To change the language:
- From the main menu, navigate to "Setting" using the arrow keys.
- Basın OK button to enter the Setting menu.
- "Dil" seçeneğini belirleyin ve listeden tercih ettiğiniz dili seçin.
- Basmak OK Seçiminizi onaylamak için.
3. Tarayıcının Çalıştırılması
3.1 Gezinme Düğmesi
- ÇIKIŞ: Returns to the previous screen or main menu.
- YUKARI/AŞAĞI Okları: Menü seçenekleri arasında gezinin.
- Sol/Sağ Oklar: Navigate through data screens or adjust settings.
- OK: Seçimi onaylar veya bir alt menüye girer.
- YARASA: Initiates the battery voltage testi.

Figure 3.1: Main Menu and Professional Functions. This image illustrates the scanner's main menu interface and highlights its key diagnostic capabilities such as Engine Fault Diagnostics, Quick Clear Fault Code, Real-time Data Stream, and Battery Life Test.
3.2 Tanılama İşlevleri
From the main menu, select "Diagnosis" to access the primary diagnostic functions.

Figure 3.2: OBD II Diagnostic Test Items. This image shows the comprehensive list of diagnostic tests available on the scanner, from reading and erasing codes to advanced sensor and component tests.
3.2.1 Kodları Oku
This function retrieves Diagnostic Trouble Codes (DTCs) from the vehicle's computer. These codes indicate specific issues detected by the vehicle's onboard diagnostic system.
- Select "Read Codes" from the Diagnosis menu.
- Tarayıcı, kaydedilmiş, beklemede olan veya kalıcı tüm arıza kodlarını (DTC) gösterecektir.
- Kullanın YUKARI/AŞAĞI arrows to scroll through the codes.
- For detailed information on a specific code, use the "DTC Lib" function or refer to a reliable automotive repair database.
3.2.2 Açık Kodlar
This function erases DTCs from the vehicle's computer and turns off the Malfunction Indicator Lamp (MIL), diğer adıyla Motor Arıza Lambası. Note: Clearing codes does not fix the underlying problem. The MIL will illuminate again if the fault persists.

Figure 3.3: Check and Turn Off Engine Light. This image demonstrates the scanner's ability to diagnose and clear engine fault codes, effectively turning off the Check Engine Light on the vehicle's dashboard.
- Select "Erase Codes" from the Diagnosis menu.
- İstendiğinde eylemi onaylayın.
- The MIL should turn off.
3.2.3 Real-time Data (Live Data Stream)
View real-time sensor data from the vehicle's engine control unit (ECU). This data can be displayed in text or graphical format, allowing for dynamic monitoring of vehicle performance.
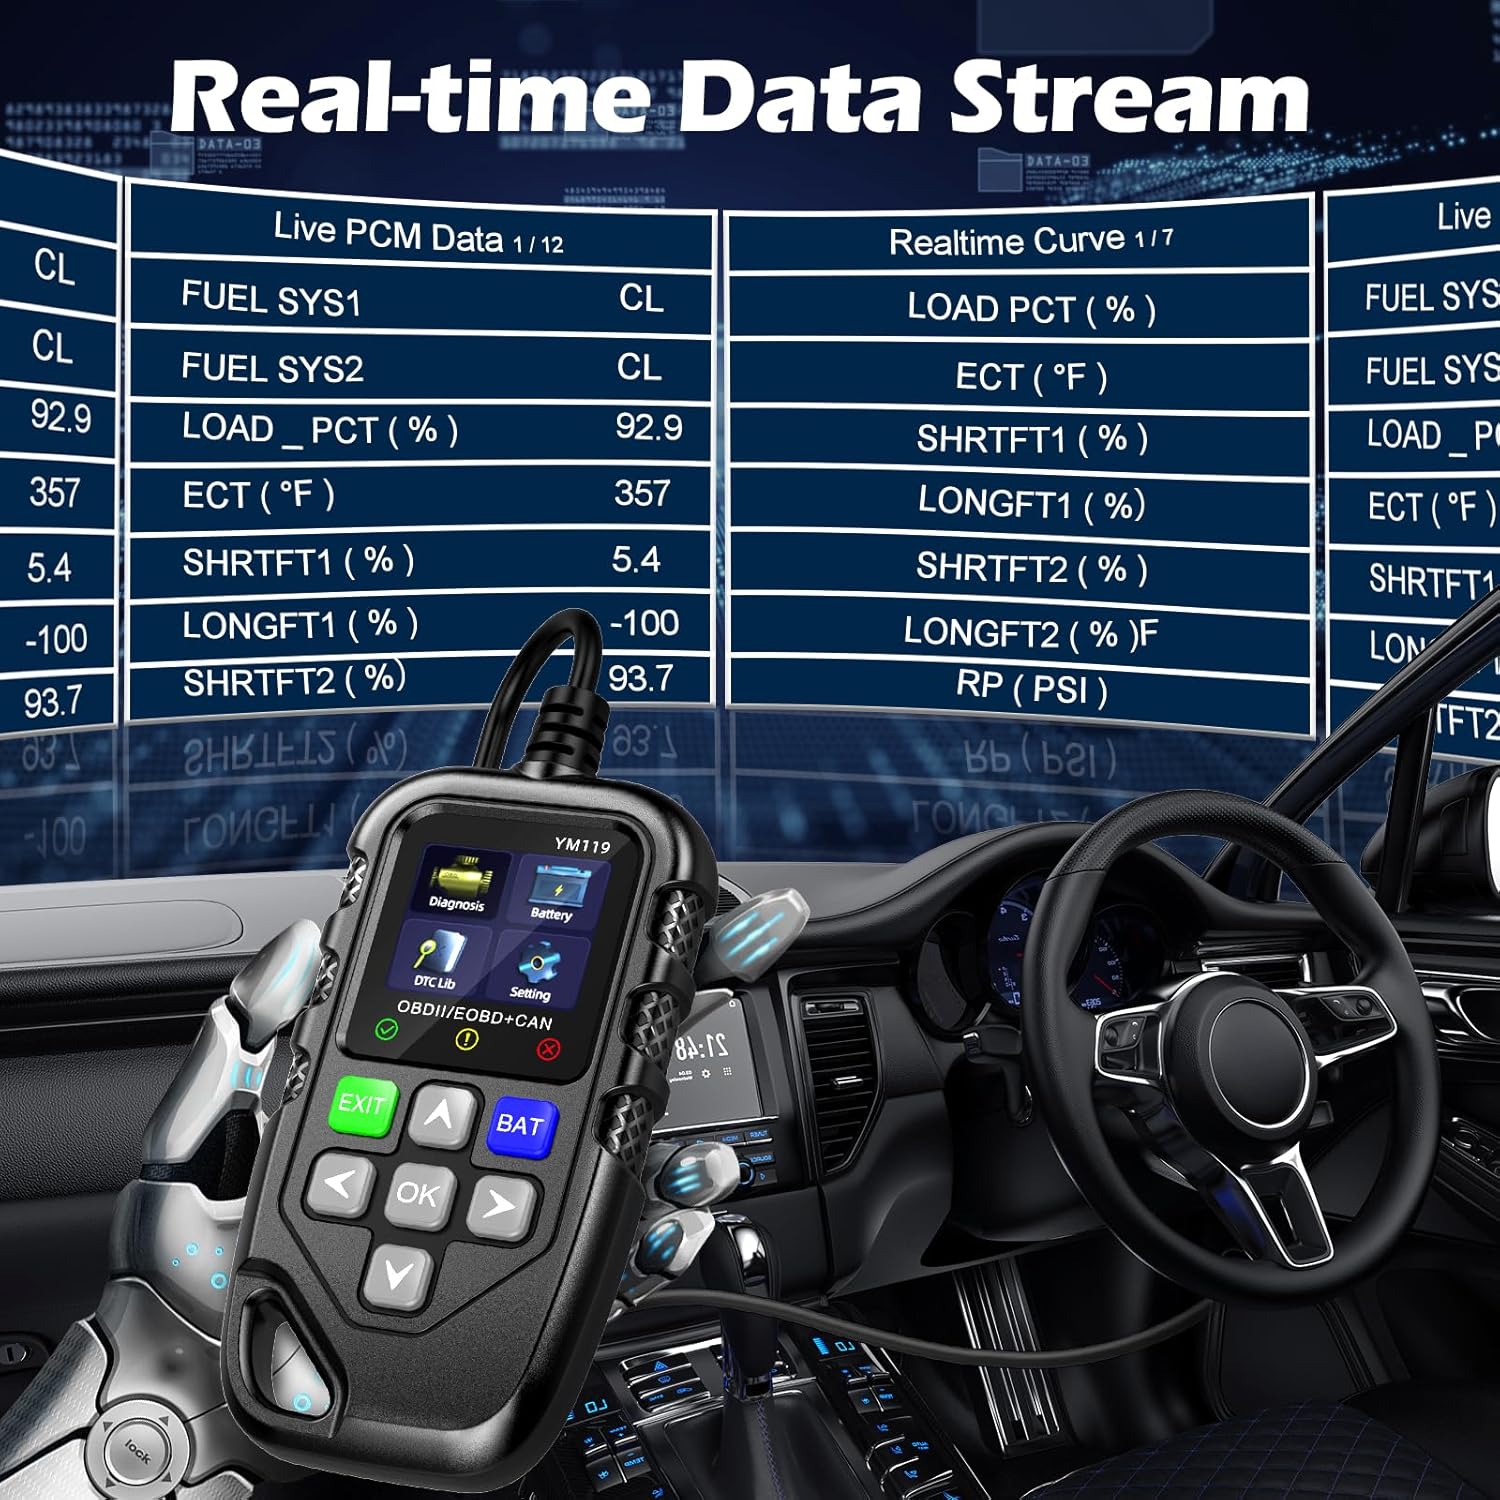
Figure 3.4: Real-time Data Stream. This image shows the scanner's capability to display live engine data, including various sensor readings and their corresponding real-time curves, aiding in dynamic vehicle diagnostics.
- Select "Live Data" or "Realtime Curve" from the Diagnosis menu.
- Kullanın YUKARI/AŞAĞI arrows to scroll through different data parameters.
- Kullanın SOL/SAĞ arrows to switch between text and graph views (if available for the parameter).
3.2.4 Dondurulmuş Kare Verileri
When an emission-related fault occurs, the vehicle's computer records a snapshot of operating conditions at the time of the fault. This "freeze frame" data helps in diagnosing intermittent problems.
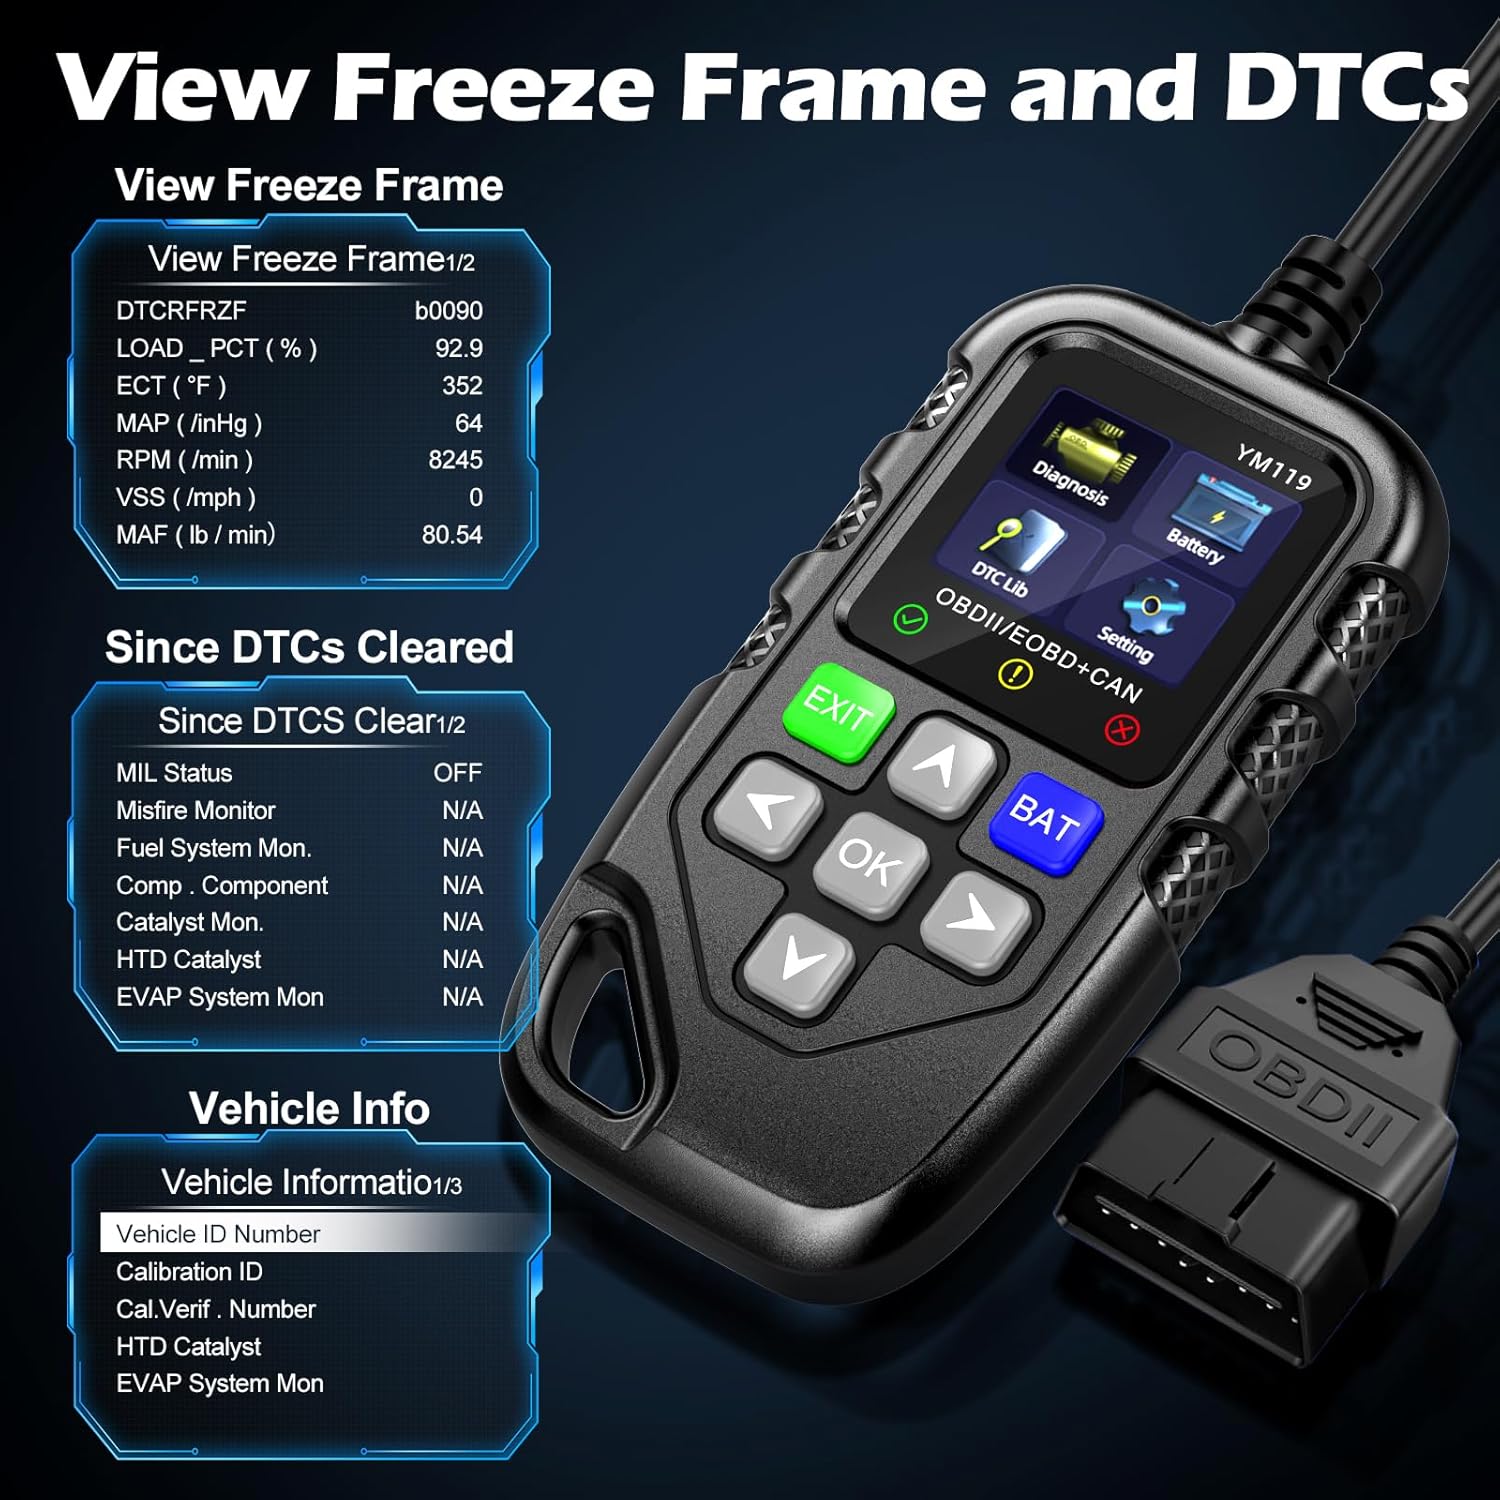
Şekil 3.5: View Freeze Frame and DTCs. This image displays the scanner's ability to capture and show freeze frame data, which provides a snapshot of engine conditions at the moment a fault code was set, aiding in diagnosis.
- Seçme "View Freeze Frame" from the Diagnosis menu.
- Review the recorded parameters.
3.2.5 DTC Query (DTC Lib)
The built-in DTC Library allows you to look up definitions for generic (P0, P2, P34, B0, C0, U0) and manufacturer-specific (P1, P30-P33, B1, C1, U1) codes.
- From the main menu, select "DTC Lib".
- Enter the DTC code using the arrow keys and OK düğme.
- Tarayıcı, kodun tanımını gösterecektir.
3.2.6 I/M Hazırlık
This function checks the readiness of the emission-related monitoring systems on the vehicle. It's useful for determining if the vehicle is ready for an emissions test.
- Select "I/M Readiness" from the Diagnosis menu.
- The scanner will display the status of various monitors (e.g., Misfire Monitor, Fuel System Monitor). "OK" indicates the monitor has completed its test, "INC" indicates incomplete, and "N/A" indicates not applicable.
3.2.7 Pil Hacmitage testi
The YM119 can perform a basic battery voltage test to assess the vehicle's battery health.

Figure 3.6: Estimate Battery Life Test. This image shows the scanner's dedicated function for monitoring and assessing the vehicle's battery voltage and overall health.
- From the main menu, select "Battery" or press the YARASA düğme.
- Tarayıcı mevcut pil seviyesini gösterecektir.tage.
3.2.8 Araç Bilgileri
Bu fonksiyon, aracın Araç Kimlik Numarasını (VIN), Kalibrasyon Kimliğini (CALID) ve Kalibrasyon Doğrulama Numarasını (CVN) alır.
- Select "Vehicle Info" from the Diagnosis menu.
- Tarayıcı, mevcut araç bilgilerini görüntüleyecektir.
4. Bakım
4.1 Cihazın Temizlenmesi
To maintain the scanner's performance and appearance:
- Üniteyi yumuşak, damp Kumaş.
- Aşındırıcı temizleyiciler veya çözücüler kullanmayınız.
- Saklamadan önce cihazın tamamen kuru olduğundan emin olun.
4.2 Depolama
Store the scanner in a clean, dry environment away from extreme temperatures and direct sunlight. Keep the OBDII connector free from dust and debris.
5. Sorun Giderme
| Sorun | Olası Neden | Çözüm |
|---|---|---|
| Tarayıcı açılmıyor. |
|
|
| "Bağlantı Hatası" veya "İletişim Hatası" mesajı. |
|
|
| Engine light reappears after clearing codes. | Underlying fault has not been repaired. | Clearing codes only turns off the light; it does not fix the problem. Diagnose and repair the underlying issue before clearing codes again. |
| Inaccurate or missing data readings. |
|
|
6. Özellikler
| Özellik | Detay |
|---|---|
| Model Numarası | AE0004L (YM119) |
| Marka | Riokko |
| Ekran Boyutu | 2.8 inç |
| Desteklenen Protokoller | Nine standard OBDII/EOBD protocols |
| Desteklenen Diller | 13 ulusal dil |
| Ürün Ağırlığı | 7.8 ons (yaklaşık 221 gram) |
| Paket Boyutları | 8.11 x 5.35 x 1.14 inç (yaklaşık 20.6 x 13.6 x 2.9 cm) |
| İlk Mevcut Tarih | 16 Ekim 2024 |
7. Garanti ve Destek
7.1 Garanti Bilgileri
The Riokko YM119 OBD2 Scanner comes with a 3 yıllık garanti satın alma tarihinden itibaren. Bu garanti, normal kullanımda malzeme ve işçilikteki kusurları kapsar.
7.2 İade Politikası
A 30 gün koşulsuz iade politikası is offered for your purchase. Please refer to your retailer's specific return instructions.
7.3 Müşteri Desteği
For technical assistance, warranty claims, or any other inquiries, please contact Riokko customer service. 24/7 müşteri hizmetleri Size yardımcı olmak için hazırız.
Please visit the official Riokko webEn güncel iletişim bilgileri için lütfen web sitemizi ziyaret edin veya ürün ambalajına bakın.