
giriiş
This manual provides essential information for the installation, operation, and maintenance of your KICKER CXA400.1 Mono Class D Car Amplifier and CXARC Remote Bass Control. Please read this manual thoroughly to ensure proper use and to achieve optimal performance from your audio system.

Resim: Üst view of the KICKER CXA400.1 Mono Class D Car Ampcankurtaran.
The KICKER CXA400.1 amplifier is designed for efficient power delivery to subwoofers, featuring a Class-D power plant and a compact design. The KICKER CXARC remote control allows for convenient adjustment of bass levels.
Güvenlik Bilgileri
Kurulum ve çalıştırma sırasında aşağıdaki güvenlik önlemlerine her zaman uyun. ampkaldırıcı:
- Disconnect the vehicle's battery negative terminal before making any electrical connections.
- Hasar veya kısa devreleri önlemek için tüm kabloların doğru şekilde yönlendirildiğinden ve sabitlendiğinden emin olun.
- Kurulum bölümünde belirtildiği gibi uygun kalınlıkta güç ve topraklama kabloları kullanın.
- monte etmekten kaçının amplifier in locations exposed to excessive heat, moisture, or vibration.
- Çalıştırmayın amplifier if it is damaged or malfunctioning. Refer to the troubleshooting section or contact KICKER support.
- Prolonged exposure to high sound pressure levels can cause permanent hearing loss. Use caution when adjusting volume levels.
Paket İçeriği
Paketinizde tüm öğelerin mevcut olduğundan emin olun:
- KICKER CXA400.1 Mono Class D Car Ampcankurtaran
- KICKER CXARC Remote Bass Control
- Mounting Hardware (screws, vertical mounting brackets)
- Kullanım Kılavuzu (bu belge)
Kurulum ve Yükleme
Proper installation is crucial for optimal performance and safety. If you are unsure about any part of the installation process, consult a professional installer.
Montajı Ampcankurtaran
The CXA400.1 amplifier features a compact design and includes vertical mounting hardware for flexible installation options. Choose a location that is dry, well-ventilated, and protected from direct sunlight or excessive heat. Ensure there is sufficient space around the amphava sirkülasyonu için lifier.
Kablolama Bağlantıları
All wiring should be done with the vehicle's battery disconnected. Use high-quality power, ground, and speaker wires of appropriate gauge.

Resim: View of the KICKER CXA400.1 amplifier showing RCA input/output and control panel.
- Güç Bağlantısı: Connect the main power wire from the battery (with an inline fuse) to the ampAmplifikatörün +12V terminali.
- Topraklama: Kalın telli kısa bir topraklama kablosunu şuradan bağlayın: amplifier's GND terminal to a clean, bare metal point on the vehicle's chassis.
- Uzaktan Açma: Bağlan amplifier's REM terminal to the remote turn-on output of your head unit.
- Giriş sinyali: The CXA400.1 accepts both low-level (RCA) and high-level (speaker wire) input signals. It can accept up to 40 volts of speaker-level input, eliminating the need for line-out converters in many cases. Connect your head unit's RCA outputs to the amplifier's INPUT terminals for low-level input, or use the high-level input if your head unit does not have RCA outputs.
- Hoparlör Çıkışı: Subwoofer(lar)ınızı şuraya bağlayın: amplifier's speaker output terminals. Ensure correct polarity.

Resim: Yan view of the KICKER CXA400.1 ampAmplifikatörde güç, topraklama, uzaktan kumanda ve hoparlör terminalleri gösterilmektedir.
Başlangıç Ayarları
After all connections are made, reconnect the vehicle's battery. Before playing audio, set the amplifier's gain control to its minimum position. Adjust other settings like crossover and bass boost as needed for your specific audio setup.
Çalıştırma Amplifier and Bass Knob
The KICKER CXA400.1 amplifier offers several adjustable features to fine-tune your audio experience. The CXARC remote bass control provides convenient real-time adjustments.
Kazanç Kontrolü
Kazanç kontrolü şu şekilde eşleşir: amplifier's input sensitivity to the output level of your head unit. Start with the gain at minimum and slowly increase it until you hear distortion, then back off slightly. This ensures maximum clean signal from your head unit.
Geçiş Ayarları
The amplifier features a variable 12dB low-pass crossover (50Hz–200Hz). This filter allows only frequencies below the set point to pass to the subwoofer, preventing higher frequencies from reaching it and improving overall sound clarity. Adjust this to blend smoothly with your main speakers.
Sesaltı Filtre
A 24dB/octave subsonic filter set at 25Hz helps protect your subwoofer by removing extremely low, inaudible frequencies that can cause excessive cone excursion and potential damage. It also improves efficiency by preventing the amplifier from wasting power on these frequencies.
KickEQ Bas Güçlendirme
The KickEQ offers a variable 0-6dB bass boost centered at 40Hz. Use this feature to enhance low-frequency response. Adjust carefully to avoid distortion and speaker damage.
CXARC Remote Bass Control
The CXARC remote bass control connects to your CXA400.1 amplifier and allows you to adjust the bass level conveniently from the driver's seat. This provides on-the-fly control over your subwoofer's output without needing to access the ampdoğrudan lifier.
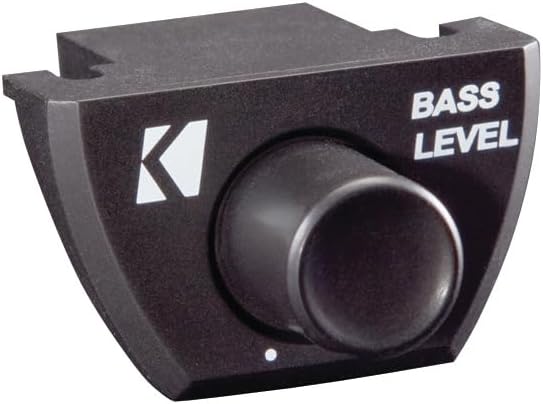
Image: The KICKER CXARC Remote Bass Control knob.
Bakım
Your KICKER amplifier and bass knob require minimal maintenance to ensure long-lasting performance.
- Temizlik: Periyodik olarak silin amplifier and remote with a soft, dry cloth to remove dust and dirt. Do not use harsh chemicals or abrasive cleaners.
- Bağlantılar: Kabloların tüm bağlantılarını periyodik olarak kontrol ederek sağlam ve korozyondan arınmış olduklarından emin olun. Gevşek bağlantılar düşük performansa veya hasara yol açabilir.
- Havalandırma: Şunların sağlanmasını temin edin: amplifier's cooling fins are not obstructed to allow for proper heat dissipation.
Sorun giderme
If you experience issues with your KICKER ampYaşam tarzınızı geliştirmek için aşağıdaki yaygın sorunlara ve çözümlere bakın:
- Güç Yok: Check the inline fuse on the power wire, ensure the ground connection is solid, and verify the remote turn-on wire is receiving 12V when the head unit is on.
- Ses Yok: Check all input and output connections. Ensure the gain is not set to minimum. Verify the head unit is sending an audio signal. Check speaker wires for shorts or open circuits.
- Bozuk Ses: Reduce the gain setting. Check for proper crossover and bass boost settings. Ensure the input signal is not overdriven.
- AmpAmperiyer Aşırı Isınma: Çevresinde yeterli havalandırma olduğundan emin olun. amplifier. Check the impedance of your speakers; ensure it matches the ampLifier'ın yetenekleri.
- Remote Bass Knob Not Working: Check the connection cable between the CXARC and the ampkaldırıcı. emin olun amplifier açık.
If problems persist after checking these points, contact KICKER customer support.
Özellikler
| Özellik | Şartname |
|---|---|
| Güç Çıkışı (RMS) | 150x1 watts/ch at 4 Ohms, 300x1 watts/ch at 2 Ohms, 400x1 watts/ch at 1 Ohm |
| Frekans Tepkisi | 25-200Hz |
| Giriş Hassasiyeti | 250mV-10V (Low Level), 1V-40V (High Level) |
| Sinyal-Gürültü Oranı | >95dB |
| Aktif Geçiş | Değişken Lo-pass 50Hz–200Hz, 12dB/oktav |
| Sesaltı Filtre | 25Hz @24dB/octave |
| KickEQ Boost | Variable 0-6dB @40Hz |
| Boyutlar | 8-1/8" x 5.9" x 17" (20.6cm x 15cm x 43cm) |
| Ürün Ağırlığı | 5.3 pound |
| Model Numarası | KickerBDL240611-01 (Bundle) |
Garanti
The KICKER CXA400.1 Amplifier and CXARC Bass Knob are covered by a 1 Yıllık Üretici Garantisi. This warranty covers defects in materials and workmanship under normal use. Please retain your proof of purchase for warranty claims. For specific warranty terms and conditions, refer to the documentation included with your product or visit the official KICKER webalan.
Destek
For technical assistance, troubleshooting, or warranty inquiries, please contact KICKER customer support. You can find contact information and additional resources on the official KICKER website. When contacting support, please have your product model number (CXA400.1, CXARC) and proof of purchase readily available.
Ziyaret edin KICKER Store on Amazon Daha fazla ürün ve bilgi için.