
1. Giriş
This manual provides essential information for the safe and effective operation of your Mastech MS8301A Digital Multimeter. Please read this manual thoroughly before using the device to ensure proper functionality and to prevent potential hazards. Keep this manual for future reference.
2. Güvenlik Bilgileri
Always adhere to the following safety precautions to avoid electric shock or personal injury, and to prevent damage to the multimeter or the equipment under test.
- Talimatları okuyun: Understand all instructions and safety information before use.
- Anma Hacmitage: Nominal hacimden fazlasını uygulamayıntage, multimetre üzerinde işaretlendiği gibi, terminaller arasında veya herhangi bir terminal ile toprak arasında.
- Test Uçları: Test uçlarında hasarlı yalıtım veya açıkta metal olup olmadığını kontrol edin. Hasarlıysa değiştirin.
- Devre Bağlantısının Kesilmesi: Devre gücünü kesin ve tüm yüksek voltajlı kabloları boşaltın.tage direnç, süreklilik, diyotlar veya kapasitans testinden önce kapasitörler.
- İşlev Seçimi: Ölçüm sırasında fonksiyon anahtarının doğru konumda olduğundan emin olun.
- Canlı Devreler: Do not measure current on a live circuit with the test leads connected in parallel.
- Çalışma Ortamı: Do not operate the multimeter in explosive gas, vapor, or damp ortamlar.
- Kişisel Koruyucu Donanım: Always wear appropriate personal protective equipment, such as safety glasses, when working with electrical circuits.
- Güvenlik Derecelendirmesi: This device is rated for CAT III 600V. Do not exceed this rating.
3. Ürün Bittiview
3.1 Özellikler
The Mastech MS8301A Digital Multimeter offers a range of features for various electrical measurements:
- Görüntülemek: 2000 Sayım
- Veri tutma: Görüntülenen değeri dondurarak kolay kayıt imkanı sağlar.
- Battery Tester: For 1.5V and 9V batteries.
- Kompakt Tasarım: Product Size: 150mm x 74mm x 48mm (5.9" x 2.9" x 1.7")
- Hafif: Ürün Ağırlığı: 220 g (0.48 lb)

Image: Detailed features and specifications of the Mastech MS8301A multimeter, including display count, data hold, battery test function, and physical dimensions.
3.2 Bileşenler
The Mastech MS8301A package typically includes the following components:
- Mastech MS8301A Digital Multimeter Unit
- Test Kabloları (Kırmızı ve Siyah)
- AAA Batteries (2x1.5V)
- Kalibrasyon Sertifikası (varsa)
- Hızlı Başlangıç Kılavuzu
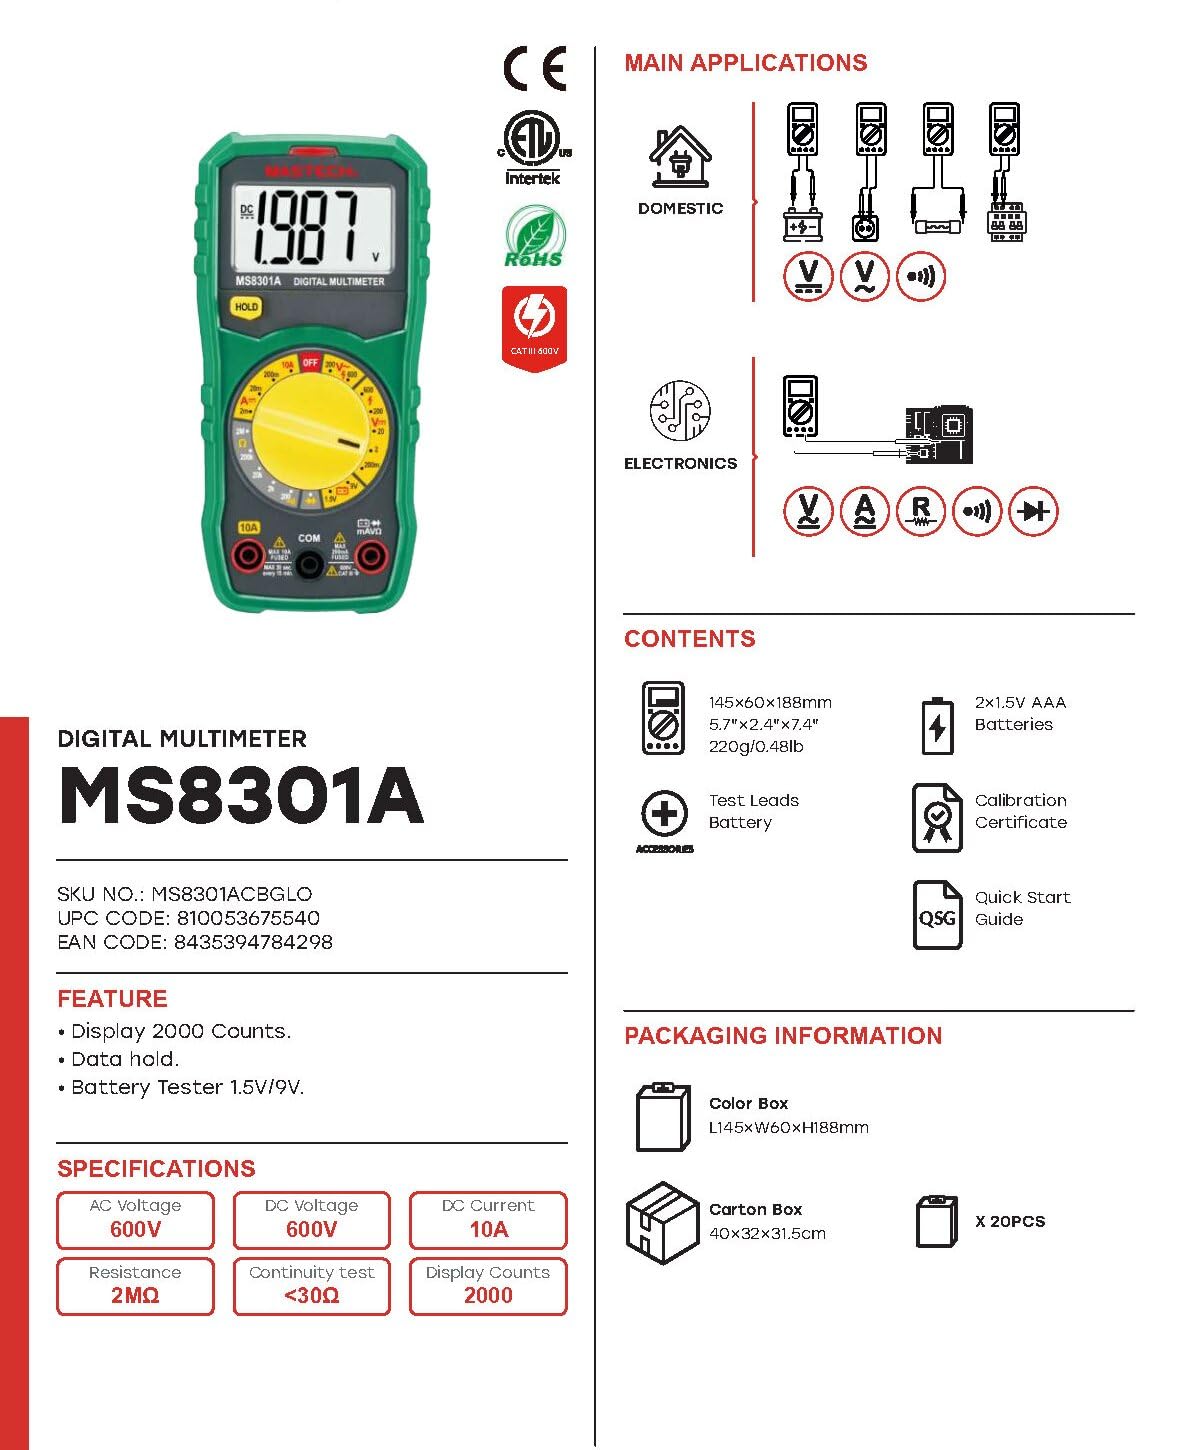
Image: The Mastech MS8301A Digital Multimeter showing its front panel, rotary switch, display, input jacks, and a list of included accessories such as test leads and batteries.
4. Kurulum
4.1 Pil Kurulumu
- Ensure the multimeter is turned off and disconnect any test leads.
- Multimetrenin arkasındaki pil bölmesi kapağını bulun.
- Tutma vidasını/vidalarını sökün ve kapağı çıkarın.
- Bölmenin içinde belirtilen doğru kutuplara (+ ve -) dikkat ederek iki adet 1.5V AAA pil takın.
- Pil bölmesi kapağını yerine takın ve vida(lar) ile sabitleyin.
4.2 Test Uçlarının Bağlanması
Test uçlarını multimetrenin uygun giriş jaklarına bağlayın:
- Ekle siyah test kurşunu içeri Bİlgİ (Ortak) kriko.
- Çoğu ölçüm için (Cilttage, Resistance, Diode, Continuity, Temperature, Battery Test), insert the kırmızı test kurşunu içeri VΩmA kriko.
- For high current measurements (up to 10A), insert the kırmızı test kurşunu içeri 10A kriko.
5. Kullanım Talimatları
Ölçüm yapmadan önce, test uçlarının doğru şekilde bağlandığından ve döner anahtarın istenen fonksiyona ayarlandığından emin olun.
5.1 DC Vol Ölçümütage (V=)
- Set the rotary switch to the desired V= range (e.g., 20V for measuring up to 20V DC).
- Kırmızı test ucunu devrenin pozitif (+) tarafına, siyah test ucunu ise negatif (-) tarafına bağlayın.
- Cildi okutagEkrandaki e değeri.
5.2 AC Vol Ölçümütage(V~)
- Set the rotary switch to the desired V~ range (e.g., 200V for measuring up to 200V AC).
- Test uçlarını AC voltaj regülatörüne bağlayın.tage kaynak.
- Cildi okutagEkrandaki e değeri.
5.3 Doğru Akımın Ölçülmesi (A=)
- Önemli: Disconnect power to the circuit before connecting the multimeter in series.
- Set the rotary switch to the desired A= range (e.g., 200mA or 10A). Remember to move the red lead to the 10A jack for high current.
- Open the circuit where current is to be measured.
- Connect the multimeter in series with the circuit, ensuring the current flows through the multimeter.
- Devreye enerji verin ve akım değerini display üzerinden okuyun.
5.4 Direncin Ölçülmesi (Ω)
- Önemli: Direnç ölçümü yapmadan önce devrenin enerjisinin kesildiğinden ve tüm kapasitörlerin boşaltıldığından emin olun.
- Set the rotary switch to the desired Ω menzil.
- Ölçümü yapılacak bileşenin üzerine test uçlarını bağlayın.
- Ekrandaki direnç değerini okuyun.
5.5 Diyot Testi (→|)
- Önemli: Diyotun devreden bağlantısının kesildiğinden emin olun.
- Döner anahtarı konumuna getirin. Diyot Testi konum.
- Kırmızı test ucunu diyotun anot ucuna, siyah test ucunu ise diyotun katot ucuna bağlayın. Ekranda ileri-geri akım (Voltaj) gösterilecektir.tage damla.
- Reverse the leads. The display should show "OL" (Open Loop) for a good diode.
5.6 Süreklilik Testi ())))
- Önemli: Devre enerjisinin kesildiğinden emin olun.
- Döner anahtarı konumuna getirin. Süreklilik Testi konum.
- Connect the test leads across the component or wire to be tested.
- If the resistance is below approximately 30Ω, the buzzer will sound, indicating continuity. The display will also show the resistance value.
5.7 Battery Test (1.5V/9V)
- Döner anahtarı konumuna getirin. 1.5V or 9V battery test position, corresponding to the battery type.
- Connect the red test lead to the positive (+) terminal of the battery and the black test lead to the negative (-) terminal.
- Pil hacmini okuyuntage ekranda.
5.8 Veri Tutma
Ekrandaki mevcut okumayı dondurmak için "HOLD" düğmesine basın. Dondurulmuş okuma işlevini kaldırmak ve canlı okumalara devam etmek için tekrar basın.
6. Özellikler
| Ölçüm | Menzil | Çözünürlük |
|---|---|---|
| DC Hacmitage | 200mV / 2V / 20V / 200V / 600V | 100µV / 1mV / 10mV / 100mV / 1V |
| AC Hacmitage | 200V / 600V | 100mV / 1V |
| Doğru Akım | 2mA / 20mA / 200mA / 10A | 1µA / 10µA / 100µA / 10mA |
| Rezistans | 200Ω / 2kΩ / 20kΩ / 200kΩ / 2MΩ | 0.1Ω / 1Ω / 10Ω / 100Ω / 1kΩ |
| Süreklilik Testi | Buzzer sounds at <30Ω | — |
| Diyot Testi | ileri sestage damla | — |
| Pil Testi | 1.5V / 9V | — |
Genel Özellikler
- Görüntülemek: 2000 Sayım
- Güç Kaynağı: 2 x 1.5V AAA Pil
- Boyutlar: Xnumxmm x xnumxmm x xnumxmm (xnumx "x xnumx" x xnumx ")
- Ağırlık: 220g (0.48lb)
- Güvenlik Derecelendirmesi: KAT III 600V
- Malzeme: Akrilonitril Bütadien Stiren (ABS)
- Renk: Mavi

Image: A table detailing manual ranging specifications for various Mastech digital multimeters, including the MS8301A, showing display counts, safety ratings, and measurement capabilities.
7. Bakım
7.1 Pil Değişimi
When the battery low indicator appears on the display, replace the batteries immediately to ensure accurate readings. Follow the steps outlined in Section 4.1 for battery installation.
7.2 Temizlik
Davayı reklamla silinamp Bez ve hafif deterjan kullanın. Aşındırıcı veya çözücü maddeler kullanmayın. Kullanmadan önce multimetrenin tamamen kuru olduğundan emin olun.
7.3 Depolama
If the multimeter is not used for an extended period, remove the batteries to prevent leakage and damage to the device. Store in a cool, dry place away from direct sunlight.
8. Sorun Giderme
| Sorun | Olası Neden | Çözüm |
|---|---|---|
| Ekran yok veya soluk ekran | Pillerin bitmiş veya zayıf olması; pil kutuplarının yanlış takılması. | Pilleri değiştirin; pilin yönünü kontrol edin. |
| "OL" (Aşırı Yük) görüntülendi | Measurement exceeds selected range; open circuit. | Select a higher range; check for open circuit in the component or leads. |
| Yanlış okumalar | Incorrect function selected; poor test lead connection; damaged test leads. | Verify function switch position; ensure secure lead connection; inspect and replace damaged leads. |
| Süreklilik bip sesi yok | Open circuit; resistance too high. | Check for breaks in the circuit; ensure resistance is below 30Ω. |
9. Garanti ve Destek
Mastech products are designed for reliability and performance. For specific warranty information, please refer to the warranty card included with your product or contact Mastech customer support. Keep your purchase receipt as proof of purchase.
For technical support or service inquiries, please visit the official Mastech websiteyi ziyaret edin veya yetkili servis merkezlerine başvurun.


