
1. Giriş
The Mastech MS8250D is a high-performance digital multimeter designed for accurate measurement of AC/DC voltage, AC/DC current, resistance, capacitance, frequency, and temperature. It features a 6600-count display, auto/manual ranging, True RMS, Non-Contact Voltage (NCV) detection, diode and continuity testing, and a USB interface for PC connectivity. This manual provides detailed instructions for safe and effective use of the device.
Temel Özellikler:
- 6600-count digital display
- Automatic and Manual Ranging
- Gerçek RMS ölçümü
- Temassız Hacimtage (NCV) algılama
- Diode and Continuity Tester (buzzer < 50Ω)
- MAX/MIN value recording
- Veri Bekletme işlevi
- Ekran Arka Aydınlatması
- Otomatik Kapanma
- Bağıl Ölçüm modu
- Düşük Pil Göstergesi
- USB Interface for Windows OS
2. Güvenlik Bilgileri
UYARI: To avoid electric shock or personal injury, and to avoid damage to the meter or to the equipment under test, read all safety information carefully before using the meter. This device complies with CE, RoHS, and UL safety standards.
- Test uçlarının her zaman iyi durumda ve doğru şekilde bağlı olduğundan emin olun.
- Nominal hacimden fazlasını uygulamayıntage, terminaller arasında veya herhangi bir terminal ile topraklama arasında sayaç üzerinde işaretlendiği gibi.
- Vol ile çalışırken dikkatli oluntag30V AC RMS, 42V tepe veya 60V DC'nin üzerinde. Bu hacimtagşok tehlikesi yaratabilir.
- Before measuring current, ensure the circuit is de-energized and the meter is connected in series.
- Fonksiyonları veya aralıkları değiştirmeden önce test uçlarını devreden mutlaka ayırın.
- Hasarlı görünüyorsa veya kutusu açıksa ölçüm cihazını kullanmayın.
- Doğru ölçümler elde etmek için düşük pil göstergesi göründüğü anda pili değiştirin.
- Adhere to the specified measurement categories (CAT III 1000V / CAT IV 600V) for safe operation.
3. Ürün Bittiview
Familiarize yourself with the components of your Mastech MS8250D Digital Multimeter.

Resim 3.1: Ön view of the Mastech MS8250D Digital Multimeter, showing the display, function dial, and input jacks. The display shows "1.987 V", indicating a voltage measurement. The function dial is set to T-RMS. Input jacks are labeled for µA mA, A, VΩHz%, and COM.
Ana bileşenler:
- LCD Ekran: Ölçüm değerlerini, birimleri ve fonksiyon göstergelerini gösterir.
- İşlev Kadranı: Used to select the desired measurement function (e.g., Voltage, Current, Resistance, Diode, Continuity, Temperature).
- Fonksiyon Düğmeleri:
- TUTMAK: Mevcut ekran okumasını dondurur.
- ARALIK: Switches between auto and manual ranging.
- : Bağıl ölçüm modunu etkinleştirir.
- MAKS/MIN: Maksimum ve minimum değerleri kaydeder.
- FONK: Kadran pozisyonu içindeki alt fonksiyonları seçer (örneğin, AC/DC, Diyot/Süreklilik).
- T-RMS: (Indicated on dial) True RMS measurement.
- NCV: Temassız Hacimtage algılama.
- Arka Işık Düğmesi: Activates display backlight.
- Giriş Jakları:
- İletişim: Common terminal for all measurements (negative lead).
- VΩHz%: vol için giriştage, resistance, frequency, capacitance, and diode/continuity measurements (positive lead).
- µA mA: Mikro için girişampburada ve milliampere current measurements (positive lead). Fused for protection.
- A: Giriş: ampere current measurements (positive lead). Fused for protection.
Dahil Bileşenler:
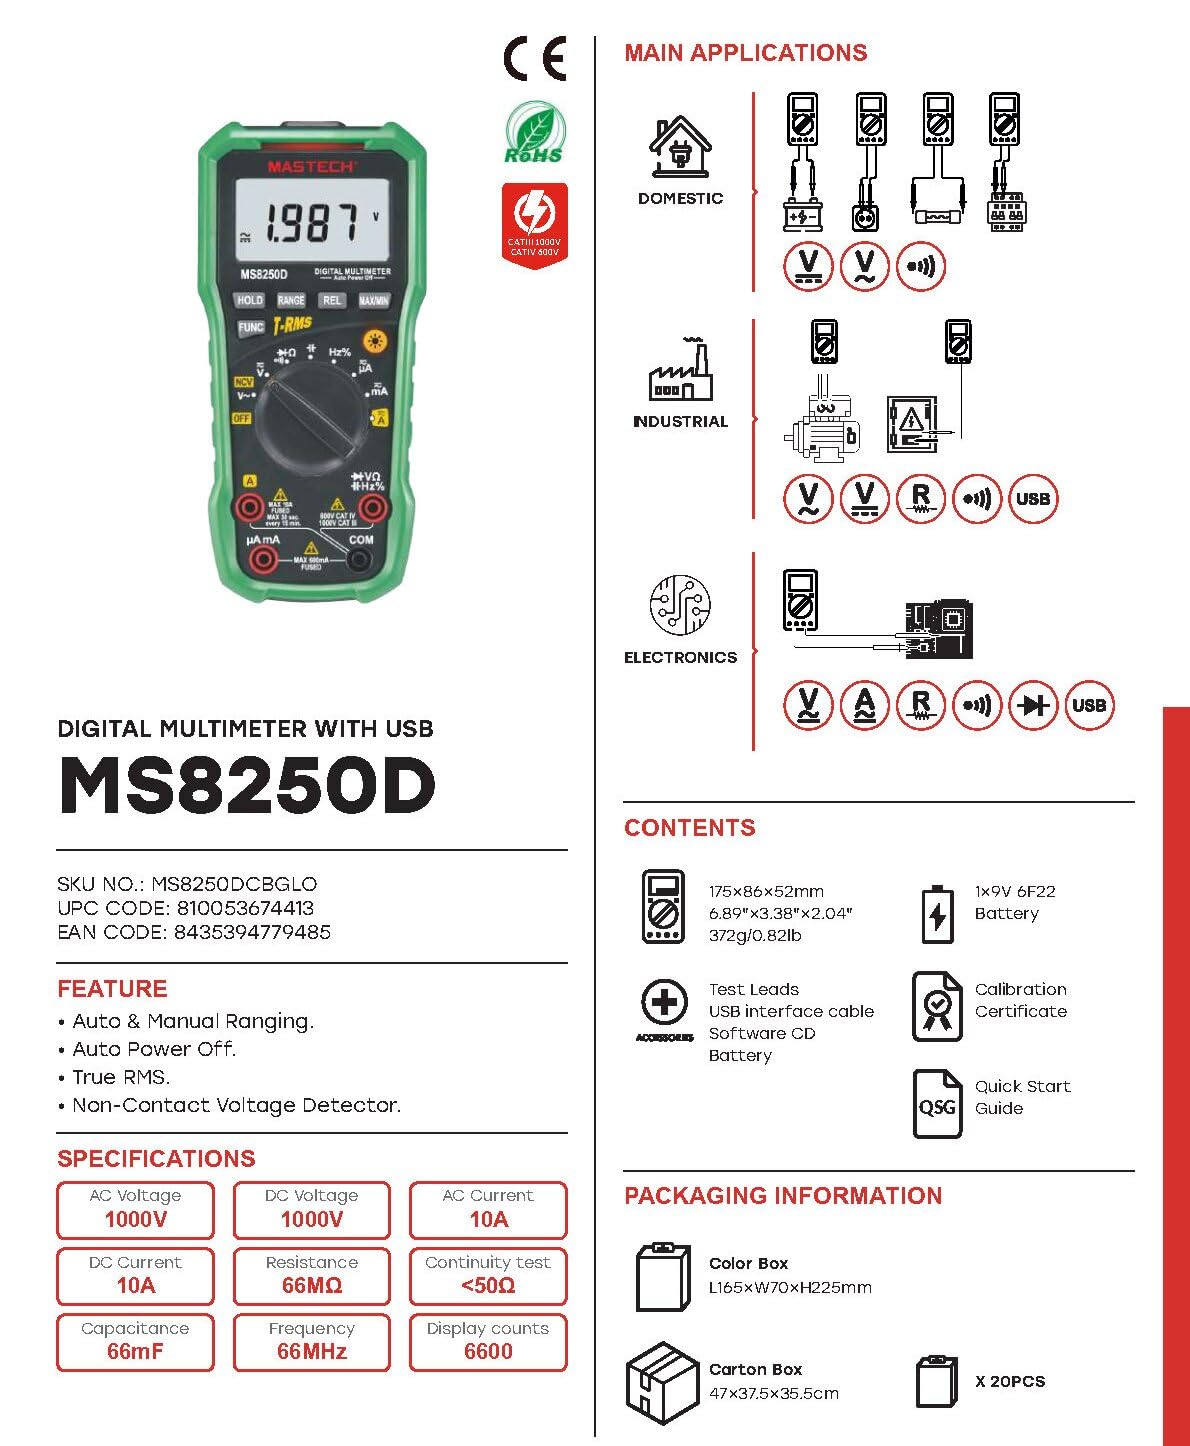
Resim 3.2: Diagram showing the Mastech MS8250D Multimeter and its included accessories. The image also illustrates typical applications in domestic, industrial, and electronics settings.
- Mastech MS8250D Dijital Multimetre
- Test Kabloları (Kırmızı ve Siyah)
- 1 adet 9V 6F22 pil (önceden takılı veya ayrı olarak dahil)
- USB Arabirim Kablosu
- Software CD (for Windows OS)
- Kalibrasyon Sertifikası
- Hızlı başlangıç Kılavuzu
4. Kurulum
4.1 Pil Kurulumu
The MS8250D requires one 9V 6F22 battery for operation. Two LR44 batteries are also mentioned in specifications, likely for a different internal component or an error in data. For the main power, use the 9V battery.
- Multimetrenin KAPALI olduğundan emin olun.
- Ölçüm cihazının arkasındaki pil bölmesi kapağını bulun.
- Kapağı sabitleyen vidayı/vidaları gevşetmek için bir tornavida kullanın.
- Kapağı çıkarın.
- Connect the 9V battery to the battery clips, observing correct polarity (+ and -).
- Pili bölmeye yerleştirin.
- Pil bölmesi kapağını yerine takın ve vida(lar) ile sabitleyin.
Not: The meter also uses 2 LR44 batteries, which are typically included and pre-installed for specific functions like the backlight or non-contact voltage detection. Refer to the quick-start guide for specific details on these smaller batteries if replacement is needed.
4.2 Test Uçlarının Bağlanması
Always connect the black test lead to the COM jack. Connect the red test lead to the appropriate input jack based on the measurement type:
- cilt içintage, Resistance, Capacitance, Frequency, Diode, and Continuity measurements: Connect the red lead to the %VΩHz kriko.
- For Current measurements (µA or mA): Connect the red lead to the uA mA kriko.
- For High Current measurements (A): Connect the red lead to the A kriko.
Ensure the test leads are fully inserted into the jacks.
5. Kullanım Talimatları
5.1 Güç Açma/Kapatma
To turn the meter ON, rotate the function dial from the "OFF" position to any desired measurement function. To turn the meter OFF, rotate the function dial back to the "OFF" position.
Sayaçta şu özellikler bulunur: Otomatik Kapanma function to conserve battery life. It will automatically power off after a period of inactivity. To disable or re-enable this feature, refer to the quick-start guide or the full user manual provided on the software CD.
5.2 Auto Ranging and Manual Ranging
The MS8250D defaults to Auto Ranging, which automatically selects the best measurement range. Press the RANGE geçiş yapmak için düğme Manuel Aralığı. In manual ranging, each press of the RANGE button cycles through available ranges. To return to auto ranging, press and hold the RANGE düğme.
5.3 AC/DC Hacim Ölçümütage(V)
- Fonksiyon kadranını şu konuma getirin: V~ (AC Cilttage) veya V- (DC Cilttage) konum.
- Siyah test ucunu Bİlgİ Jack ve kırmızı test kurşunu %VΩHz kriko.
- Test problarını ölçülecek devreye veya bileşene bağlayın.
- Cildi okutage value on the display. The meter will automatically detect AC or DC if the dial is set to the combined V position, or you can use the FUNC button to toggle between AC and DC if available on your model.
5.4 AC/DC Akımının Ölçülmesi (A, mA, µA)
UYARI: Ölçüm cihazını asla bir vol'e paralel olarak bağlamayın.tagAkım ölçerken kaynağı kullanmayın. Bu, sigortanın atmasına veya ölçüm cihazının hasar görmesine neden olabilir.
- Devreye giden gücü KAPATIN.
- Fonksiyon kadranını şu konuma getirin: A~ (Alternatif Akım), A- (DC Akım), mA~, mA-, µA~, veya µA- konum.
- Siyah test ucunu Bİlgİ kriko.
- Kırmızı test ucunu aşağıdaki bağlantı noktasına bağlayın. A jack for high current, or uA mA jack for low current.
- Open the circuit where the current is to be measured and connect the meter in series with the load.
- Devreye güç verin.
- Read the current value on the display. Use the FUNC Gerektiğinde AC ve DC arasında geçiş yapmak için kullanılan düğme.
5.5 Direncin Ölçülmesi (Ω)
- Fonksiyon kadranını şu konuma getirin: Ω konum.
- Siyah test ucunu Bİlgİ Jack ve kırmızı test kurşunu %VΩHz kriko.
- Test edilecek devrenin veya bileşenin enerjisinin kesildiğinden emin olun.
- Test problarını bileşen boyunca bağlayın.
- Ekrandaki direnç değerini okuyun.
5.6 Diyot Testi ve Süreklilik Testi
- Fonksiyon kadranını şu konuma getirin: Diyot/Süreklilik position (often shared with resistance or capacitance).
- Siyah test ucunu Bİlgİ Jack ve kırmızı test kurşunu %VΩHz kriko.
- Kullanın FUNC button to select between Diode Test and Continuity Test.
- Diyot Testi İçin: Kırmızı probu diyotun anot ucuna, siyah probu ise diyotun katot ucuna bağlayın. Ekranda ileri-geri akım (ileri-geri) değeri gösterilecektir.tage drop (typically 0.5V to 0.8V for silicon diodes). Reversing the probes should show "OL" (Open Loop).
- Süreklilik Testi İçin: Connect the probes across the circuit or component. If resistance is less than approximately 50Ω, the buzzer will sound, indicating continuity.
5.7 Kapasitans Ölçümü (F)
- Fonksiyon kadranını şu konuma getirin: Kapasitans position (often shared with resistance or diode).
- Siyah test ucunu Bİlgİ Jack ve kırmızı test kurşunu %VΩHz kriko.
- Ensure the capacitor is fully discharged before testing to avoid damage to the meter.
- Test problarını kondansatör terminallerine bağlayın.
- Ekrandaki kapasitans değerini okuyun.
5.8 Measuring Frequency (Hz) and Duty Cycle (%)
- Fonksiyon kadranını şu konuma getirin: Hz% position (often shared with voltage).
- Siyah test ucunu Bİlgİ Jack ve kırmızı test kurşunu %VΩHz kriko.
- Test problarını sinyal kaynağına bağlayın.
- The display will show the frequency. Press the FUNC button to toggle to Duty Cycle measurement if available.
5.9 Temassız Hacimtage (NCV) Tespiti
- Fonksiyon kadranını şu konuma getirin: NCV konum.
- Hold the meter with the NCV sensor (usually at the top of the meter) near a live AC voltage kaynak.
- Sayaç, alternatif akım voltajının varlığını gösterecektir.tage through an audible beep and/or visual indicator (e.g., LED).
5.10 USB Interface (Windows OS)
The MS8250D includes a USB interface for connecting to a computer running Windows OS. This allows for data logging and real-time monitoring of measurements. Install the provided software from the CD and follow the on-screen instructions for driver installation and software usage.
6. Bakım
6.1 Temizlik
Sayacın kasasını reklamla silinamp Bir bez ve hafif bir deterjan kullanın. Aşındırıcı veya çözücü maddeler kullanmayın. Kullanmadan önce ölçüm cihazının tamamen kuru olduğundan emin olun.
6.2 Pil Değişimi
When the low battery indicator appears on the display, replace the 9V battery immediately to ensure accurate readings. Follow the steps in Section 4.1 Battery Installation.
6.3 Sigorta Değişimi
If the meter fails to measure current, the fuse may be blown. Fuses are located inside the meter. To replace a fuse:
- Ölçüm cihazının kapalı olduğundan ve tüm test uçlarının çıkarılmış olduğundan emin olun.
- Pil bölmesi kapağını (ve tasarıma bağlı olarak ana kasayı da) açın.
- Eski sigortayı dikkatlice çıkarın.
- Replace with a fuse of the exact same type and rating (e.g., F600mA/250V for mA/µA range, F10A/250V for A range). Refer to the meter's internal markings or the full manual for specific fuse ratings.
- Reassemble the meter, ensuring all screws are tightened.
UYARI: Never use a fuse with a different rating or bypass the fuse. This can damage the meter and pose a serious safety hazard.
7. Sorun Giderme
| Sorun | Olası Neden | Çözüm |
|---|---|---|
| Sayaç açılmıyor. | Pil bitmiş. | 9V pili değiştirin. |
| "OL" (Aşırı Yük) görüntüleniyor. | Measurement exceeds selected range or meter's maximum capacity. | Switch to a higher range (if in manual ranging) or ensure the measurement is within the meter's limits. |
| Şu anda bir okuma yok. | Blown fuse; incorrect lead connection; open circuit. | Check and replace fuse if necessary. Ensure leads are connected correctly (in series). Verify circuit continuity. |
| Hatalı okumalar. | Low battery; poor lead contact; external interference. | Replace battery. Ensure leads are firmly connected. Move away from strong electromagnetic fields. |
| Display shows "USB" but no PC connection. | Drivers not installed; incorrect software settings. | Install drivers from the provided CD. Refer to software manual for connection instructions. |
8. Özellikler
The following table details the technical specifications of the Mastech MS8250D Digital Multimeter.

Resim 8.1: Detailed specifications table for the Mastech MS8250D, outlining ranges, resolutions, and accuracies for various measurement functions.
| İşlev | Menzil | Çözünürlük | Kesinlik |
|---|---|---|---|
| DC Hacmitage | |||
| 660mV | 0.1mV | ±(0.8%+3) | |
| 6.6V/66V/660V/1000V | 1mV/10mV/0.1V/1V | ±(0.5%+5) | |
| AC Hacmitage (Gerçek RMS) | |||
| 660mV | 0.1mV | ±(1.5%+5) | |
| 6.6V/66V | 1mV/10mV | ±(1.2%+5) | |
| 660V/1000V | 0.1V/1V | ±(1.0%+3) | |
| Doğru Akım | |||
| 660µA / 6600µA / 66mA / 660mA | 0.1µA/1µA/10µA/0.1mA | ±(1.0%+5) | |
| 10A | 10mA | ±(2.0%+5) | |
| AC Akımı (Gerçek RMS) | |||
| 660µA / 6600µA / 66mA / 660mA | 0.1µA / 1µA / 0.01mA / 0.1mA | ±(1.5%+5) | |
| 10A | 10mA | ±(3.0%+5) | |
| Rezistans | |||
| 660Ω / 6.6kΩ / 66kΩ / 660kΩ / 6.6MΩ | 0.1Ω / 1Ω / 10Ω / 100Ω / 1kΩ | ±(0.8%+5) | |
| 66MΩ | 10kΩ | ±(1.5%+5) | |
| Kapasitans | |||
| 6.6nF/66nF/660nF/6.6µF/66µF | 1pF/10pF/0.1nF/1nF/10nF | ±(4.0%+5) | |
| 600µF | 1µF | ±(3.0%+5) | |
| 6.6mF/66mF | 1µF/10µF | ±(4.0%+5) | |
| Sıklık | |||
| 66Hz/660Hz/6.6kHz/66kHz | 0.01 Hz / 0.1 Hz / 1 Hz / 10 Hz | ±(1.5%+5) | |
| 660kHz/6.6MHz/66MHz | 0.1kHz/1kHz/10kHz | ±(1.5%+5) | |
| Görev Döngüsü | |||
| %0.1~%99.9 | %0.1 | ±(2.0%+5) | |
Genel Özellikler:
- Görüntülemek: 6600 Sayım
- Güç Kaynağı: 1x 9V 6F22 Battery (main power), 2x LR44 batteries (auxiliary, e.g., backlight)
- Otomatik Kapanma: Evet
- Gerçek RMS: Evet
- Temassız Hacimtage (NCV) Detector: Evet
- Diyot Açık Voltage: 3.2V
- Süreklilik Buzzer'ı: < 50Ω
- MAKS/MIN: Evet
- Veri tutma: Evet
- Düşük Pil Göstergesi: Evet
- Ekran Arka Işığı: Evet
- USB Arayüzü: Yes (Windows OS)
- Güvenlik Derecelendirmesi: KAT III 1000V / KAT IV 600V
- Ölçüm Doğruluğu: 0.4% (general, specific accuracies per function in table)
- Çalışma Hacmitage (Dakika): 3.2 Volt
- Üst Sıcaklık Değerlendirmesi: 50 Derece Santigrat
- Boyutlar (U x G x Y): 20x15x25 cm
- Ürün Ağırlığı: 1 kilo
- Malzeme: Akrilonitril Bütadien Stiren (ABS)
- Renk: Mavi
- Üretici: MASTECH
- Menşei ülke: Tayvan
- Sertifikalar: CE, RoHS, UL
9. Garanti ve Destek
Mastech products are designed for reliability and durability. For specific warranty information, please refer to the warranty card included with your product or contact Mastech customer support directly. Typically, Mastech offers a limited warranty against defects in materials and workmanship.
For technical support, troubleshooting assistance, or warranty claims, please contact your authorized Mastech dealer or visit the official Mastech webiletişim bilgileri için site.
AB Yedek Parça Temin Süresi: 1 Yıl


