
1. Giriş
The Mastech MS8233B is a compact, handheld digital multimeter designed for measuring AC/DC voltage, DC current, resistance, diode, continuity, and temperature. It features a 2000-count display, data hold function, and low battery indication, making it suitable for various electrical testing applications in domestic and electronics environments.
2. Güvenlik Bilgileri
To ensure safe operation and service of the meter, please read this manual thoroughly before use. Failure to observe safety warnings can result in severe injury or death.
- Kullanmadan önce ölçüm cihazının iyi çalışma koşullarında olduğundan emin olun.
- Nominal hacimden fazlasını uygulamayıntage, which is 600V CAT III.
- Vol ile çalışırken dikkatli oluntag30V AC RMS, 42V tepe veya 60V DC'nin üzerindeki akımlarda elektrik çarpması tehlikesi vardır.
- Fonksiyonları değiştirmeden önce test uçlarını mutlaka devreden ayırın.
- Pil seviyesi düşük göstergesi göründüğünde pili hemen değiştirin.
- Do not operate the meter if the battery cover is not properly closed.
- Yerel ve ulusal güvenlik kurallarına uyun.
3. Ürün Bittiview
The Mastech MS8233B Digital Multimeter features a clear display, a rotary function switch, and dedicated input jacks for various measurements.

Şekil 3.1: Ön view of the Mastech MS8233B Digital Multimeter. This image displays the LCD screen, rotary function switch, input jacks, and control buttons.
3.1 Bileşenler
- LCD Ekran: Ölçüm değerlerini, birimleri ve fonksiyon göstergelerini gösterir.
- Fonksiyon Döner Anahtarı: Used to select the desired measurement function (e.g., V~, V-, A-, Ω, Diode, Continuity, Temp).
- TUTMA Düğmesi: Ekrandaki mevcut okumayı dondurur.
- Arka Işık Düğmesi: Düşük ışık koşullarında daha iyi görüş için ekran arka ışığını etkinleştirir.
- VΩmA Giriş Jakı: Hacim için pozitif giriştage, direnç, diyot, süreklilik ve 200mA'e kadar akım ölçümleri.
- COM Giriş Jakı: Tüm ölçümler için ortak (negatif) giriş.
- 10A Giriş Jakı: Yüksek akım ölçümleri için pozitif giriş (10A'e kadar).
4. Kurulum
4.1 Pil Kurulumu
The MS8233B requires 2 LR44 batteries for operation. Ensure the batteries are installed correctly before first use or when replacing them.
- Multimetreyi kapatın ve tüm test uçlarını ayırın.
- Ölçüm cihazının arkasındaki pil bölmesini bulun.
- Pil bölmesi kapağını açmak için tornavida kullanın.
- Insert the 2 LR44 batteries, observing the correct polarity (+ and -).
- Pil bölmesi kapağını yerine takın ve vidayla sabitleyin.
5. Kullanım Talimatları
Before taking any measurements, ensure the test leads are properly connected to the meter and the circuit under test.
5.1 Genel İşlem
- Turn the rotary switch from the "OFF" position to the desired measurement function.
- Connect the test leads to the appropriate input jacks and the circuit.
- Ölçüm değerini LCD ekranda okuyun.
- To turn off the meter, rotate the switch back to the "OFF" position.
5.2 DC Hacmitage Ölçümü (V-)
- Döner anahtarı istenen DC Vol değerine ayarlayıntage aralığı (örneğin, 200mV, 2V, 20V, 200V, 600V).
- Kırmızı test ucunu VΩmA jakına ve siyah test ucunu COM jakına bağlayın.
- Test uçlarını ölçülecek bileşene veya devreye bağlayın.
5.3 AC Hacmitage Ölçümü (V~)
- Döner anahtarı istenen AC Vol değerine ayarlayıntage aralığı (örneğin, 200V, 600V).
- Kırmızı test ucunu VΩmA jakına ve siyah test ucunu COM jakına bağlayın.
- Test uçlarını AC voltaj regülatörüne bağlayın.tage kaynak.
5.4 DC Akım Ölçümü (A-)
- Döner anahtarı istenen DC akım aralığına ayarlayın (örneğin, 200µA, 2mA, 20mA, 200mA, 10A).
- For currents up to 200mA, connect the red test lead to the VΩmA jack. For currents up to 10A, connect the red test lead to the 10A jack. Always connect the black test lead to the COM jack.
- Connect the meter in series with the circuit to measure the current.
- Dikkat: Do not attempt to measure currents exceeding 200mA through the VΩmA jack or 10A through the 10A jack.
5.5 Direnç Ölçümü (Ω)
- Döner anahtarı istediğiniz Direnç aralığına (örneğin, 200Ω, 2kΩ, 20kΩ, 200kΩ, 2MΩ) ayarlayın.
- Kırmızı test ucunu VΩmA jakına ve siyah test ucunu COM jakına bağlayın.
- Connect the test leads across the resistor or component to be measured. Ensure the circuit is de-energized.
5.6 Diyot Testi
- Döner anahtarı Diyot sembolüne getirin.
- Kırmızı test ucunu VΩmA jakına ve siyah test ucunu COM jakına bağlayın.
- Kırmızı test ucunu diyotun anot ucuna, siyah test ucunu ise diyotun katot ucuna bağlayın. Ekranda ileri-geri akım (Voltaj) gösterilecektir.tage damla.
- Reverse the leads. An open circuit (OL) reading indicates a good diode. A reading in both directions or no reading indicates a faulty diode.
5.7 Süreklilik Testi
- Döner anahtarı Süreklilik sembolüne getirin.
- Kırmızı test ucunu VΩmA jakına ve siyah test ucunu COM jakına bağlayın.
- Connect the test leads across the circuit or component. If the resistance is less than approximately 60Ω, the buzzer will sound, indicating continuity.
5.8 Sıcaklık Ölçümü
While the product title mentions temperature, the MS8233B model's detailed specifications do not explicitly list a temperature function. If your specific unit includes this feature, typically you would:
- Set the rotary switch to the Temperature function (usually marked with °C or °F).
- Connect a K-type thermocouple (if included) to the VΩmA and COM jacks, observing polarity.
- Place the thermocouple probe at the point where temperature needs to be measured.
5.9 Veri Tutma Fonksiyonu
- Press the "HOLD" button to freeze the current reading on the display.
- Press the "HOLD" button again to release the reading and resume live measurements.
5.10 Arka Aydınlatma Fonksiyonu
- Press the backlight button (often marked with a sun symbol) to turn on the display backlight.
- Press the button again to turn off the backlight.
6. Bakım
6.1 Pil Değişimi
When the low battery indicator appears on the display, replace the batteries as described in Section 4.1. Always use 2 new LR44 batteries.
6.2 Temizlik
Davayı reklamla silinamp Bez ve hafif deterjan kullanın. Aşındırıcı veya çözücü maddeler kullanmayın. Kullanmadan önce ölçüm cihazının tamamen kuru olduğundan emin olun.
7. Sorun Giderme
- Ekran Yok/Soluk Ekran: Pillerin takılıp takılmadığını kontrol edin ve şarj edin. Gerekirse pilleri değiştirin.
- Ekranda "OL" veya "1": Aşırı aralık veya açık devre durumunu gösterir. Daha yüksek bir aralık seçin veya bağlantıları kontrol edin.
- Yanlış Okumalar: Ensure correct function selection, proper lead connection, and that the circuit is de-energized for resistance/diode tests.
- Devamlılık Bildirimi Yok: Check if the resistance is above 60Ω or if the function is correctly selected.
8. Özellikler
Aşağıdaki tabloda Mastech MS8233B Dijital Multimetre'nin teknik özellikleri özetlenmiştir.
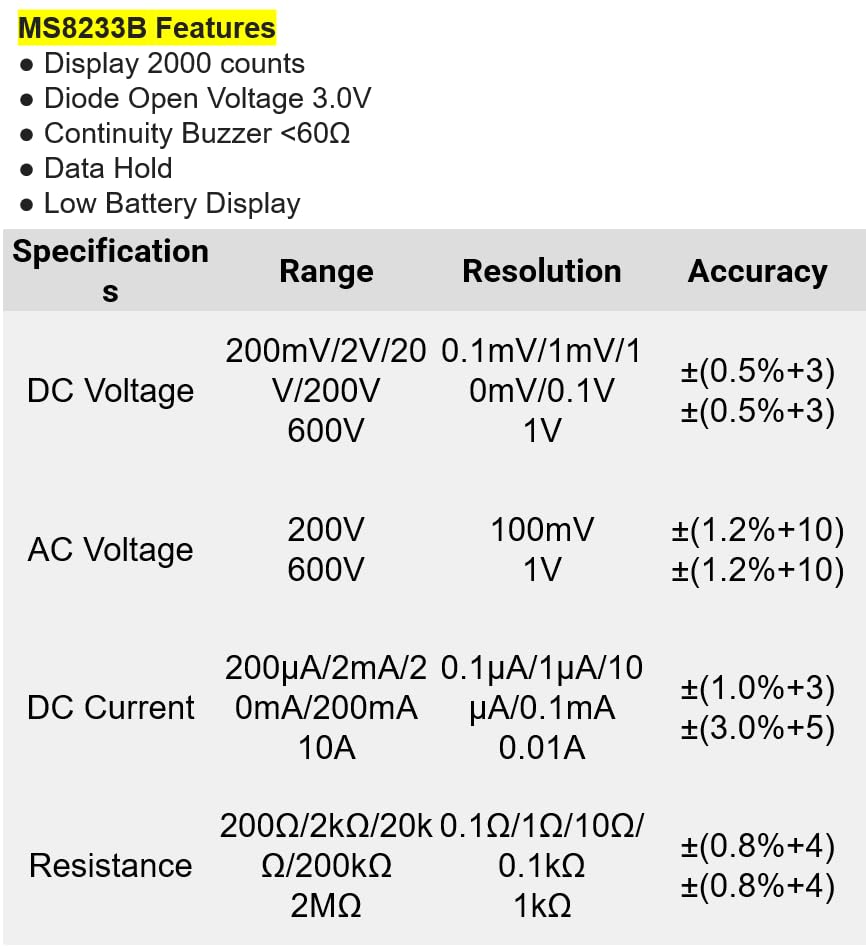
Şekil 8.1: Detailed specifications for the Mastech MS8233B, including ranges, resolutions, and accuracies for various measurements.
| Şartname | Değer |
|---|---|
| Görüntülemek | 2000 Sayım |
| Diyot Açık Voltage | 3.0V |
| Süreklilik Uyarı Cihazı | <60Ω |
| Veri Tutma | Evet |
| Düşük Pil Gösterimi | Evet |
| DC Hacmitage Aralık | 200mV, 2V, 20V, 200V, 600V |
| AC Hacmitage Aralık | 200V, 600V |
| DC Akım Aralığı | 200µA, 2mA, 20mA, 200mA, 10A |
| Direnç Aralığı | 200Ω, 2kΩ, 20kΩ, 200kΩ, 2MΩ |
| Güvenlik Derecelendirmesi | KAT III 600V |
| Güç Kaynağı | 2 adet LR44 pil (dahil) |
| Ürün Boyutları | 20x15x25 cm |
| Ürün Ağırlığı | 1 Kilogram |
| Üretici | MASTECH |
| Ürün Model Numarası | YQ-MS8233B |
| Menşei ülke | Tayvan |

Şekil 8.2: A comparison table showing features across various Mastech digital multimeter models, including the MS8233B.
9. Garanti ve Destek
For warranty information, technical support, or service inquiries, please refer to the documentation provided with your purchase or contact your retailer. Keep your purchase receipt as proof of purchase for any warranty claims.


