1. Giriş
Thank you for choosing the Primo Touch Compact Tabletop Water Dispenser. This manual provides essential information for the safe and efficient operation of your new appliance. Please read these instructions thoroughly before installation and use, and retain them for future reference.
2. Güvenlik Bilgileri
- Dağıtıcıyı daima topraklı bir elektrik prizine bağlayın.
- Dağıtıcıyı, güç kablosunu veya fişini suya veya başka sıvılara batırmayın.
- Dispenseri doğrudan güneş ışığından ve ısı kaynaklarından uzak tutunuz.
- Ünite çevresinde uygun havalandırmanın olduğundan emin olun.
- Temizlik veya bakım işlemlerine başlamadan önce dağıtıcının fişini çekin.
- Bu cihaz, fiziksel, duyusal veya zihinsel yetenekleri kısıtlı veya deneyim ve bilgi eksikliği olan kişiler tarafından, güvenliklerinden sorumlu bir kişi tarafından cihazın kullanımıyla ilgili olarak gözetim veya talimat verilmediği sürece kullanılmak üzere tasarlanmamıştır.
- Çocukların cihazla oynamamalarını sağlamak için gözetim altında tutulmaları gerekir.
- Hot water can cause severe burns. Exercise caution when dispensing hot water.
3. Ürün Bittiview
The Primo Touch Compact Tabletop Water Dispenser provides convenient access to cold, hot, and ambient temperature water. It features an intuitive control panel and a compact design suitable for various environments.

Şekil 1: Ön view of the Primo Touch Compact Tabletop Water Dispenser.
Kontrol Paneli
The control panel allows you to select your desired water temperature. An LED display indicates the status of the water cooling and heating functions.

Şekil 2: Ayrıntılı view of the control panel with temperature selection icons.
4. Kurulum
- Paketin açılması: Dispenseri ambalajından dikkatlice çıkarın. Herhangi bir hasar olup olmadığını kontrol edin.
- Atama: Place the dispenser on a flat, stable, and level surface. Ensure there is adequate space around the unit for ventilation (at least 10 cm from walls). Avoid placing it in direct sunlight or near heat sources.
- Güç Bağlantısı: Dağıtıcının fişinin çekili olduğundan emin olun.
- Su Şişesi Montajı: Remove the protective seal from a standard 3 or 5-gallon (11 or 19-liter) water bottle. Invert the bottle and carefully place it onto the support collar on top of the dispenser. Push down firmly until the bottle is seated and water begins to flow into the dispenser's reservoir. The anti-leak system ensures a secure fit.
- İlk Astarlama: Before plugging in, dispense water from both the cold and hot taps until water flows steadily. This removes air from the system.
- Eklenti: Dağıtıcıyı topraklı bir elektrik prizine takın.
5. Kullanım Talimatları
The dispenser is designed for easy operation, providing cold, hot, and ambient water with a simple touch.
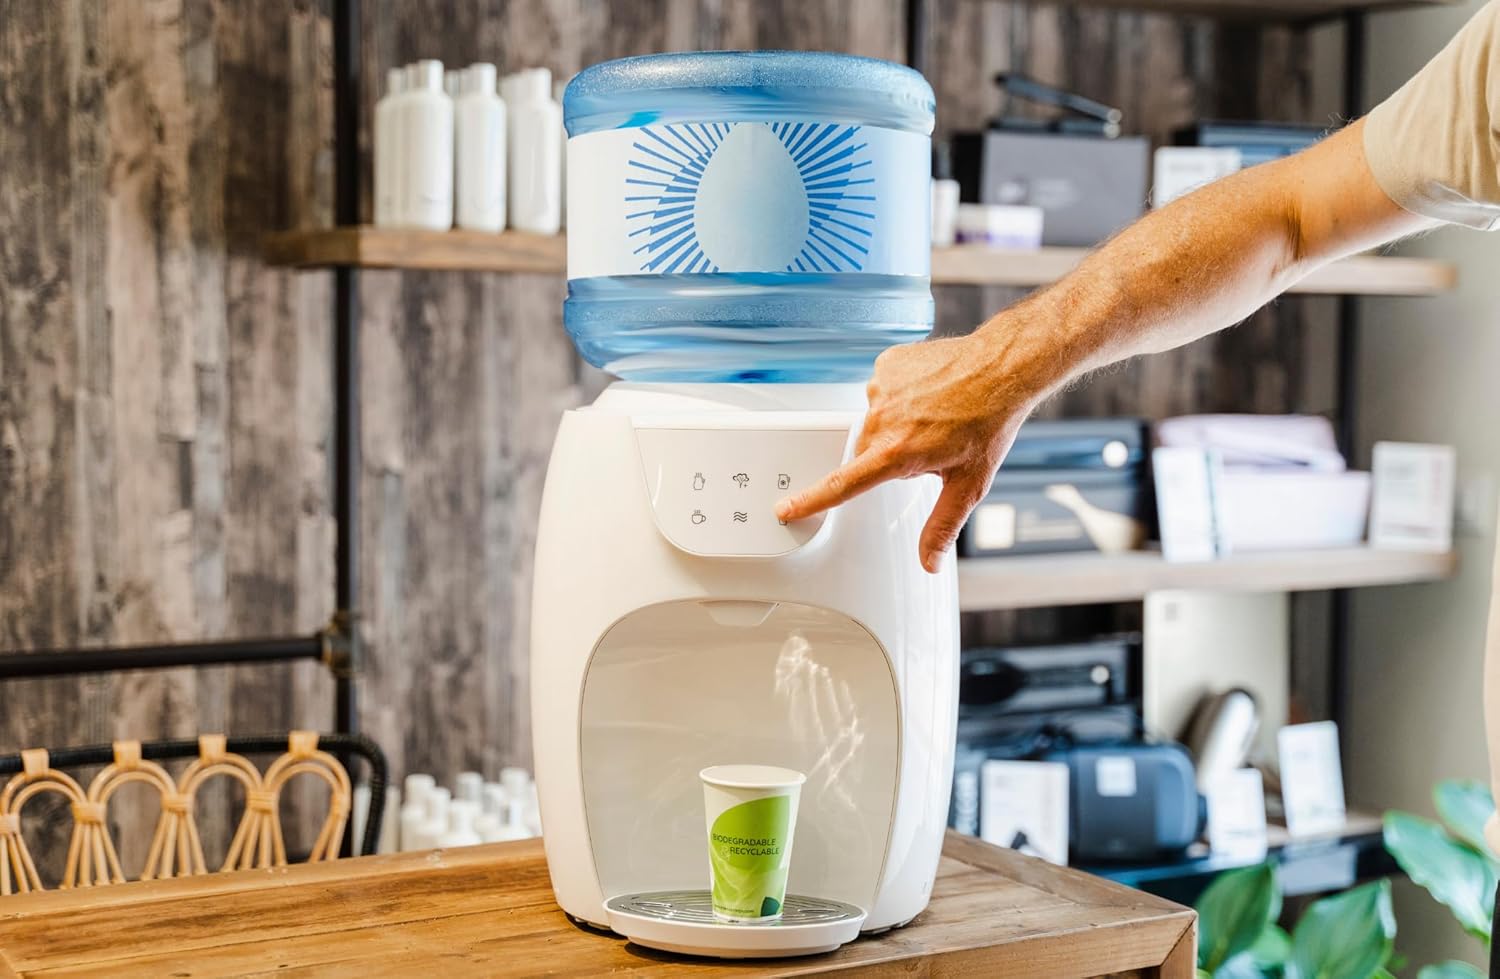
Şekil 3: Cihazdan su dağıtımı.
- Güç Açık: Once plugged in, the dispenser will begin cooling and heating water. The LED display will indicate when the cold water has reached its optimal cooling temperature (approximately 5°C) and when the hot water has reached its optimal heating temperature (approximately 95°C).
- Soğuk Su Dağıtımı: Place your cup under the cold water tap. Press the cold water button (typically indicated by a snowflake icon). Release the button to stop dispensing.
- Sıcak Su Dağıtımı: Place your cup under the hot water tap. Press the hot water button (typically indicated by a teacup or steam icon). Caution: Hot water can cause burns. Dağıtımı durdurmak için düğmeyi bırakın.
- Dispensing Ambient Water: Place your cup under the ambient water tap. Press the ambient water button (typically indicated by a wave icon). Release the button to stop dispensing.
6. Bakım ve Temizlik
Düzenli temizlik, su sebiliinizin optimum performans ve hijyenini sağlar.
- Dış Temizlik: Dış yüzeyleri yumuşak, damp bezle silin. Aşındırıcı temizleyiciler veya çözücüler kullanmayın.
- Damlama tepsisi: The drip tray should be emptied and cleaned regularly to prevent overflow and bacterial growth. Remove the tray, wash it with mild soap and water, rinse thoroughly, and dry before replacing.
- Water Reservoir (Internal): For thorough cleaning, it is recommended to periodically sanitize the internal water reservoirs. Consult the manufacturer's website or customer support for detailed sanitization procedures, which may involve specific cleaning solutions. Always unplug the unit and drain all water before attempting internal cleaning.
- Su Şişesinin Değiştirilmesi: When the water bottle is empty, lift it off the dispenser. Place a new, full water bottle onto the dispenser as described in the Setup section.
7. Sorun Giderme
Su sebili ile ilgili sorunlarla karşılaşırsanız, aşağıdaki yaygın sorunlar ve çözümlere bakın:
| Sorun | Olası Neden | Çözüm |
|---|---|---|
| Su dağıtımı yok | Empty water bottle; Airlock in system; Dispenser unplugged. | Replace water bottle; Prime the system by dispensing from all taps; Check power connection. |
| Water not cold/hot enough | Dispenser recently plugged in; Ventilation blocked; Heating/cooling element malfunction. | Allow 1-2 hours for water to reach temperature; Ensure proper ventilation; Contact customer support if problem persists. |
| Su sızıntısı | Water bottle not seated correctly; Damaged water bottle; Internal leak. | Re-seat water bottle firmly; Check bottle for cracks; Unplug and contact customer support. |
| Olağandışı gürültü | Normal operation (compressor); Unit not level. | Some noise is normal during cooling/heating cycles; Ensure dispenser is on a level surface. |
8. Özellikler
| Özellik | Detay |
|---|---|
| Model Numarası | HC03-ARI |
| Ürün Boyutları | 37.3x30.8x37.6 cm |
| Renk | Beyaz |
| Malzeme | Plastik |
| Kurulum Türü | Tezgah |
| Suya Erişim Konumu | Üstten yüklemeli |
| Ayar Sayısı | 5 (Hot, Cold, Ambient, Hot for cooking, Cold jug - based on image interpretation) |
| Sıcak Su Sıcaklığı | 95°C'ye kadar |
| Soğuk Su Sıcaklığı | Down to 5°C |
| Güç Kaynağı | Kablolu Elektrik |
9. Garanti ve Destek
For warranty information or technical support, please refer to the documentation included with your purchase or visit the official Primo webSite. Satın alma belgenizi garanti talepleriniz için saklayın.


