
1. Giriş
This manual provides instructions for the proper use and maintenance of the SUNMI V2SE Smart Mobile Terminal. The V2SE is a versatile device designed for various business applications, featuring an integrated 58mm thermal printer, 1D/2D barcode recognition, NFC capabilities, and running on Android 12.0.
Temel özellikler şunlardır:
- Integrated 58mm thermal printer with 80mm/s print speed.
- 1D/2D Barcode recognition for efficient scanning.
- NFC for contactless transactions.
- Android 12.0 operating system with a Quad Core 2.0 GHz CPU.
- 2 GB RAM and 8 GB ROM for smooth operation.
- Connectivity: 4G/3G/2G, 2.4G/5G Wi-Fi, Bluetooth 2.1/3.0/4.2.
- Removable Lithium Ion battery.
2. Cihaz Bileşenleri
Familiarize yourself with the main components of your SUNMI V2SE terminal.
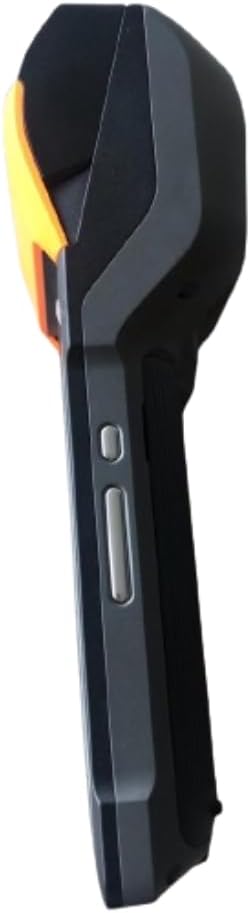
Şekil 2.1: Ön ve Yan View. This image displays the device's screen, the integrated barcode scanner at the top, and the power and volume buttons located on the side.

Şekil 2.2: Taraf ViewBu görüntü yan tarafı gösteriyor.file of the terminal, including the cover for the SIM card slot and additional buttons.

Şekil 2.3: Geri View. This image illustrates the rear of the device, featuring the thermal printer cover, the 0.3 MP camera, and the charging contact points.
Bileşen Listesi:
- Ekran Görüntüsü: Touch-sensitive LCD for user interaction.
- Barkod Tarayıcı: Integrated 1D/2D scanner for data capture.
- Termal yazıcı: For printing receipts and other documents.
- Güç Düğmesi: To turn the device on/off or wake/sleep.
- Ses Düğmeleri: Ses seviyelerini ayarlamak için.
- Kamera: 0.3 MP front photo sensor.
- SIM Kart Yuvası: Supports 1 Nano SIM.
- Pil Bölmesi: Houses the removable Lithium Ion battery.
- Charging Port/Contacts: Cihazı şarj etmek için.
3. İlk Kurulum
3.1. Pil Kurulumu
- Cihazın kapalı olduğundan emin olun.
- Cihazın arka tarafında bulunan pil bölmesi kapağını bulun (Şekil 2.3'e bakınız).
- İşaretlere göre kapağı kaydırarak veya kaldırarak çıkarın.
- Insert the provided Lithium Ion battery, ensuring the contacts align correctly.
- Pil bölmesi kapağını güvenli bir şekilde yerine takın.
3.2. SIM Kart Kurulumu
- Ensure the device is powered off and the battery is installed.
- Locate the SIM card slot cover on the side of the device (refer to Figure 2.2).
- Kapağı açın.
- Insert a Nano SIM card into the designated slot with the gold contacts facing down and the notched corner aligned.
- Close the SIM card slot cover firmly.
3.3. Thermal Paper Loading
- Locate the printer cover release latch, typically on the top or side of the printer compartment (refer to Figure 2.3).
- Yazıcının kapağını açın.
- Insert a 58mm thermal paper roll into the compartment, ensuring the paper feeds from the bottom and the leading edge extends out of the printer slot.
- Close the printer cover firmly until it clicks into place. Ensure there is no slack in the paper roll.
3.4. İlk Şarj ve Güç Açma
- Connect the provided power adapter to the device's charging port.
- Plug the adapter into a power outlet. Allow the device to charge fully before first use.
- To power on, press and hold the Power button (refer to Figure 2.1) until the SUNMI logo appears on the screen.
4. Kullanım Talimatları
4.1. Güç Açma/Kapatma ve Uyku Modu
- Güç Açık: Cihaz titreyene ve ekran aydınlanana kadar Güç tuşuna basılı tutun.
- Kapat: Press and hold the Power button until a power menu appears. Select "Power Off" and confirm.
- Uyku/Uyandırma: Briefly press the Power button to put the device into sleep mode or wake it up.
4.2. Using the Thermal Printer
The integrated 58mm thermal printer can be used to print receipts, tickets, and other documents.
- Ensure thermal paper is correctly loaded (refer to Section 3.3).
- Open the application that requires printing (e.g., POS software).
- Initiate the print command within the application. The device will automatically print the content.
- Tear off the printed paper against the serrated edge.
4.3. Barkod Tarama
The V2SE supports 1D and 2D barcode recognition.
- Open an application that requires barcode input.
- Point the scanner window (located at the top of the device, refer to Figure 2.1) at the barcode.
- Press the dedicated scan button (if available) or trigger the scan function within the application.
- Barkodun tarayıcının görüş alanında olduğundan emin olun. view and well-lit for optimal performance.
4.4. NFC İşlevselliği
The device supports Near Field Communication (NFC) for contactless operations.
- Ensure NFC is enabled in the device settings (Settings > Connected devices > NFC).
- Open an application that utilizes NFC (e.g., payment app, data transfer app).
- Hold the NFC-enabled card or device close to the NFC detection area on your terminal (typically near the top or back of the device).
- Follow the on-screen prompts to complete the transaction or data transfer.
4.5. Ağ Bağlantısı
- Wifi: Go to Settings > Network & internet > Wi-Fi to connect to available wireless networks.
- Mobile Data (4G/3G/2G): Ensure a valid SIM card is installed and mobile data is enabled in Settings > Network & internet > Mobile network.
- Bluetooth: Diğer Bluetooth cihazlarıyla eşleştirmek için Ayarlar > Bağlı cihazlar > Bluetooth'a gidin.
5. Bakım
5.1. Cihazın Temizlenmesi
- Temizlemeden önce cihazı kapatın.
- Yumuşak, tiftiksiz bir bez kullanın ve hafifçe kurulayın.ampDış yüzeyi suyla veya hafif, aşındırıcı olmayan bir temizleyiciyle silin.
- For the display, use a screen-specific cleaner and a microfiber cloth.
- Do not use harsh chemicals, solvents, or abrasive materials. Avoid spraying liquids directly onto the device.
5.2. Pil Bakımı
- Charge the battery regularly, avoiding complete discharge whenever possible.
- Pili aşırı sıcaklıklara maruz bırakmayın.
- Cihaz uzun süre kullanılmayacaksa, pili yaklaşık %50'ye kadar şarj edin ve serin, kuru bir yerde saklayın.
- Use only the original or approved charger and battery.
5.3. Printer Head Cleaning
Regular cleaning of the printer head can prevent print quality issues.
- Power off the device and open the printer cover.
- Pamuklu bir çubuğu hafifçe kullanınampened with isopropyl alcohol to gently wipe the thermal print head.
- Allow the print head to dry completely before closing the cover and powering on the device.
6. Sorun Giderme
| Sorun | Olası Neden | Çözüm |
|---|---|---|
| Cihaz açılmıyor | Low battery; Faulty battery; Power button issue | Charge the device for at least 30 minutes. Ensure battery is correctly installed. Try a different charger. |
| Yazıcı yazdırmıyor | No paper; Paper jammed; Printer head dirty; Application error | Check and load paper. Clear any paper jams. Clean the printer head (Section 5.3). Restart the application or device. |
| Barkod okuyucu çalışmıyor. | Scanner window obstructed; Barcode damaged; Application error | Ensure scanner window is clean. Try scanning a different barcode. Restart the application or device. |
| Wi-Fi bağlantısı yok | Wi-Fi off; Incorrect password; Out of range | Enable Wi-Fi in settings. Re-enter password. Move closer to the Wi-Fi router. |
| Mobil veri bağlantısı yok. | SIM card not installed; Mobile data off; No network coverage | Check SIM card installation. Enable mobile data in settings. Check for network coverage in your area. |
7. Özellikler
| Özellik | Detay |
|---|---|
| Örnek | V2SE |
| İşletim Sistemi | Android 12.0 |
| İşlemci | Dört Çekirdek 2.0 GHz |
| Veri deposu | 2 GB |
| ROM | 8 GB |
| Görüntülemek | LCD, 1920 x 1080 resolution, 16:9 Aspect Ratio |
| Yazıcı | 58 mm thermal printer, 80 mm/s print speed |
| Barcode Recognition | 1D / 2D Barcode recognition |
| Kamera | 0.3 MP Front Photo Sensor |
| SIM Yuvası | 1 Nano SIM (Dual SIM support) |
| Bağlantı | 4G/3G/2G Cellular, Wi-Fi (2.4G/5G), Bluetooth 2.1/3.0/4.2, NFC |
| Küresel Konumlama Sistemi | True, Supports GPS satellite navigation system |
| Pil | 1 Lithium Ion battery (removable, included) |
| Boyutlar | 22x9x9 cm |
| Ağırlık | 400 gr |
| Üretici | GÜNEŞİM |
8. Garanti ve Destek
For warranty information and technical support, please refer to the documentation provided with your purchase or contact your vendor. Keep your proof of purchase for warranty claims.