1. Giriş
Satın aldığınız için teşekkür ederizasing the CLAYMORE Heady3 CLC-500 Headlight. This versatile headlight is designed for various outdoor activities, offering multiple lighting modes, a motion sensor, and flexible mounting options. Please read this manual carefully before use to ensure proper operation and maintenance.
2. Güvenlik Bilgileri
- Göz yaralanmalarını önlemek için doğrudan ışık huzmesine bakmayın.
- Keep the device away from water and moisture unless specifically designed for waterproof use (check specifications).
- Do not attempt to disassemble or modify the headlight. This may void the warranty and pose safety risks.
- Yalnızca belirtilen şarj hacmini kullanıntage (USB 5V 1A).
- Çocukların erişemeyeceği yerde saklayınız.
- Aşırı sıcaklıklardan ve doğrudan güneş ışığından kaçının.
3. Paket İçeriği
Lütfen tüm öğelerin mevcut olduğundan emin olun:
- CLAYMORE Heady3 CLC-500 Headlight
- USB-C Şarj Kablosu
- Kafa bandı
- Kullanım Kılavuzu (bu belge)
4. Ürün Bittiview
Familiarize yourself with the components of your CLAYMORE Heady3 CLC-500 Headlight.
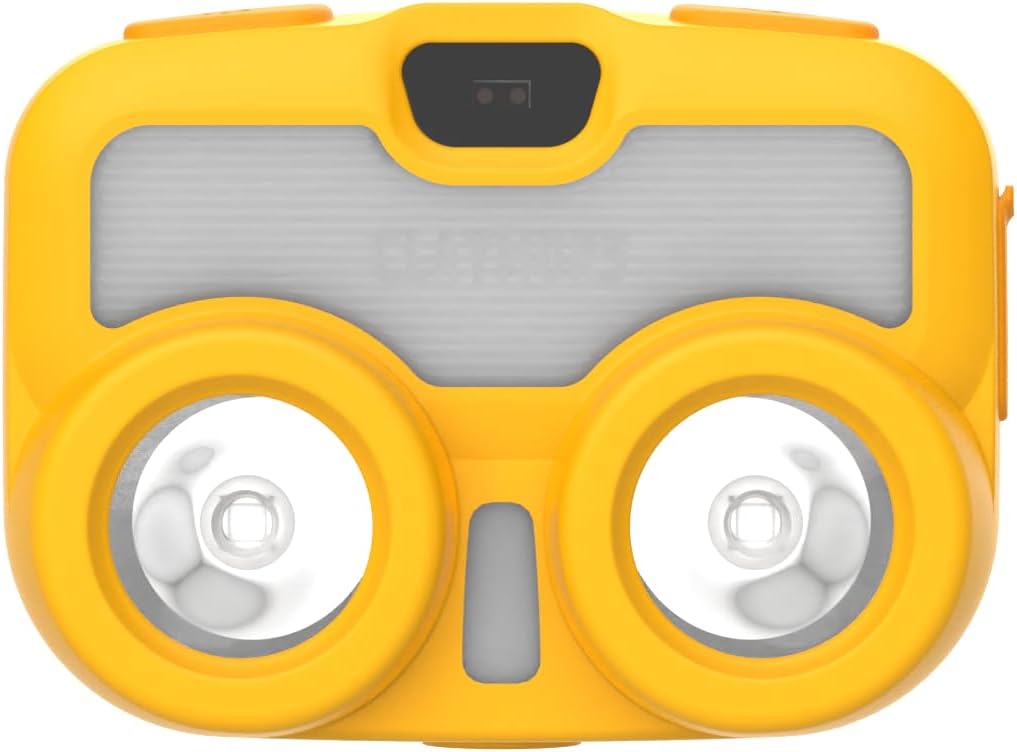
Şekil 4.1: Ön View. This image shows the front of the CLAYMORE Heady3 CLC-500 Headlight, highlighting the two main light sources and the central sensor area.

Şekil 4.2: Üst View. This image displays the top side of the headlight, featuring the power button (left), the P-SENSOR label, and the mode/motion sensor button (right).

Şekil 4.3: Yan View. This image illustrates the side of the headlight, clearly showing the USB-C charging port with its protective cover.
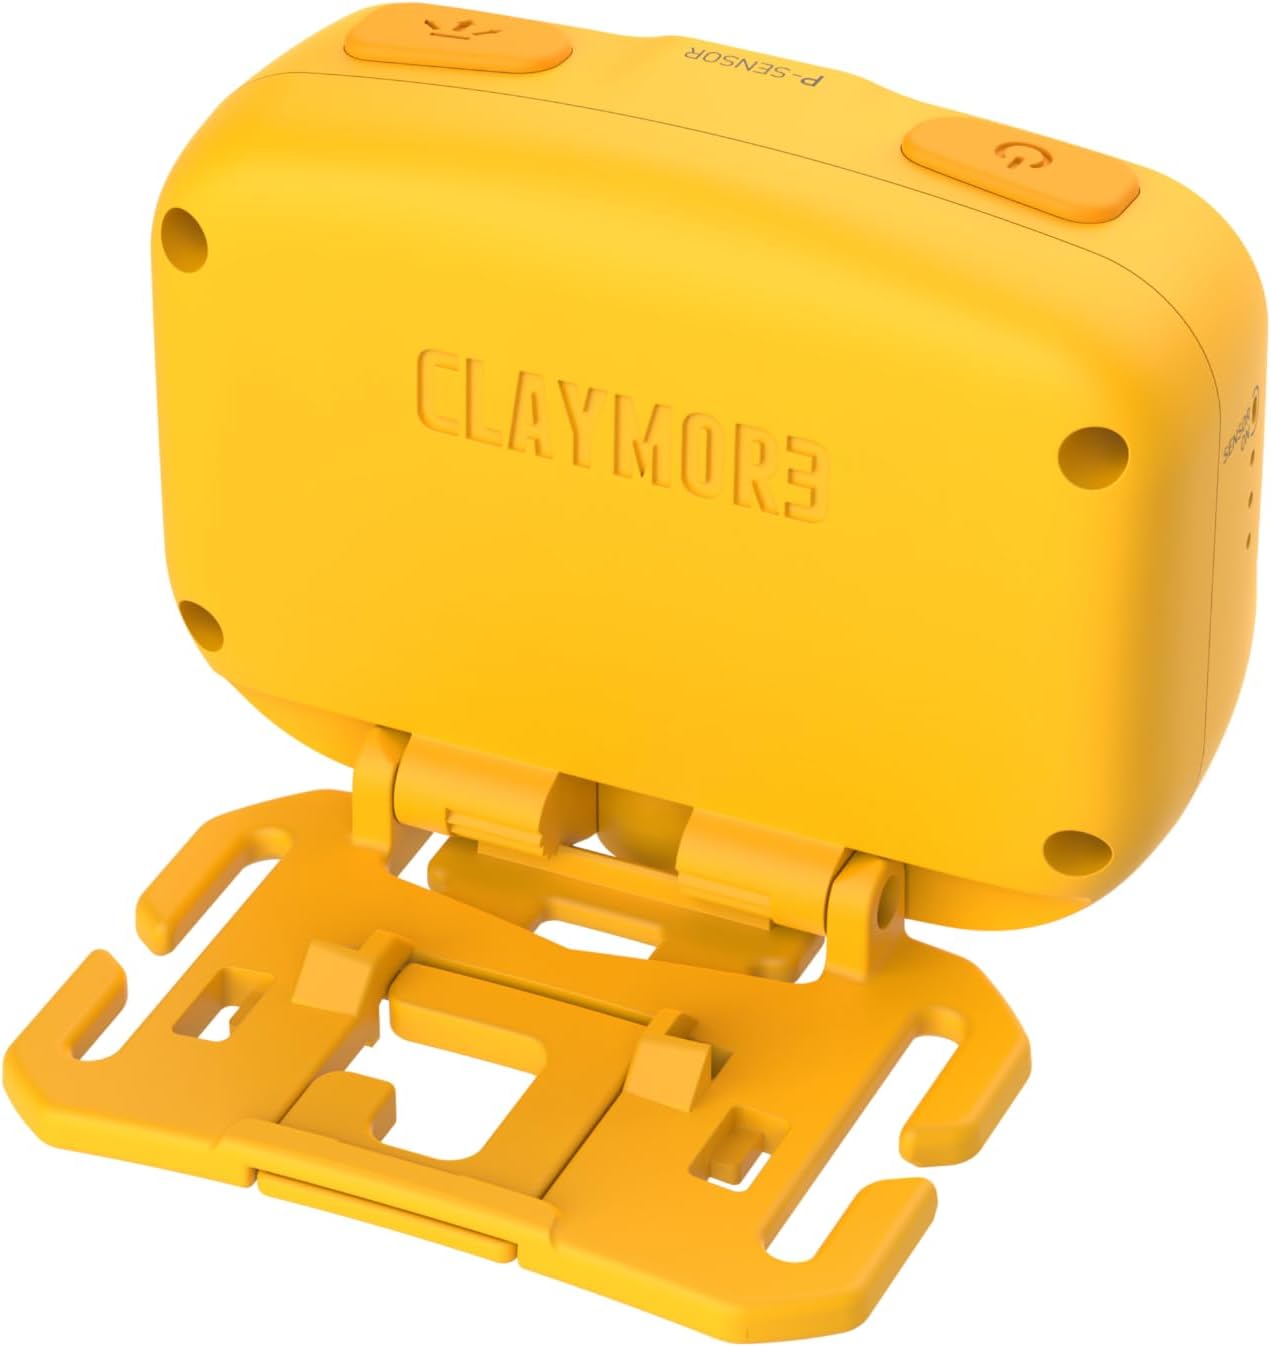
Şekil 4.4: Geri View. This image presents the rear of the headlight, showing the CLAYMORE branding and the integrated mounting bracket for various attachments.
5. Kurulum
5.1 Farların Şarj Edilmesi
- Locate the USB-C port on the side of the headlight (refer to Figure 4.3).
- Connect the provided USB-C cable to the headlight and the other end to a USB power source (e.g., wall adapter, power bank, computer USB port). Ensure the power source provides 5V 1A.
- Şarj gösterge ışığı, şarj durumunu gösterecektir (örneğin, şarj oluyorsa kırmızı, tamamen şarj olduysa yeşil).
- Tam şarj işlemi genellikle birkaç saat sürer.
5.2 Montaj Seçenekleri
The CLAYMORE Heady3 offers multiple ways to attach and use the light:
- Kafa bandı: Attach the headlight to the included headband for traditional headlamp kullanmak.
- Kanca: Utilize the integrated hook on the mounting bracket to hang the light from tents, branches, or other suitable fixtures.
- Timsah klibi: Attach the light to a bag, pocket, or other gear using an alligator clip (may require an additional accessory, not specified as included).
- Tripod Vida Deliği: The headlight features a tripod screw hole for mounting on standard tripods or other compatible accessories, offering stable positioning.
6. Kullanım Talimatları
6.1 Güç Açma/Kapatma
- To turn on the headlight, press and hold the power button (left button on top, refer to Figure 4.2).
- To turn off the headlight, press and hold the power button again.
6.2 Aydınlatma Modlarını Değiştirme
The CLC-500 features 6 lighting modes:
- Cool White (5700K, 6500K): Bright, clear light for general illumination.
- White (4200K): Neutral white light.
- Sıcak Beyaz (3000K): Softer, warmer light for comfortable ambiance.
- Kırmızı ışık: Preserves night vision and is less disruptive in dark environments.
- Diffused Light: Provides a wide, even spread of light.
- Odaklanmış Işık: Concentrated beam for long-distance illumination.
To cycle through the lighting modes, short press the mode button (right button on top, refer to Figure 4.2) while the light is on.
6.3 Brightness Adjustment (Dimming)
The brightness can be adjusted from 15 lumens to 500 lumens.
- While the light is on in any mode, press and hold the mode button to continuously adjust the brightness. Release the button when the desired brightness level is reached.
6.4 Hareket Sensörü Fonksiyonu
The motion sensor allows for hands-free operation, enabling you to turn the light on/off or dim it with a wave of your hand.
- To activate the motion sensor, double-press the mode button. An indicator light (if present, not specified) may confirm activation.
- Once activated, wave your hand in front of the sensor (located centrally on the front, refer to Figure 4.1) to toggle the light on/off or to dim it, depending on the specific mode.
- To deactivate the motion sensor, double-press the mode button again.
7. Bakım
- Temizlik: Wipe the headlight with a soft, dry cloth. Do not use abrasive cleaners or solvents.
- Pil Bakım: To prolong battery life, charge the device regularly, even if not in frequent use. Avoid fully discharging the battery for extended periods. Store in a cool, dry place.
- Depolamak: When storing for long periods, ensure the battery is partially charged (around 50%) and recharge every 3-6 months.
8. Sorun Giderme
- Işık yanmıyor:
- Pilin şarjlı olduğundan emin olun. Bir güç kaynağına bağlayın ve şarj göstergesini kontrol edin.
- Güç düğmesine birkaç saniye basılı tutun, böylece kısa bir basış olmadığından emin olun.
- Işık şarj olmuyor:
- USB-C kablosunun hasarlı olup olmadığını kontrol edin ve doğru şekilde bağlı olduğundan emin olun.
- Try a different USB power source or wall adapter.
- Hareket sensörü yanıt vermiyor:
- Ensure the motion sensor function is activated (double-press mode button).
- Clean the sensor area on the front of the headlight.
- Eliniz ile sensör arasında herhangi bir engel olmadığından emin olun.
9. Özellikler
| Örnek | CLC-500 |
| Boyutlar (yaklaşık) | 68 x 51 x 37 mm (2.7 x 2.0 x 1.5 inç) |
| Ağırlık (yaklaşık) | 82 gr (2.9 oz) |
| Parlaklık | 15 - 500 Lumens |
| Işık Renk Sıcaklıkları | Cool: 5700K, 6500K / White: 4200K / Warm: 3000K / Red |
| Giriş | USB 5V 1A |
| Pil Türü | Lityum Polimer (1 adet dahil) |
| Malzeme | Alüminyum |
| Özel Özellikler | Hareket Sensörü |
10. Garanti ve Destek
This product comes with a standard manufacturer's warranty. For specific warranty terms and conditions, please refer to the documentation provided at the time of purchase or contact your retailer. For technical support or service inquiries, please contact the manufacturer or your local distributor.