
Sharp ES-NIH814BWA-EN
Sharp ES-NIH814BWA-EN Entegre Çamaşır Makinesi Kullanım Kılavuzu
Model: ES-NIH814BWA-EN | Capacity: 8kg | Spin Speed: 1400 rpm
1. Giriş
1.1 Ürün Üzeriview
Thank you for choosing the Sharp ES-NIH814BWA-EN Integrated Washing Machine. This appliance is designed to provide efficient and reliable laundry care for your home. With an 8kg capacity and a 1400 rpm spin speed, it offers powerful cleaning performance while integrating seamlessly into your kitchen or utility space.

Şekil 1.1: Ön view of the Sharp ES-NIH814BWA-EN Integrated Washing Machine, showing its sleek design and integrated panel.
1.2 Güvenlik Bilgileri
Before operating your washing machine, please read all safety instructions carefully. Keep this manual for future reference. Improper installation, maintenance, or use can cause serious injury or damage. Always disconnect the appliance from the power supply before cleaning or maintenance.
- Cihazın uygun şekilde topraklandığından emin olun.
- Çocukların cihazla oynamasına izin vermeyin.
- Do not open the detergent dispenser during the wash cycle.
- Cihaza ıslak elle dokunmayın.
- Ambalaj malzemelerini çocukların erişemeyeceği yerlerde saklayın.
2. Kurulum ve Kurulum
2.1 Paketin açılması
Carefully remove all packaging materials. Check for any transport damage. Remove all transit bolts from the rear of the machine before installation. These bolts are essential for safe transport but must be removed for operation to prevent vibration and damage.
2.2 Location and Levelling
Place the washing machine on a firm, level floor. Adjust the adjustable feet to ensure the machine is perfectly level and stable. This prevents excessive vibration and noise during operation.
2.3 Su Bağlantısı
Connect the water inlet hose to a cold water tap with a 3/4-inch thread. Ensure all connections are tight to prevent leaks. The drain hose should be securely placed into a standpipe or connected to a suitable drain system, ensuring it is not kinked.

Şekil 2.1: Arka view Çamaşır makinesinin su giriş ve tahliye hortumu bağlantılarını gösteren şema.
2.4 Elektrik Bağlantısı
Güç kablosunu topraklı bir elektrik prizine takın. Ses seviyesinin düşük olduğundan emin olun.tage ve frekans değerlerinin cihazın bilgi plakasındaki özelliklerle eşleştiğinden emin olun. Uzatma kablosu veya birden fazla adaptör kullanmayın.
2.5 İlk Kullanım
Before the first wash, run an empty cycle with a small amount of detergent at 60°C to clean the drum and remove any manufacturing residues.
3. Kullanım Talimatları
3.1 Kontrol Paneli Üstüview
The control panel consists of a program selection dial, a digital display, and function buttons for customizing your wash cycle.
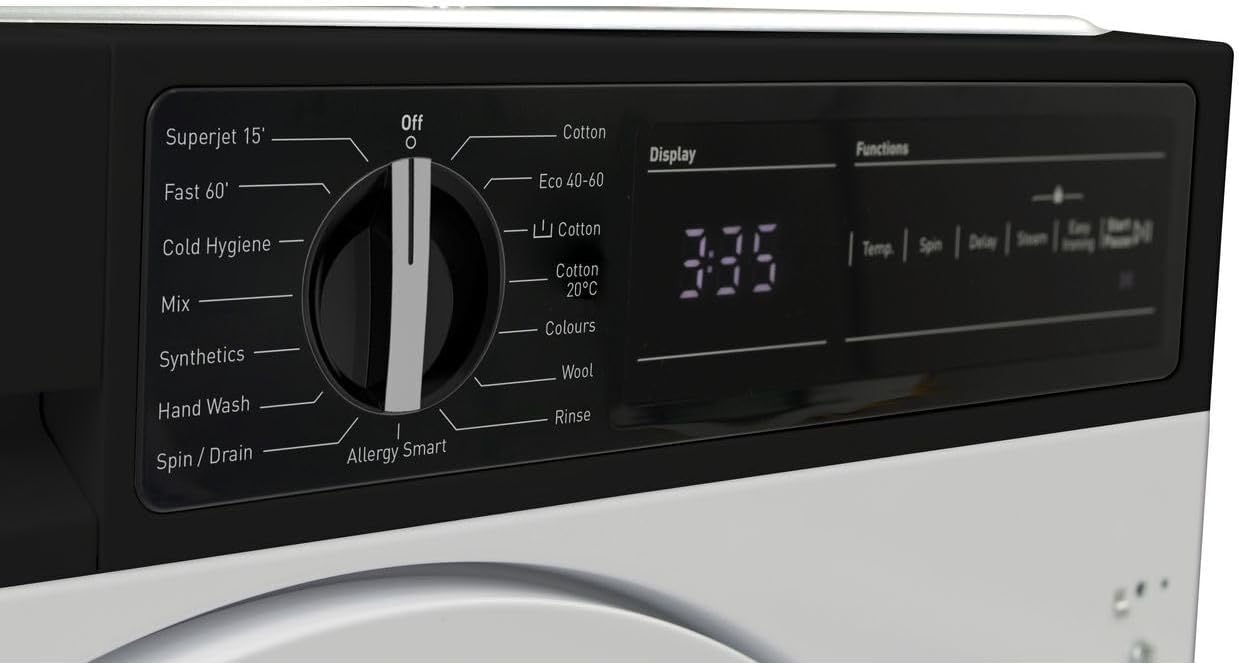
Şekil 3.1: Ayrıntılı view of the program selection dial and digital display.

Figure 3.2: Close-up of the digital display showing time remaining and function buttons for Temp, Spin, Delay, Steam, and Easy Ironing.
3.2 Çamaşırların Yüklenmesi
Open the washing machine door and load your laundry. Do not overload the machine; leave enough space for clothes to tumble freely. Close the door firmly until it clicks.

Figure 3.3: The washing machine door open, revealing the drum for loading laundry.

Şekil 3.4: İç kısım view Etkili yıkama için tasarlanmış paslanmaz çelik tambur.
3.3 Deterjan ve Katkı Maddelerinin Eklenmesi
Pull out the detergent dispenser drawer. Add the appropriate amount of detergent to the main wash compartment and fabric softener to its designated compartment. Refer to your detergent packaging for dosage recommendations.

Şekil 3.5: Deterjan ve yumuşatıcı bölmelerini gösteren deterjan çekmecesi.
3.4 Yıkama Programı Seçimi
Turn the program selection dial to choose your desired wash program. Available programs include:
- Superjet 15': Hafif kirli çamaşırlar için hızlı yıkama.
- Fast 60': A faster cycle for everyday loads.
- Cold Hygiene: For hygienic washing at lower temperatures.
- Karışım: For mixed fabric loads.
- Sentetikler: For synthetic fabrics.
- El Yıkama: Gentle cycle for delicate items.
- Sıkma / Boşaltma: To spin and drain water from laundry.
- Allergy Smart: Designed to remove allergens.
- Pamuk: Standard program for cotton items.
- Eko 40-60: Energy-efficient program for cottons and mixed items at 40-60°C.
- Pamuklu 20°C: Low-temperature cotton wash.
- Renkler: For colored garments to preserve vibrancy.
- Yün: Gentle program for woolens.
- Durulmak: To rinse laundry without washing.
3.5 Ayarların Yapılması
After selecting a program, you can customize settings using the function buttons:
- Sıcaklık: Adjust wash temperature.
- Döndürmek: Change spin speed.
- Gecikme: Set a delayed start time.
- Buhar: Add a steam function for better hygiene or wrinkle reduction.
- Kolay ütüleme: Reduces creasinDaha kolay ütüleme için g.
3.6 Yıkama Döngüsünün Başlatılması
Basın Başlat/Duraklat button to begin the selected wash cycle. The display will show the remaining time.
3.7 Ending a Wash Cycle
Once the cycle is complete, the machine will signal. The door will unlock after a short delay. Remove your laundry promptly.
4. Bakım ve Özen
Düzenli bakım, çamaşır makinenizin optimum performansını sağlar ve ömrünü uzatır.
4.1 Deterjan Bölmesinin Temizlenmesi
Deterjan kalıntısı birikmesini önlemek için deterjan haznesini periyodik olarak çıkarıp akan su altında temizleyin.
4.2 Tamburun Temizlenmesi
Run a maintenance wash (e.g., a hot cycle with a washing machine cleaner or vinegar) monthly to clean the drum and remove any odors or residue.
4.3 Filtrenin Temizlenmesi
Locate the drain pump filter, usually at the bottom front of the machine. Open the cover, drain any residual water, and carefully remove and clean the filter. This should be done regularly to prevent blockages.
4.4 Dış Cephenin Temizlenmesi
Dış yüzeyleri yumuşak, damp bezle silin. Aşındırıcı temizleyiciler veya çözücüler kullanmayın.
5. Sorun Giderme
If you encounter issues with your washing machine, refer to the following common problems and solutions before contacting customer service.
| Sorun | Olası Neden | Çözüm |
|---|---|---|
| Makine başlamıyor | Elektrik yok; Kapı kapalı değil; Program seçilmedi; Başlat/Duraklat düğmesine basılmadı. | Check power supply; Ensure door is latched; Select a program; Press Start/Pause. |
| Su alımı yok | Su musluğu kapalı; Giriş hortumu bükülmüş; Su basıncı çok düşük. | Musluğu açın; Hortumu düzeltin; Evdeki su basıncını kontrol edin. |
| Su akmıyor | Drain hose kinked; Drain pump filter blocked. | Tahliye hortumunu düzeltin; Tahliye pompası filtresini temizleyin. |
| Aşırı titreşim/gürültü | Taşıma cıvataları çıkarılmamış; Makine düz değil; Dengesiz yük. | Remove transit bolts; Adjust feet to level machine; Redistribute laundry. |
| Dağıtıcıda deterjan kalıntısı | Too much detergent; Low water pressure; Dispenser blocked. | Reduce detergent amount; Check water pressure; Clean dispenser. |
6. Teknik Özellikler
| Özellik | Şartname |
|---|---|
| Marka | Keskin |
| Örnek | ES-NIH814BWA-EN |
| Kapasite | 8 Kilogram |
| Maksimum Dönme Hızı | 1400 RPM |
| Kurulum Türü | Entegre |
| Kontrol Konsolu | Buttons, Dial, Digital Display |
| Konum Erişimi | Ön Yükleme |
| Malzeme (Davul) | Paslanmaz çelik |
| Cilttage | 2.2E+2 Volt (AC) |
| Renk | Beyaz |
7. Garanti ve Müşteri Desteği
Your Sharp ES-NIH814BWA-EN Washing Machine comes with a manufacturer's warranty. Please refer to the separate warranty card provided with your appliance for specific terms and conditions, including warranty period and coverage.
For technical assistance, spare parts, or to schedule a service appointment, please contact Sharp customer support. Contact details can typically be found on the Sharp official webSitede veya garanti belgelerinizde.
When contacting support, please have your model number (ES-NIH814BWA-EN) and serial number ready. The serial number is usually located on a sticker inside the door frame or on the back of the appliance.
Ask a question about this manual
Ask about setup, troubleshooting, compatibility, parts, safety, or missing instructions. Manuals+ will review the question and use this page’s manual context to help answer it.