
giriiş
Thank you for choosing the JOOM Waterfall Black Kitchen Faucet. This manual provides detailed instructions for the safe and efficient installation, operation, and maintenance of your new faucet. Please read this manual thoroughly before installation and keep it for future reference.
Güvenlik Bilgileri
- Herhangi bir kurulum veya bakım işlemine başlamadan önce ana su kaynağını mutlaka kapatın.
- Montaj sırasında güvenlik gözlüğü ve eldiven gibi uygun kişisel koruyucu ekipman kullanın.
- Sızıntıları önlemek için tüm bağlantıların güvenli olduğundan emin olun.
- Kurulum sürecinin herhangi bir noktasında emin değilseniz, kalifiye bir tesisatçıya danışın.
- Musluğun yüzeyinde aşındırıcı temizleyiciler veya sert kimyasallar kullanmayın.
Paket İçeriği
Kuruluma başlamadan önce tüm bileşenlerin mevcut olduğundan emin olun:
- JOOM Waterfall Black Kitchen Faucet body
- Pull-out spray hose
- Mounting hardware (nut, washer)
- Hot and cold water supply lines (pre-installed)
- Çekilebilir hortum için karşı ağırlık
- Deck plate (for 3-hole installation, if applicable)
- Kullanım Kılavuzu
Özellikler
| Özellik | Detay |
|---|---|
| Marka | JOOM |
| Model Adı | JU011 |
| Model Numarası | JU011B01 |
| Malzeme | Paslanmaz çelik |
| Bitiş Türü | Siyah |
| Kol Sayısı | 1 (Tek Saplı) |
| Montaj Tipi | Güverte Dağı |
| Delik Sayısı | 1 or 3 (with optional deck plate) |
| Özel Özellikler | Pull-out Sprayer, 360° Swivel Spout |
| Musluk Tasarımı | Şelale |
| Emzik yüksekliği | 11.5 cm (4.5 inç) |
| Emzik ulaşmak | 8 inç (20.3 cm) |
| Ürün Boyutları (D x G x Y) | 8.1D x 24.1G x 45.7Y cm (3.2D x 9.5G x 18Y inç) |
| Su Temini Bağlantısı | G1/2 UK |
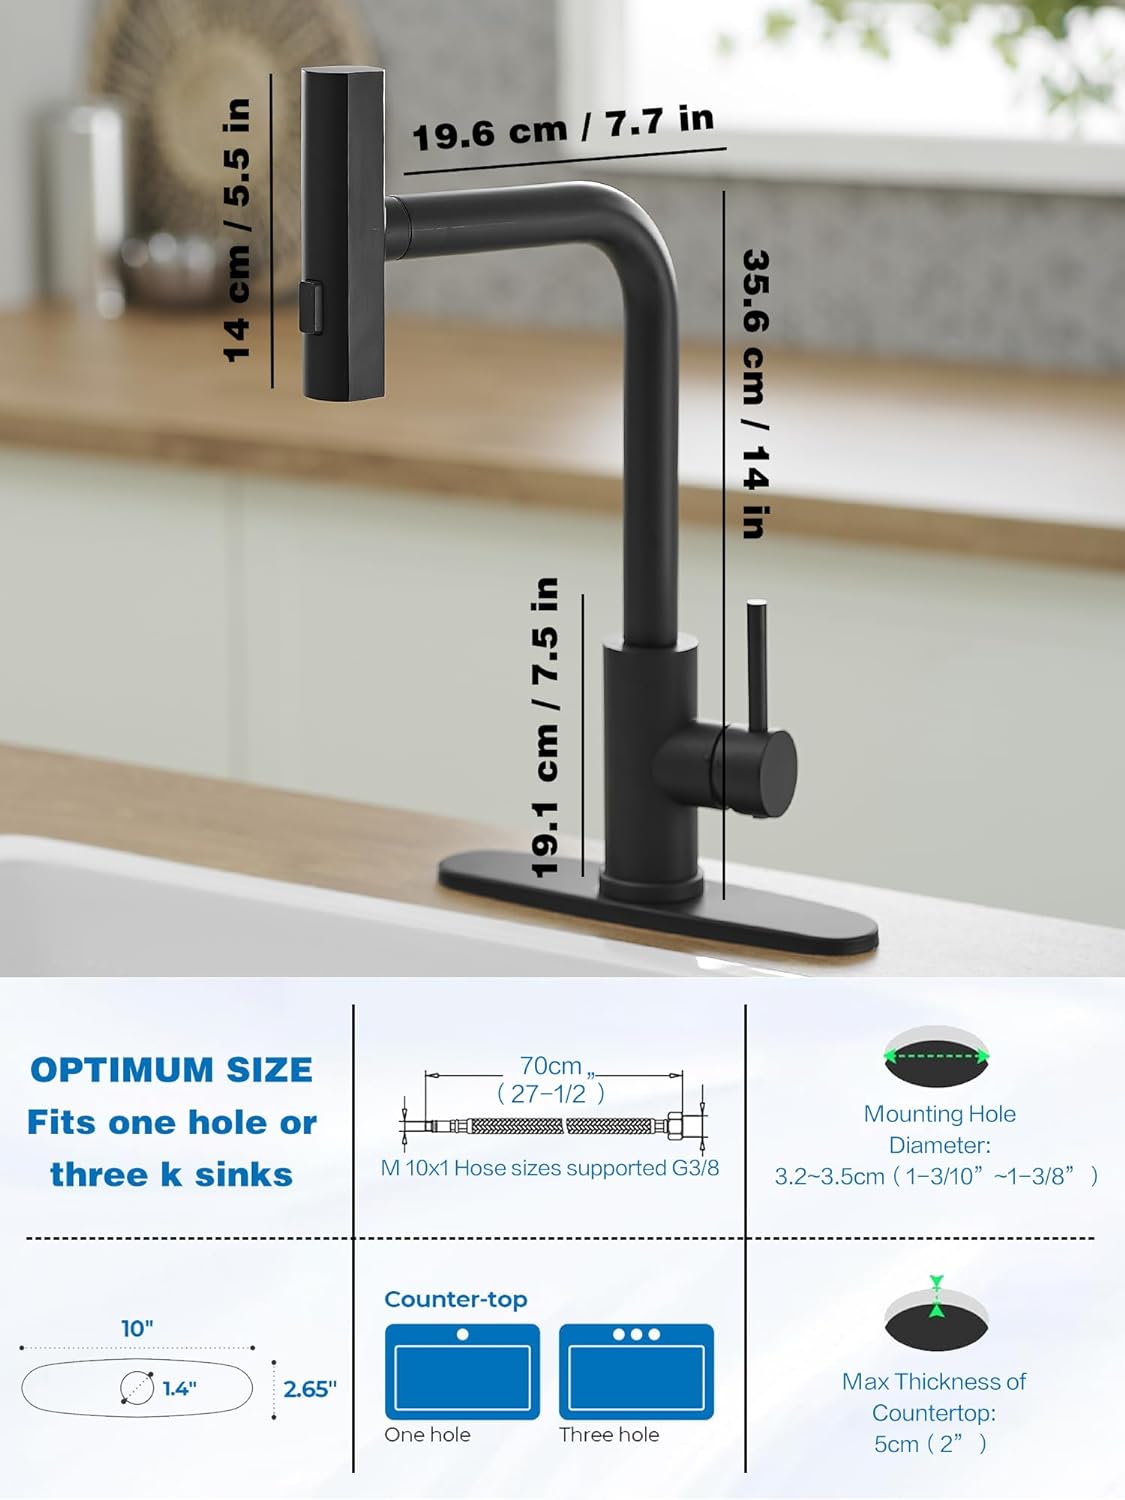
Image: Detailed dimensions and installation requirements for the JOOM kitchen faucet, illustrating compatibility with one or three-hole sinks, mounting hole diameter (3.2-3.5 cm), and maximum countertop thickness (5 cm).
Kurulum Kılavuzu
The JOOM kitchen faucet is designed for easy installation. Follow these steps carefully:
- Lavaboyu Hazırlayın: Ensure the mounting surface is clean and dry. If installing on a 3-hole sink, use the included deck plate. For a 1-hole sink, the deck plate is optional.
- Musluğu Monte Edin: Insert the faucet body into the mounting hole. From underneath the sink, secure the faucet with the provided washer and mounting nut. Tighten firmly but do not overtighten.
- Su Besleme Hatlarını Bağlayın: The hot and cold water supply lines are pre-installed. Connect them to your hot and cold water supply valves. Ensure a tight seal to prevent leaks. The connection standard is G1/2 UK.
- Install Counterweight: Attach the counterweight to the pull-out spray hose underneath the sink. This ensures the spray head retracts smoothly. Position it to allow full extension of the spray head.
- Sızıntı Testi: Once all connections are made, slowly turn on the main water supply and check for any leaks. Run water through the faucet for a few minutes to flush out any debris.

Image: Step-by-step installation process for the JOOM kitchen faucet, demonstrating how to secure the faucet, connect water lines, and attach the pull-out hose counterweight for both 1-hole and 3-hole sink configurations.
Kullanım Talimatları
Your JOOM kitchen faucet is designed for ease of use and versatility.
Su Akışı ve Sıcaklık Kontrolü
Tek bir kumanda kolu hem su akışını hem de sıcaklığı kontrol eder:
- Sıcaklık: Sıcak su için kolu sola, soğuk su için sağa çevirin.
- Flow Volume: Lift the handle up to increase water flow and push it down to decrease or turn off the water.
3-Mode Pull-Out Sprayer
The pull-out spray head offers three distinct modes for various tasks:
- Akış Modu: Provides a steady, aerated stream for filling pots and general washing. This mode is gentle and minimizes splashing.
- Broom Mode: Delivers a powerful, wide spray designed to remove stubborn food residues and clean larger surfaces efficiently.
- Yağmur Modu: Offers a gentle, wide rain-like spray, ideal for rinsing delicate fruits and vegetables.
To switch between modes, press the button(s) on the spray head.

Image: The JOOM kitchen faucet demonstrating its three spray modes: Stream for filling, Broom for powerful cleaning, and Rain for gentle rinsing.

Rain Mode: Ideal for delicate ingredient cleaning.

Broom Mode: Efficient for dish washing and removing stubborn stains.

Stream Mode: Perfect for filling containers quickly.
360° Swivel and Pull-Out Hose
The faucet features a 360° swivel spout, allowing you to direct water to any part of your sink. The retractable PEX hose provides extended reach, covering the entire sink area for maximum flexibility during use.

Image: The JOOM faucet's 360° swivel and pull-out spray hose extending to cover the entire sink, highlighting its flexibility.
Bakım
Regular maintenance will ensure the longevity and optimal performance of your JOOM kitchen faucet.
- Bitişin Temizlenmesi: Clean the faucet regularly with a soft cloth and mild soap. Avoid abrasive cleaners, harsh chemicals, or scouring pads, as these can damage the black finish. Rinse thoroughly and dry with a soft cloth to prevent water spots.
- Püskürtme Nozullarının Temizlenmesi: Over time, mineral deposits can build up in the spray nozzles. To clean, gently rub the rubber nozzles with your finger or a soft brush to dislodge any deposits.
- Sızıntıların Kontrolü: Periodically inspect all connections under the sink for any signs of leaks. Tighten connections if necessary, but do not overtighten.
- Havalandırıcı Bakımı: If water flow becomes restricted, the aerator (if present) may be clogged. Unscrew the aerator from the spray head, clean any debris, and rinse it before reattaching.
Sorun giderme
| Sorun | Olası Neden | Çözüm |
|---|---|---|
| Düşük Su Akışı | Clogged aerator or spray nozzles; partially closed shut-off valves; kinked supply line. | Clean aerator/spray nozzles. Ensure shut-off valves are fully open. Check supply lines for kinks. |
| Musluk tabanından su sızıntısı | Loose mounting nut; worn O-rings or gaskets. | Tighten mounting nut under the sink. Inspect and replace O-rings/gaskets if worn (consult a plumber if unsure). |
| Püskürtme başlığından sızıntı | Mineral buildup in spray head; damaged internal components. | Clean spray nozzles. If problem persists, contact customer support. |
| Sprey Başlığının Geri Çekilmesinde Zorluk | Improperly positioned counterweight; obstruction under the sink. | Adjust the counterweight position on the hose. Clear any obstructions under the sink that might impede hose movement. |
| Su Sıcaklığı Sorunları | Incorrect hot/cold supply line connection; issue with water heater. | Sıcak ve soğuk su hatlarının doğru şekilde bağlandığını kontrol edin. Su ısıtıcısının ayarlarını kontrol edin. |
Garanti ve Destek
For warranty information and customer support, please refer to the documentation included with your purchase or contact JOOM customer service directly. Keep your purchase receipt as proof of purchase.
For further assistance, please visit the JOOM official websitesine gidin veya müşteri destek ekibiyle iletişime geçin.