
1. Giriş
This manual provides detailed instructions for the installation, operation, and maintenance of your XSDTS Smart Lock Digital Smart Lock Doorbell. This smart lock offers multiple unlocking methods including fingerprint, RFID card, digital key, mobile application (Tuya Wifi App), and traditional physical keys. It is designed for doors with a thickness between 35mm and 75mm and includes child safety features.
Temel Özellikler
- Multiple unlocking methods: Fingerprint, RFID Card, Passcode, Tuya App, Mechanical Key.
- Integrated doorbell function.
- Remote access and control via Tuya Wifi App.
- Anti-peeping password function for enhanced security.
- Automatic locking feature.
- Pil göstergesi.
- Durable aluminum construction with polished finish.
- Suitable for door thicknesses from 35mm to 75mm.
2. Ürün Bileşenleri
The XSDTS Smart Lock package includes the following items:
- Ön panel x 1
- Back panel x 1
- Plug lock x 1 (optional)
- Smart card x 2
- Mechanical key x 2
- Vida seti x 1

Şekil 2.1: Üzeriview of the XSDTS Smart Lock, showing the exterior and interior units, and the Tuya app interface for remote unlocking.

Figure 2.2: Detailed dimensions of the lock body and panels, indicating compatibility with door thicknesses between 35mm and 70mm.

Figure 2.3: Visual representation of the multiple unlocking methods: temporary password, IC card, standard password, fingerprint, manual key, and app unlock.
3. Kurulum ve Kurulum
3.1 Kurulum Öncesi Ölçümler
Before beginning installation, ensure your door meets the required specifications. Accurate measurements are crucial for proper fit and function.
- Measure the thickness of your door frame.
- Measure the length of the guide piece.
- Measure the width of the guide piece.
- Confirm the door aligns with the center of the lock.
- Measure the distance for the screw hole of the back panel.

Figure 3.1: Step-by-step guide for measuring your door to ensure compatibility and proper installation of the smart lock.
3.2 Pil Kurulumu
The smart lock requires 4 AA batteries (not included). Locate the battery cover on the back panel and insert the batteries according to the polarity indicators.
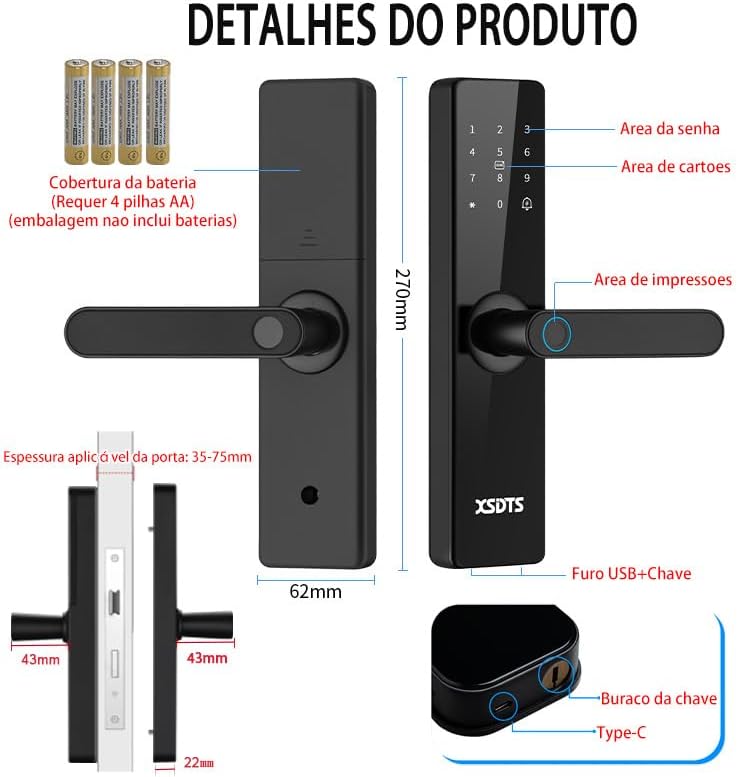
Figure 3.2: Illustration of the smart lock's components, including the battery cover, password area, card area, fingerprint area, USB port, and keyhole.
3.3 İlk Kurulum ve Uygulama Bağlantısı
To utilize the smart features, download the Tuya Smart APP.

Figure 3.3: The Tuya Smart App interface, demonstrating features like app unlock, scene linkage, information sending, and record verification.
- Cihazınızın uygulama mağazasından "Tuya Smart" uygulamasını indirin.
- Hesabınıza kaydolun veya giriş yapın.
- Follow the in-app instructions to add your XSDTS Smart Lock. This typically involves putting the lock into pairing mode and connecting it to your Wi-Fi network.
- Once connected, you can manage users, generate temporary passwords, and view kayıtların kilidini açmak.
4. Akıllı Kilidin Çalıştırılması
4.1 Kilit Açma Yöntemleri
4.1.1 Parmak İziyle Kilit Açma
Kayıtlı parmağınızı parmak izi sensörüne yerleştirin. Parmak izi tanınırsa kilit açılacaktır.
Figure 4.1: Visual representation of the multiple unlocking methods, including fingerprint recognition.

Figure 4.2: Illustrates the speed and accuracy of the fingerprint recognition system: recognition speed ≤0.5s, error rate ≤0.001%, rejection rate ≤0.01%.
4.1.2 Parola Kilidini Açma
Enter your registered passcode on the keypad. Press the '#' key to confirm.
Gözetleme Önleme Şifresi: To prevent others from guessing your password, you can enter random digits before or after your actual password. For example, if your password is "123456", you can enter "987123456098" and the lock will still recognize "123456".
4.1.3 RFID Card Unlock
Present your registered RFID card to the card reading area on the lock.
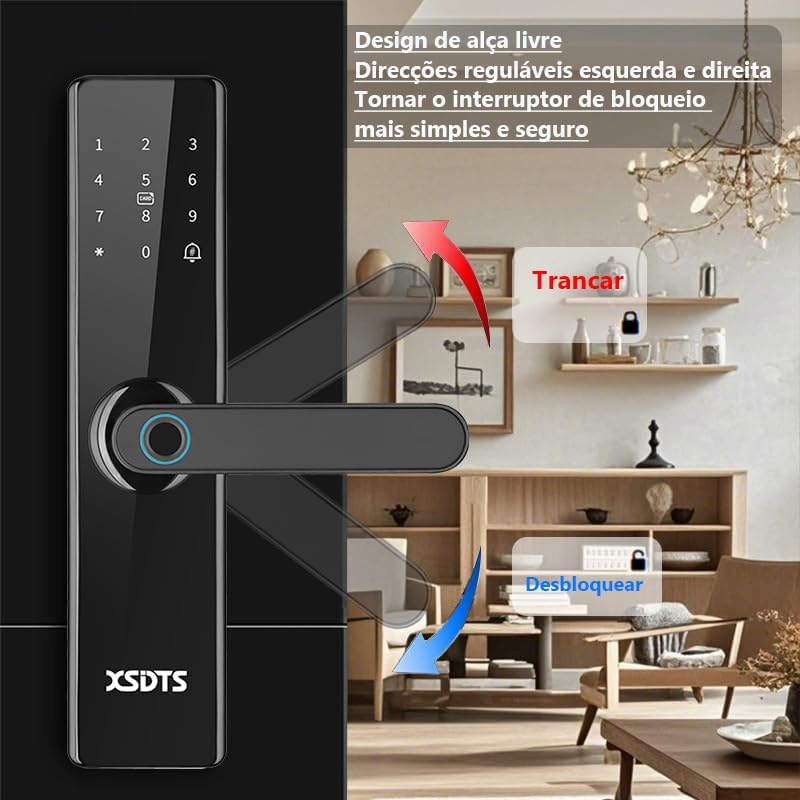
Figure 4.3: Demonstrates the use of an encrypted IC card for unlocking, highlighting dynamic encryption technology for enhanced security.
4.1.4 Tuya App Unlock
Open the Tuya Smart App on your smartphone. Select your lock and use the unlock function within the app. You can also generate temporary passwords or send remote unlocking requests.
Figure 4.4: The Tuya Smart App interface, showing options for remote unlocking requests and managing security settings.
4.1.5 Mechanical Key Unlock
In case of battery depletion or system malfunction, use the provided mechanical keys to unlock the door. The keyhole is typically located at the bottom of the front panel.
Figure 4.5: Illustration showing the location of the USB port and the mechanical keyhole on the smart lock.
4.2 Kapının Kilitlenmesi
The XSDTS Smart Lock features an auto-lock function. After closing the door, the lock will automatically engage.
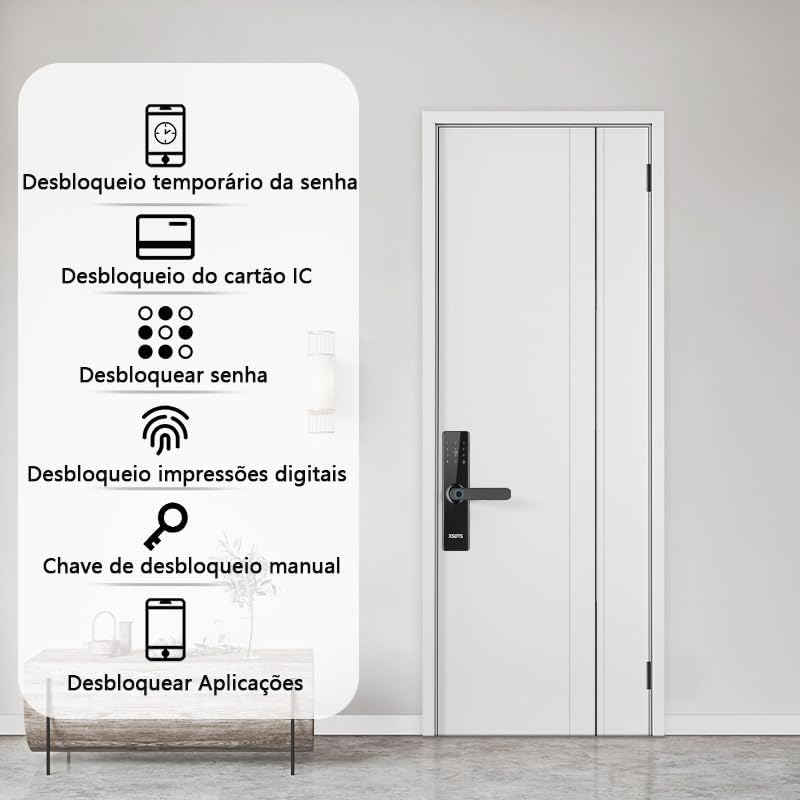
Figure 4.6: Demonstrates the free handle design, allowing the handle to be moved up to lock and down to unlock, making operation simpler and more secure.
4.3 Kapı Zili Fonksiyonu
The smart lock has a built-in doorbell. When the doorbell button is pressed, it will alert you via the lock's speaker and potentially through the Tuya app, depending on your settings.
5. Bakım
5.1 Pil Değişimi
When the battery indicator shows low power, replace all four AA batteries promptly. Do not mix old and new batteries.
5.2 Temizlik
Clean the lock's surface with a soft, dry cloth. Avoid using abrasive cleaners or solvents that could damage the finish or electronic components.
5.3 Fingerprint Sensor Care
Keep the fingerprint sensor clean and free of dirt or moisture to ensure optimal performance.
6. Sorun Giderme
6.1 Kilit Yanıt Vermiyor
- Pil seviyesini kontrol edin. Pil seviyesi düşükse değiştirin.
- Kilidin düzgün bir şekilde takıldığından ve tüm bağlantıların güvenli olduğundan emin olun.
- Use the mechanical key as a backup.
6.2 Fingerprint Not Recognized
- Parmağınızın temiz ve kuru olduğundan emin olun.
- Parmakınızı sensör üzerinde yeniden konumlandırmayı deneyin.
- Re-register your fingerprint if the issue persists.
6.3 Uygulama Bağlantı Sorunları
- Ensure your Wi-Fi network is stable and the lock is within range.
- Wi-Fi yönlendiricinizi ve akıllı kilidi yeniden başlatın.
- Uygulama güncellemelerini kontrol edin.
- Re-pair the lock with the Tuya app if necessary.
6.4 Lock Does Not Auto-Lock
- Verify that the auto-lock feature is enabled in the app settings.
- Kapının tamamen kapanmasını engelleyen herhangi bir engel olup olmadığını kontrol edin.
7. Özellikler
| Bağlanmak | Detay |
|---|---|
| Marka | XSDTS |
| Model Numarası | F17 |
| Kilit Tipi | Sürgü |
| Malzeme | Alüminyum |
| Renk | Siyah |
| Sona ermek | Cilalı |
| Ürün Boyutları | 25x6x7.5 cm |
| Ürün Ağırlığı | 2.5 Kilogram |
| Kapı Kalınlığı Uyumluluğu | 35mm ila 75mm |
| Kontrol Yöntemi | Application (Tuya Wifi App) |
| Güç Kaynağı | 4 x AA Pil (dahil değildir) |
| Özel Özellikler | Anti-Peeping Password, Auto-Lock, Battery Indicator, Fingerprint, Passcode Unlock |
8. Garanti Bilgileri
Ürün bilgilerinde belirli garanti detayları verilmemektedir. Lütfen satıcının veya üreticinin resmi web sitesine başvurun. webGaranti şartları ve koşulları için lütfen siteyi ziyaret edin.
9. Müşteri Desteği
For technical assistance, troubleshooting, or further inquiries, please contact XSDTS customer support through their official channels. Refer to the product packaging or the manufacturer's webiletişim bilgileri için site.


