
1. Giriş
Satın aldığınız için teşekkür ederizasing the DAYTECH Window and Door Opening Sensor. This device is designed to enhance security and convenience in your home or business by detecting the opening and closing of doors, windows, and other entry points. It features multiple operation modes, adjustable volume, and remote control functionality. Please read this manual carefully before use to ensure proper installation and operation.
2. Ürün Bittiview
2.1 Paket İçeriği
- Main Sensor Unit (Receiver)
- Magnetic Strip (Transmitter)
- Uzaktan kumanda
- Çift Taraflı Yapışkan Bant
- Kullanıcı Kılavuzu
2.2 Bileşen Tanımlama
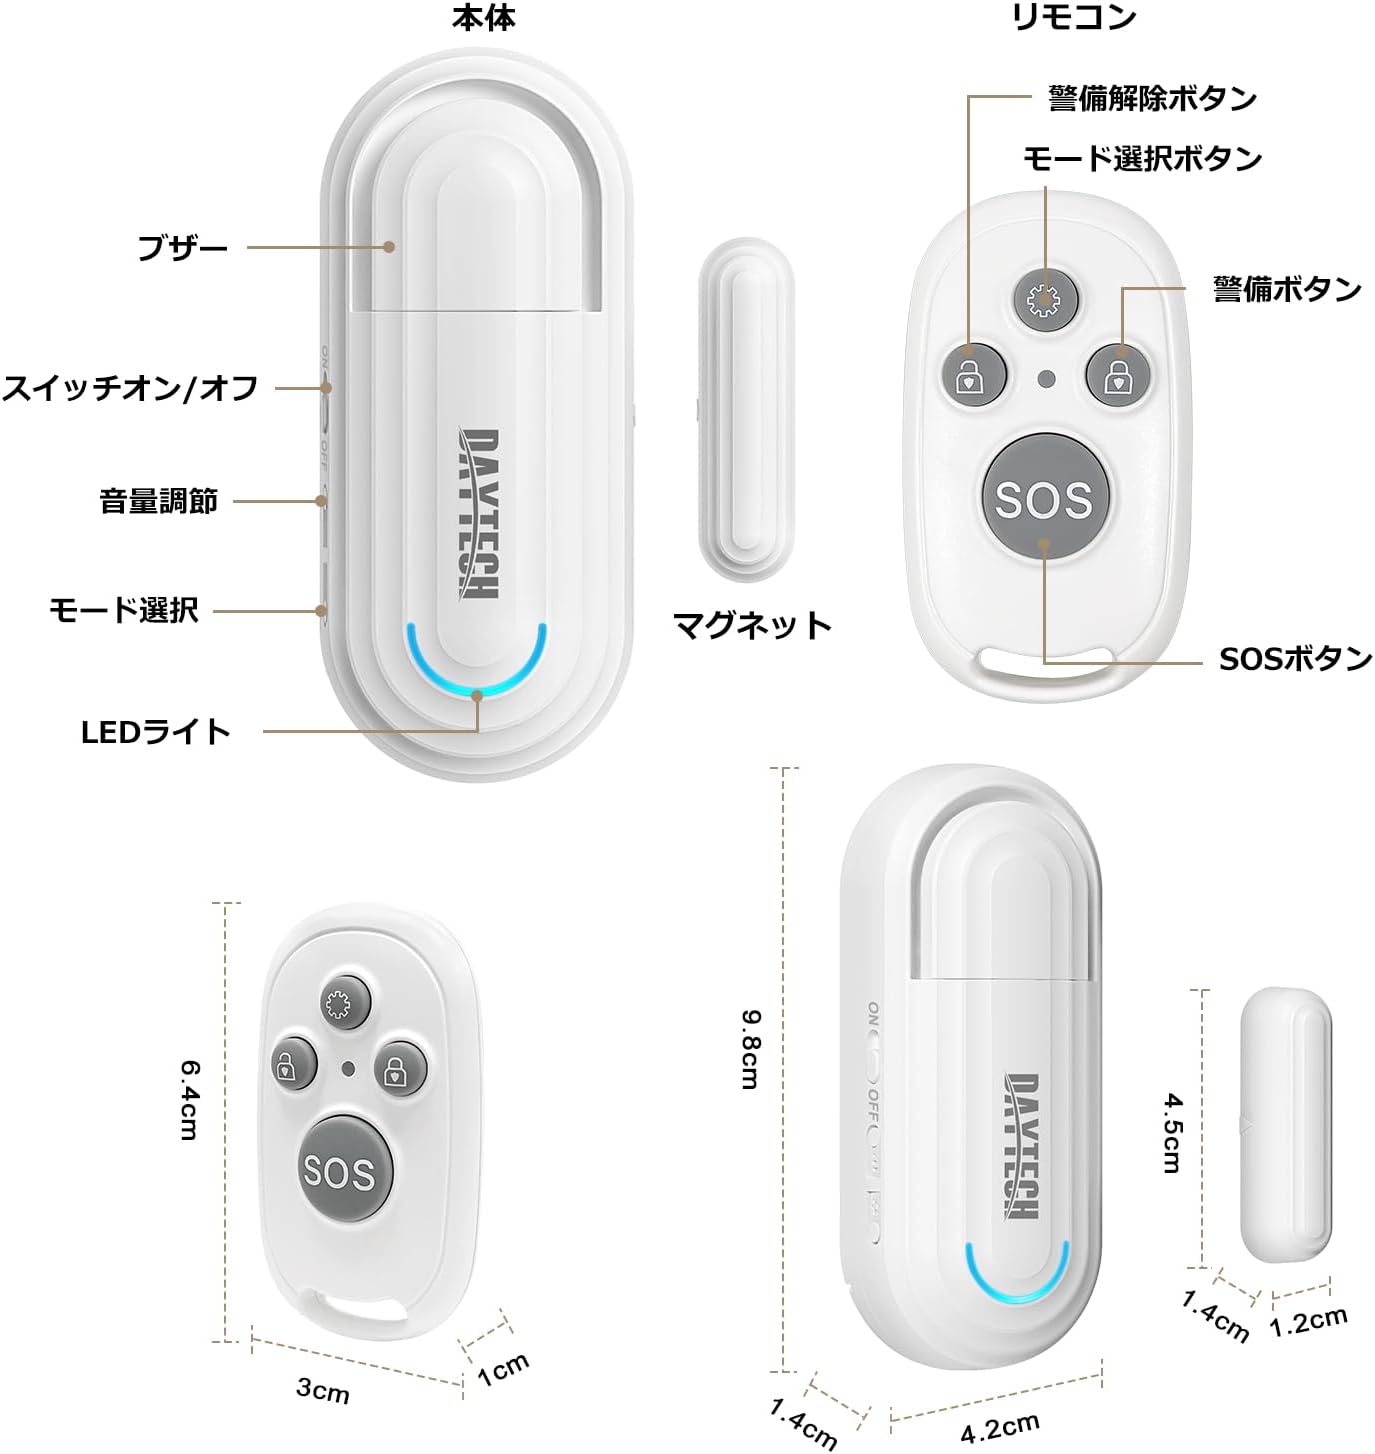
Şekil 1: Main Sensor Unit, Magnetic Strip, and Remote Control. The main unit features an ON/OFF switch, volume adjustment buttons, mode selection, and an LED indicator. The remote control has arm, disarm, mode selection, and SOS buttons.
- Ana Sensör Ünitesi: Contains the alarm speaker, LED light, ON/OFF switch, volume adjustment buttons, and mode selection button.
- Manyetik Şerit: The smaller component that triggers the sensor when separated from the main unit.
- Uzaktan kumanda: Used to arm/disarm the alarm, select modes, and activate an SOS function.
3. Özellikler
- Uzaktan Kumanda İşlevselliği: Conveniently arm, disarm, and select modes from a distance.
- Four Operation Modes:
- Elderly Monitoring: Alerts when a door is opened, useful for monitoring elderly individuals.
- Visitor Chime: Functions as a doorbell, notifying you of visitors.
- Refrigerator Reminder: Prevents leaving the refrigerator door open.
- Hırsız alarmı: Triggers a loud alarm upon unauthorized entry through windows or doors.
- Four-Level Volume Adjustment: Adjust the alarm volume from 0dB (silent) to 120dB to suit your environment and needs.
- Kolay Kurulum: Simple adhesive installation. Easily attaches to any flat surface like doors, windows, refrigerators, or cabinets using the included double-sided tape.
- Düşük Pil Hatırlatıcısı: The sensor emits a sound every 5 minutes when the battery is low.

Şekil 2: Illustrates the four versatile usage modes of the sensor.
4. Kurulum ve Yükleme
4.1 Battery Installation (Main Unit)
The main unit requires two AAA alkaline dry cell batteries (not included). Open the battery compartment on the back of the main unit and insert the batteries, ensuring correct polarity. Close the compartment securely.
4.2 Battery Installation (Magnetic Strip & Remote Control)
The magnetic strip (transmitter) and remote control come with pre-installed batteries. If replacement is needed for the magnetic strip, it uses a 12V 23A battery. For the remote control, it uses a CR2032 button cell battery. Carefully open the casing ve pilini kutuplarına dikkat ederek değiştirin.
Video 1: Demonstrates how to replace the battery in the magnetic strip (transmitter unit).
4.3 Pairing the Remote Control with the Main Unit
- Turn on the main sensor unit using the ON/OFF switch.
- Press and hold the mode selection button on the main unit for approximately 5 seconds until you hear a "beep" sound and the LED indicator flashes. This indicates pairing mode.
- While the main unit is in pairing mode, press any button on the remote control. The main unit will emit a confirmation sound, indicating successful pairing.
- Gerekirse ek uzaktan kumandalar için işlemi tekrarlayın.
4.4 Fiziksel Kurulum
The sensor can be installed using the provided double-sided adhesive tape. Ensure the installation surface is clean and dry.
- Attach the main sensor unit to the door/window frame.
- Attach the magnetic strip to the door/window itself, aligning it with the main sensor unit.
- Ensure the gap between the main unit and the magnetic strip is less than 1.5 cm (0.6 inches) when the door/window is closed. The triangular marks on both components should align.

Şekil 3: Correct installation method for the sensor, highlighting the maximum gap between the main unit and magnetic strip.
Video 2: Provides a visual guide on how to set up and pair the door sensor, including battery installation and pairing steps.
5. Kullanım Talimatları
5.1 Güç AÇIK/KAPALI
Use the ON/OFF switch on the side of the main sensor unit to power the device on or off.
5.2 Ses Ayarı
Press the volume adjustment button on the main unit to cycle through the four volume levels (0dB, 60dB, 90dB, 120dB).

Şekil 4: Visual representation of the 4-level volume adjustment feature.
5.3 Mod Seçimi
Press the mode selection button on the main unit or the mode selection key on the remote control to cycle through the four operation modes:
- Elderly Monitoring Mode: Alerts when a door is opened.
- Visitor Chime Mode: Plays a chime when a door is opened.
- Refrigerator Reminder Mode: Alerts if the refrigerator door remains open.
- Anti-theft Alarm Mode: Triggers a loud alarm upon unauthorized opening.
5.4 Uzaktan Kumanda İşlevleri

Şekil 5: Uzaktan kumanda düğmelerinin işlevleri.
- Mod Seçim Tuşu: Cycles through the four operation modes.
- Kol Düğmesi: Activates the alarm/monitoring function.
- Silahsızlandırma Düğmesi: Deactivates the alarm/monitoring function.
- SOS Butonu: Acil durum alarmını etkinleştirir.
Video 3: Demonstrates the sensor triggering an alarm when a door is opened, showcasing its basic functionality and installation.
6. Bakım
6.1 Temizlik
Cihazı yumuşak ve kuru bir bezle silin. Aşındırıcı temizleyiciler veya çözücüler kullanmayın.
6.2 Pil Değişimi
When the main unit emits a sound every 5 minutes, it indicates a low battery. Replace the two AAA alkaline batteries in the main unit. For the magnetic strip, replace the 12V 23A battery. For the remote control, replace the CR2032 button cell battery as needed.
7. Sorun Giderme
- No alarm when door/window opens:
- Ensure the main unit is powered ON.
- Check if the gap between the main unit and magnetic strip is less than 1.5 cm.
- Pillerin doğru şekilde takıldığından ve bitmemiş olduğundan emin olun.
- Confirm the correct mode is selected (e.g., Anti-theft Alarm mode).
- Uzaktan kumanda çalışmıyor:
- Uzaktan kumandanın pilini kontrol edin.
- Re-pair the remote control with the main unit (refer to Section 4.3).
- Alarm is too loud/quiet:
- Adjust the volume using the volume adjustment button on the main unit (refer to Section 5.2).
- Low battery reminder constantly sounding:
- Ana ünitedeki pilleri değiştirin.
8. Özellikler
| Özellik | Detay |
|---|---|
| Marka | DAYTECH |
| Model Numarası | DA09 |
| Ürün Ölçüleri (Ana Ünite) | 5x2x8 cm |
| Ürün Ağırlığı | 100 gr |
| Güç Kaynağı (Ana Ünite) | 2 x AAA Alkaline Batteries (1.5V DC, not included) |
| Power Source (Magnetic Strip) | 1 x 12V 23A Battery (included) |
| Power Source (Remote Control) | 1 x CR2032 Button Cell Battery (included) |
| Sensör Teknolojisi | Manyetik sensör |
| Ses Seviyeleri | 4 levels (0dB, 60dB, 90dB, 120dB) |
| Kurulum Türü | Yapışkan Montaj |
9. Güvenlik Bilgileri
- Cihazı sudan ve yüksek nemden uzak tutun.
- Cihazı kendiniz sökmeye veya onarmaya çalışmayın. Gerekirse müşteri desteğiyle iletişime geçin.
- Kullanılmış pilleri yerel düzenlemelere göre atın.
- Pilleri çocukların erişemeyeceği yerlerde saklayın.
10. Garanti ve Destek
DAYTECH offers a lifetime quality guarantee for this product. If you have any questions or encounter issues during use, please feel free to contact our customer support. We are committed to providing high-quality products and services.
Contact information can typically be found on the product packaging or the official DAYTECH webalan.