
1. Giriş
This manual provides essential instructions for the safe assembly, operation, and maintenance of your DWVO 10x10ft Hardtop Gazebo. Please read all instructions carefully before beginning assembly and retain this manual for future reference. This gazebo is designed for outdoor use, providing shade and protection from various weather conditions.
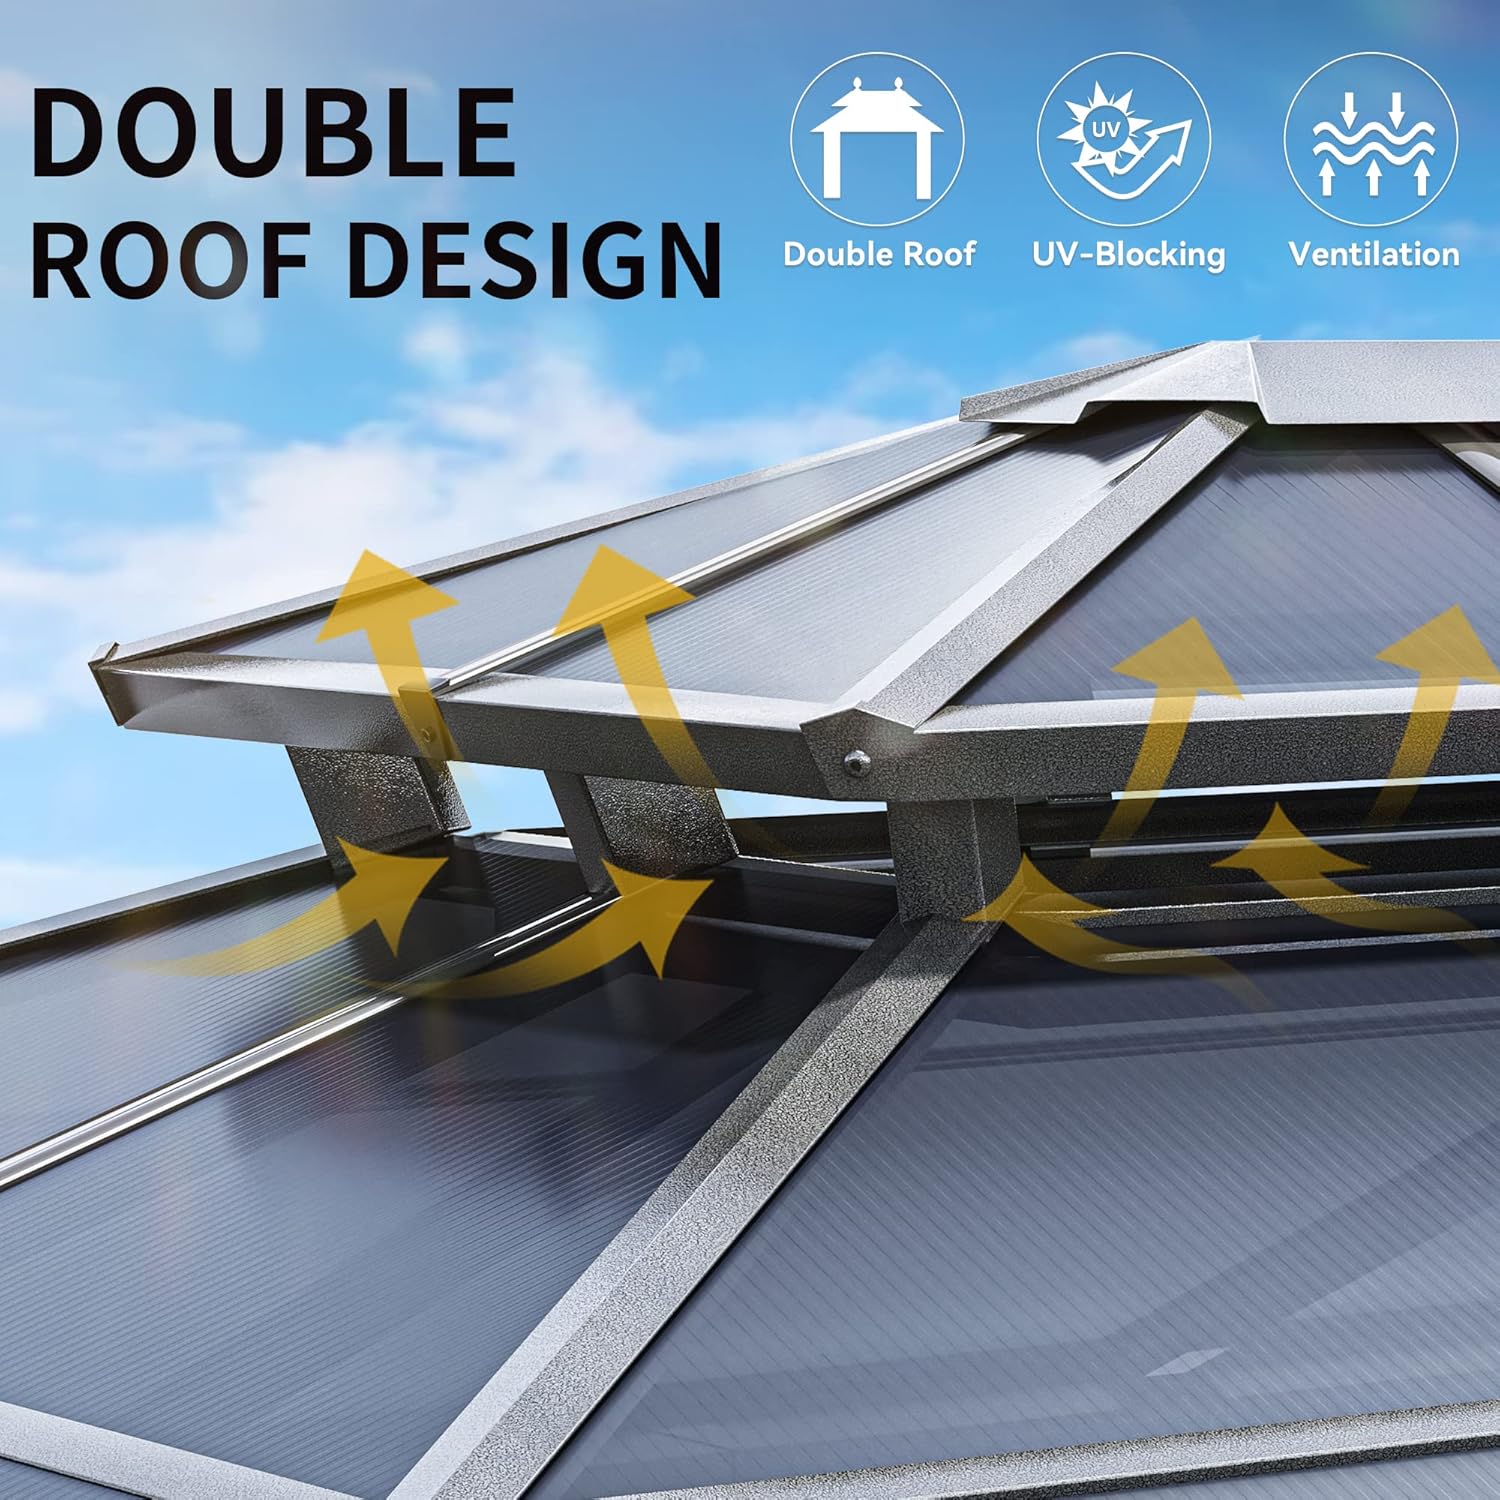
Image 1.1: Fully assembled DWVO 10x10ft Hardtop Gazebo.
2. Güvenlik Bilgileri
- Montajdan önce tüm parçaların eksiksiz ve hasarsız olduğundan emin olun. Herhangi bir parça eksik veya hasarlıysa montaj işlemine devam etmeyin.
- Assembly requires a minimum of 2-5 people. Attempting to assemble alone may result in injury or damage to the product.
- Montaj sırasında eldiven gibi uygun güvenlik ekipmanlarını giyin.
- Choose a level and stable surface for installation. Secure the gazebo to the ground using the provided stakes or other suitable anchoring methods to prevent wind damage.
- Do not hang heavy objects from the gazebo frame or roof.
- In case of severe weather conditions (e.g., heavy snow, strong winds, hurricanes), it is recommended to remove the curtains and netting and, if possible, disassemble the gazebo to prevent damage.
- Çocukları ve evcil hayvanları toplanma alanından uzak tutun.
3. Paket İçeriği
Verify that all components listed in the packing list (provided separately with your product) are present. Contact customer support immediately if any parts are missing or damaged.
Tipik bileşenler şunlardır:
- Aluminum Frame Components (posts, beams, connectors)
- Polikarbonat Çatı Panelleri
- Double-Layered Sidewalls (polyester curtains and mesh netting)
- Hardware Kit (screws, bolts, washers, nuts, ground stakes)
- Assembly Tools (basic wrench, hex key - specific tools may vary)
- Kullanım Kılavuzu (bu belge)
4. Kurulum ve Montaj
Assembly typically takes 2-4 hours with 2-5 people. Refer to the detailed tutorial installation videos and the separate assembly manual for step-by-step visual guidance.
4.1 Ön Montaj
- Toplantı için geniş ve düz bir alan ayırın.
- Unpack all components and lay them out, verifying against the packing list.
- Familiarize yourself with the parts and hardware.
4.2 Çerçeve Montajı
Begin by assembling the main aluminum frame. Connect the posts and beams according to the provided diagrams in the separate assembly manual. Ensure all connections are secure but do not fully tighten bolts until the entire frame is upright and squared.

Resim 4.1: Sağlam alüminyum çerçeve yapısının detayı.
4.3 Roof Panel Installation
Install the polycarbonate roof panels onto the assembled frame. The 6mm thick panels are designed for all-season protection. Ensure panels are correctly oriented for proper rain drainage and UV protection. It is recommended to use tape to hold roof panels in place while securing them, as suggested by user experience.

Image 4.2: The double roof design facilitates ventilation and blocks UV rays.
4.4 Sidewall Attachment
Attach the double-layered sidewalls, consisting of polyester curtains and mesh netting, to the double trail system on the gazebo frame. The sidewalls feature double-sided zippers for easy access and privacy control.

Image 4.3: Details of the double-layered sidewalls, including netting and zippers.
4.5 Final Securing
Once the gazebo is fully assembled, tighten all bolts and screws. Use the provided ground stakes to anchor the gazebo securely to the ground. For additional stability, especially in windy areas, consider using heavier-duty anchors (not included).

Image 4.4: Gazebo dimensions for planning and placement.
5. Kullanım Talimatları
5.1 Hardtop Polycarbonate Roof
The 6mm thick polycarbonate roof provides protection from rain and harmful UV rays, while also reducing heat underneath. The sleek roof slope design prevents water accumulation. The double-roof structure allows for improved ventilation.
5.2 Double-Layered Sidewalls
The gazebo features two layers of sidewalls: a brown polyester cloth for privacy and shade, and a black mesh netting for ventilation and insect protection. Both layers operate on a double trail system and have double-sided zippers for easy opening and closing. You can use them independently or together.
5.3 Convenient Top Hook
A hook is located at the center of the gazebo roof for hanging lightweight items such as decorative lights or a small fan (ensure items do not exceed the weight limit specified in the separate assembly manual).
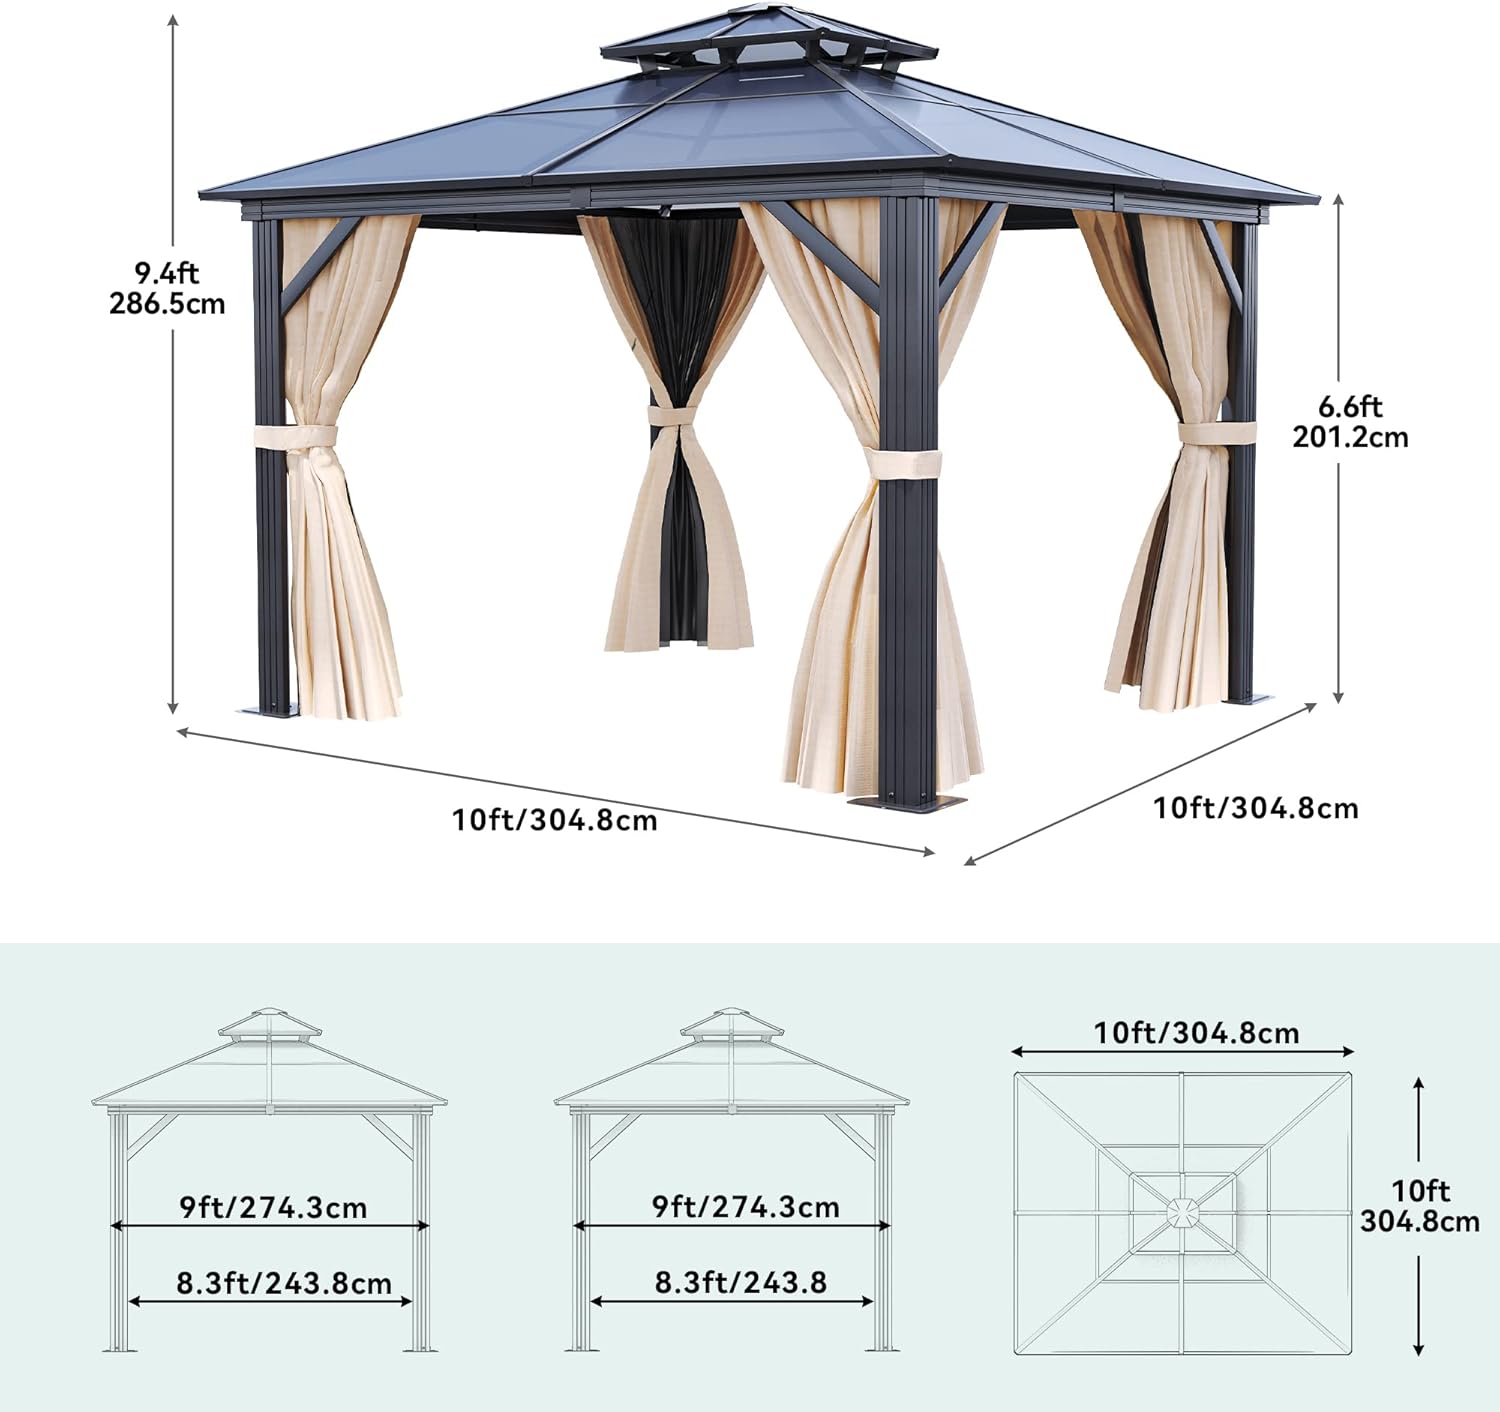
Image 5.1: The top hook provides a convenient hanging point.
6. Bakım
6.1 Temizlik
- Çerçeve: Clean the aluminum frame with a soft cloth, mild soap, and water. Avoid abrasive cleaners or harsh chemicals.
- Çatı Panelleri: Gently clean polycarbonate panels with a soft cloth and mild soapy water. Rinse thoroughly to avoid streaks.
- yan duvarlar: The polyester curtains and mesh netting can be spot cleaned with mild soap and water. For deeper cleaning, follow care instructions on the fabric tags. Ensure they are completely dry before storing or closing for extended periods to prevent mildew.
6.2 Muayene
Regularly inspect all bolts, screws, and connections to ensure they remain tight. Check the fabric for any tears or damage. Address any issues promptly to maintain the gazebo's structural integrity and appearance.
6.3 Kış Bakımı
While the gazebo is designed for all seasons, in areas with heavy snowfall, it is advisable to regularly clear snow from the roof to prevent excessive weight accumulation. Consider removing curtains and netting during winter months to prolong their lifespan.
7. Sorun Giderme
7.1 Eksik Parçalar
If you find any parts missing upon delivery, immediately contact DWVO customer service with your order details and the specific part numbers required. Do not attempt to assemble the gazebo with incomplete parts.
7.2 Montaj Zorlukları
If you encounter difficulties during assembly, refer to the detailed assembly manual and tutorial videos. Ensure you have the recommended number of people (2-5) for assistance. Some parts may require firm pressure to fit correctly. If issues persist, contact customer support.
7.3 İstikrar Kaygıları
Ensure the gazebo is installed on a level surface and securely anchored to the ground using all provided stakes. In areas prone to high winds, consider purchasing additional, more robust anchoring solutions. Regularly check the tightness of all frame connections.
8. Özellikler
| Özellik | Detay |
|---|---|
| Marka | DWVO |
| Model Numarası | MADWVDE9t7 |
| Ürün Boyutları (U x G x Y) | 120" x 120" x 108" (10ft x 10ft x 9ft) |
| Ürün Ağırlığı | 128 Pound |
| Çerçeve Malzemesi | Alüminyum |
| Çatı Malzemesi | Polycarbonate (6mm thick) |
| Yan Duvar Malzemesi | Polyester, Mesh Netting |
| Su Direnç Seviyesi | Su geçirmez |
| UV Koruması | UV Dayanıklı |
| Şekil | Kare |
| Doluluk | 6-8 Kişi |
| Montaj Gerekli | Evet |
| UPC | 840332365596 |
9. Garanti ve Destek
DWVO stands behind the quality of its products. For warranty information, please refer to the warranty card included with your purchase or visit the official DWVO website. If you have any questions, require replacement parts, or need assistance with assembly or troubleshooting, please contact our professional customer support team. Contact details can typically be found on our webSitede veya satın alma belgelerinizde bulabilirsiniz.
Thank you for choosing DWVO.