giriiş
This manual provides detailed instructions for the safe and effective use of your HEXIEDEN Wireless Dog Fence System. Please read this manual thoroughly before operating the device to ensure proper setup, functionality, and the well-being of your pet. This system is designed to create a safe boundary for your dog using a wireless transmitter and a collar receiver.
Ürün Özellikleri
- Wireless Boundary System: Establishes a circular containment area around the transmitter.
- Ayarlanabilir Aralık: Offers five signal fence distance levels (100, 200, 300, 500, 990 feet) with an approximate error margin of ±16 feet, depending on environmental factors.
- Additional Transmitter Support: Allows for the placement of multiple transmitters to eliminate signal blind spots and expand the containment area.
- Rechargeable Components: Both the transmitter and collar receiver feature built-in rechargeable batteries for extended use.
- Suya Dayanıklı Tasarım: Both the transmitter and receiver are IP65 dust-proof and IPX7 waterproof, suitable for various weather conditions.
- Otomatik Eşleştirme: The system automatically pairs transmitters and collar receivers, supporting multiple dogs simultaneously.
- Güvenlik Özellikleri: Includes a low 3.7V voltage static correction, reflective TPU collar for night safety, and silicone covers for contact probes to protect your pet's skin.
- Ayarlanabilir Yaka: The eco-friendly TPU collar is adjustable from 8 to 28 inches, fitting dogs weighing between 10 to 110 pounds.
Paket İçeriği
Aşağıda listelenen tüm öğelerin paketinizde bulunduğunu doğrulayın:
- Wireless Transmitter × 1
- Small Launcher (Additional Transmitter) × 1
- Collar Receiver × 1
- Adjustable TPU Strap × 1
- 5V/1A Charger × 1
- Metal Contact Probe × 4
- Conductive Silicone Covers × 4
- Test Light × 1
- English Manual × 1 (This document)
Kurulum Talimatları
1. Cihazların Şarj Edilmesi
Before initial use, fully charge both the Wireless Transmitter and the Collar Receiver using the provided 5V/1A charger. Ensure the devices are powered off during charging.
2. Assembling and Adjusting the Collar Receiver
- Attach the adjustable TPU strap to the Collar Receiver.
- Screw the metal contact probes into the receiver. Choose the appropriate length based on your dog's coat thickness.
- Place the conductive silicone covers over the metal contact probes. These covers help minimize direct skin contact and enhance comfort.
- Adjust the TPU strap to fit your dog's neck. The collar should be snug enough for the probes to make contact, but loose enough to comfortably fit two fingers between the collar and your dog's neck. The collar is suitable for dogs weighing 10 to 110 pounds, with an adjustable size range of 8 to 28 inches. Excess strap can be trimmed.
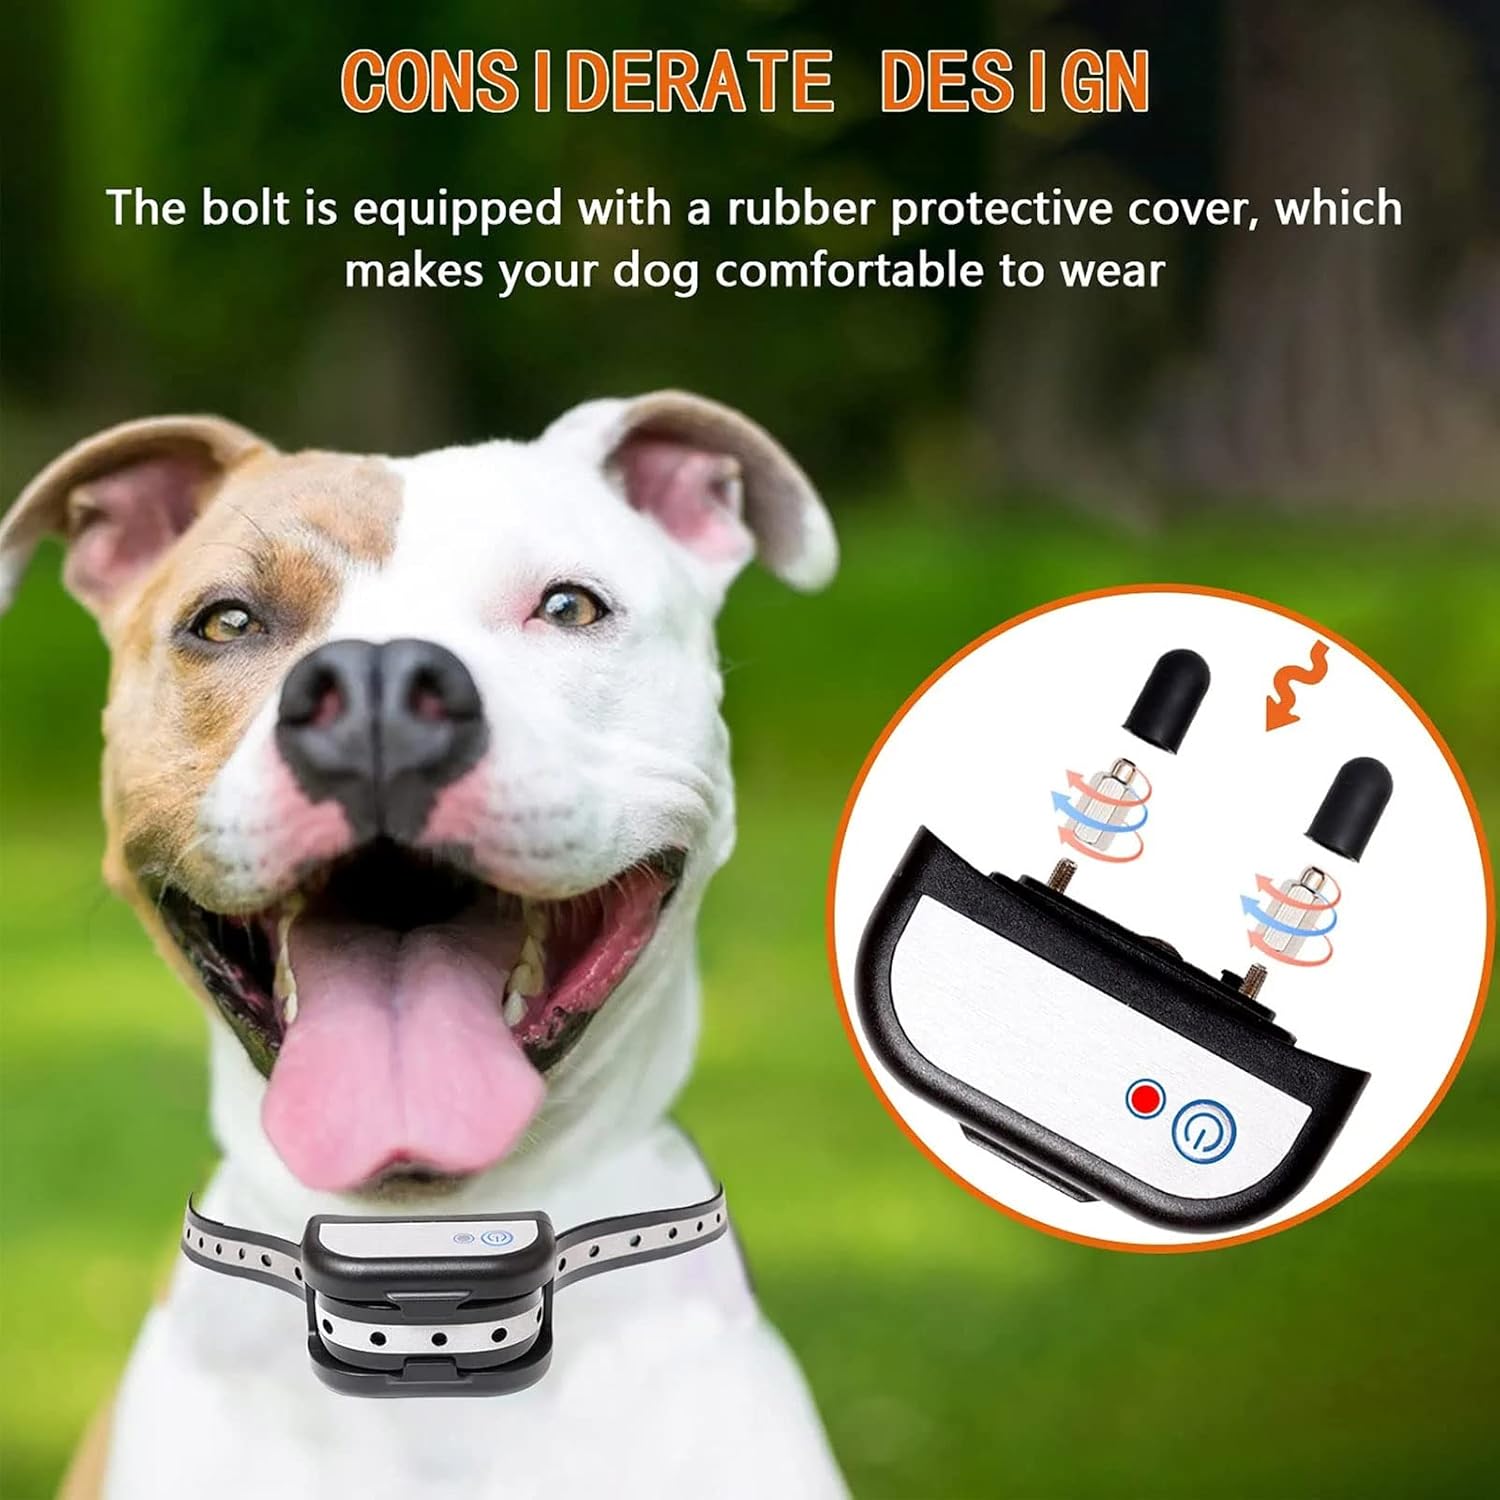
Image: Close-up of the collar receiver demonstrating the attachment of contact probes and protective silicone covers.
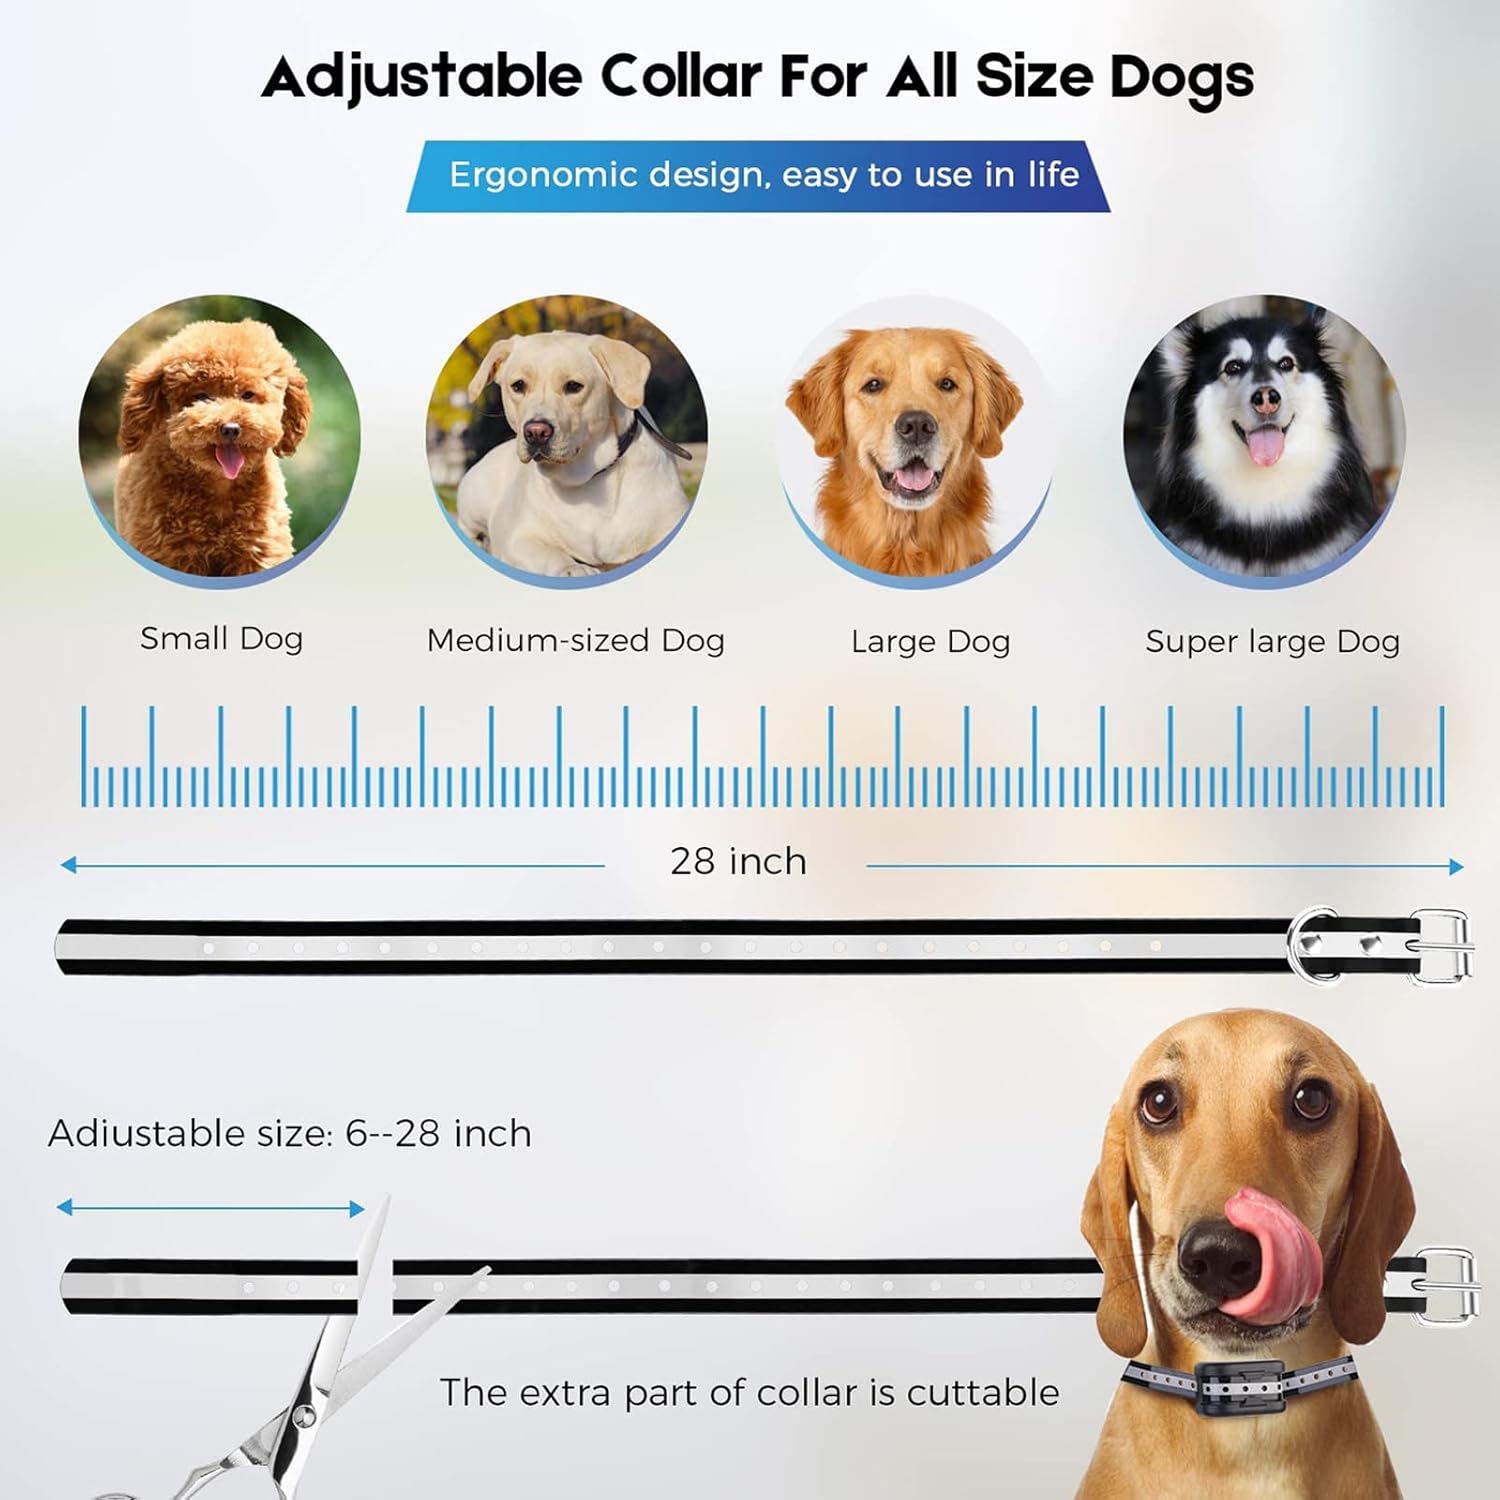
Image: Illustration of the adjustable collar, demonstrating its suitability for various dog sizes and the ability to trim excess strap.
3. Verici Yerleşimi
Position the main Wireless Transmitter in a central location within the desired containment area. For optimal signal coverage and to eliminate signal blind spots, additional transmitters can be strategically placed:
- If house walls block the signal, place an additional transmitter on the opposite side of the house.
- For semi-open garages or warehouses, additional transmitters can extend the boundary.
- Additional transmitters can also be placed indoors to allow your dog access to certain areas while maintaining the boundary.

Image: Illustration demonstrating strategic placement of additional transmitters to expand coverage and eliminate signal blind areas around a property.

Image: Step-by-step visual guide for mounting the launcher, testing the receiver, assembling the collar, and fitting it on a dog.
Kullanım Talimatları
1. Açma ve Eşleştirme
After charging, power on both the Wireless Transmitter and the Collar Receiver. The system is designed for automatic pairing. The transmitter can control multiple collar receivers simultaneously without manual pairing steps.
2. Setting the Boundary Range
The transmitter features an LED display indicating 5-level signal fence distances: 100, 200, 300, 500, and 990 feet. Select the desired radius for your containment area. The boundary is a circular zone centered around the transmitter.
3. Sistemin Test Edilmesi
Before placing the collar on your pet, perform a test:
- Fully charge both the transmitter and receiver.
- Her iki cihazı da açın.
- Use the provided LED test light tool to confirm the electric shock function.
- To confirm receiver functionality, power off the transmitter. The receiver should emit a continuous "bi-bi-bi" sound.
4. Working Principle of the Collar Receiver
The receiver remains inactive within the set boundary distance. When your dog exceeds the set range, the receiver activates in a sequence:
- Stag1: Sound warning for 5 seconds.
- Stag2: Static correction for 5 seconds.
- Stag3: Sound warning and static correction simultaneously for 6 seconds.
After two cycles of these stages, the receiver will continuously emit a "di-di-di" sound until the dog returns within the set boundary range.
If there is no signal for 5 minutes, the receiver enters standby power-saving mode. It can be reactivated by movement or touch. If the signal is lost a second time, the receiver will activate with a 5-second delay.

Image: Visual representation of the collar receiver's warning sequence when a dog leaves the designated boundary.
Bakım
1. Temizlik
Regularly clean the collar receiver and contact probes with a damp cloth. Ensure no dirt or debris accumulates around the probes, which could affect performance or irritate your pet's skin. Do not use harsh chemicals.
2. Pil Bakımı
To prolong battery life, fully charge the transmitter and receiver when the battery indicator is low. Avoid prolonged exposure to extreme temperatures. If the collar is not in use, it will enter standby mode to conserve power, which can last for several months.
3. Waterproof and Dustproof Features
The devices are IP65 dust-proof and IPX7 waterproof, meaning they can withstand rain and wet conditions. However, avoid submerging them for extended periods or exposing them to high-pressure water jets.

Image: Dogs demonstrating the collar's waterproof and snowproof capabilities in different environments.
Sorun giderme
- No Signal/Receiver Not Activating:
- Ensure both the transmitter and receiver are fully charged and powered on.
- Verify the transmitter's range setting is appropriate for the area.
- Check for potential signal interference from large metal objects or dense structures. Consider repositioning the transmitter or adding an additional transmitter.
- Receiver Continuously Beeping:
- This indicates the receiver is out of range. Guide your dog back into the safe zone.
- If the dog is within range and it still beeps, check the transmitter's power and signal strength.
- Static Correction Not Working:
- Use the provided test light to confirm the static function.
- Ensure the metal contact probes are making proper contact with your dog's skin (without causing discomfort). Trim long fur if necessary.
- Check if the silicone covers are correctly installed and not preventing contact.
- Kısa Pil Ömrü:
- Ensure devices are fully charged before use.
- Battery life can vary based on usage frequency and environmental conditions.
- Sorun devam ederse müşteri desteği ile iletişime geçin.
Özellikler
- Marka: HEXIEDEN
- Modeli: for2dogs
- Kablosuz Teknoloji: 2.4GHz with dual-antenna design
- Fence Distance Levels: 100, 200, 300, 500, 990 feet (±16ft error)
- Alıcı Hacmitage: 3.7V (düşük hacimli)tage static correction)
- Su Geçirmezlik Derecesi: IPX7 (Receiver), IP65 (Transmitter)
- Toz Geçirmezlik Derecelendirmesi: IP65 (Transmitter and Receiver)
- Collar Material: Eco-friendly TPU with reflective belt
- Collar Adjustment Range: 8 ila 28 inç
- Suitable Dog Weight: 10 ila 110 pound
- Şarj cihazı: 5V/1A
Güvenlik Bilgileri
- This system is intended for pet containment and training purposes only. Do not use it for any other purpose.
- Cilt tahrişini önlemek için tasmayı köpeğinizin üzerinde 12 saatten fazla aralıksız bırakmayın.
- Regularly check your dog's neck for any signs of irritation or sores from the contact probes. If irritation occurs, discontinue use and consult a veterinarian.
- Ensure the collar fits snugly but not too tightly. You should be able to fit two fingers comfortably between the collar and your dog's neck.
- The static correction is designed to be mild and startling, not harmful. However, monitor your dog's reaction and adjust settings if necessary.
- Keep the transmitter and receiver away from children.
- Do not attempt to modify or repair the device yourself. Contact customer support for assistance.
Garanti ve Destek
For warranty information or technical support, please refer to the contact details provided with your purchase or visit the official HEXIEDEN webSite. Satın alma belgeniz olarak satın alma fişinizi saklayın.