1. Giriş
The SONICAKE EQ Equalizer is a professional 10-band graphic equalizer pedal designed with an analog circuit. It features ten carefully selected frequency bands, allowing musicians to precisely and quickly shape their instrument's tone. This pedal is suitable for a variety of instruments and is built with a true bypass circuit to maintain signal integrity.
This manual provides detailed instructions for the setup, operation, and maintenance of your EQ Equalizer pedal to ensure you achieve the best possible sound.
2. Ürün Özellikleri
- 100% Analog 10-Band Equalizer: Based on classic EQ effect pedal frequency bands.
- Adjustable Gain Range: ±15dB adjustable gain range for each band, suitable for various instruments.
- Precise Tone Shaping: 11 high-quality sliders for quick and accurate parameter control.
- True Bypass Circuit: Ensures a clean signal path when the effect is disengaged.
- Dayanıklı Yapı: Aluminium-alloy casing for lightweight yet robust performance.
3. Kontroller ve İşlevler
Familiarize yourself with the controls of your SONICAKE EQ Equalizer pedal:

Resim: Ön view of the SONICAKE EQ Equalizer pedal with numbered control labels.
- Input Jack (1/4 inch): Connect your instrument or the output of a preceding effect pedal here.
- DC 9V Güç Girişi: Connect a standard 9V DC center-negative power supply (not included).
- Output Jack (1/4 inch): Bunu şunlara bağlayın: amplifier or the input of the next effect pedal in your chain.
- Frequency Band Sliders (31.25Hz to 16kHz): Ten individual sliders to boost or cut specific frequency ranges by ±15dB. Adjust these to shape your tone.
- Level Slider: Controls the overall output volume of the pedal. Use this to match the volume when the effect is engaged or disengaged.
- Ayak pedalı: Engages or disengages the equalizer effect. This pedal features true bypass, ensuring your signal remains unaffected when the pedal is off. The LED indicator above the footswitch illuminates when the effect is active.

Resim: Yukarıdan aşağıya view of the SONICAKE EQ Equalizer pedal, showing all sliders and the footswitch.

Image: A hand demonstrating the adjustment of the frequency sliders on the EQ Equalizer pedal.
4. Kurulum
Follow these steps to set up your EQ Equalizer pedal:
- Güç Bağlantısı: Connect a standard 9V DC center-negative power supply (not included) to the DC 9V input jack (2). Ensure the power supply meets the specified voltage ve kutupluluk gereksinimleri.
- Enstrüman Girişi: Connect your instrument (e.g., guitar) or the output of a previous effect pedal to the Input Jack (1) on the right side of the pedal.
- Çıkış Bağlantısı: Connect the Output Jack (3) on the left side of the pedal to your amplifier's input or the input of the next effect pedal in your signal chain.
- Güç Açık: Tüm bağlantılar güvenli hale geldikten sonra, cihazınızı açın. amplifier ve diğer ekipmanlar.

Resim: Açılı bir view of the EQ Equalizer pedal, highlighting the DC 9V power input and its central negative polarity requirement.
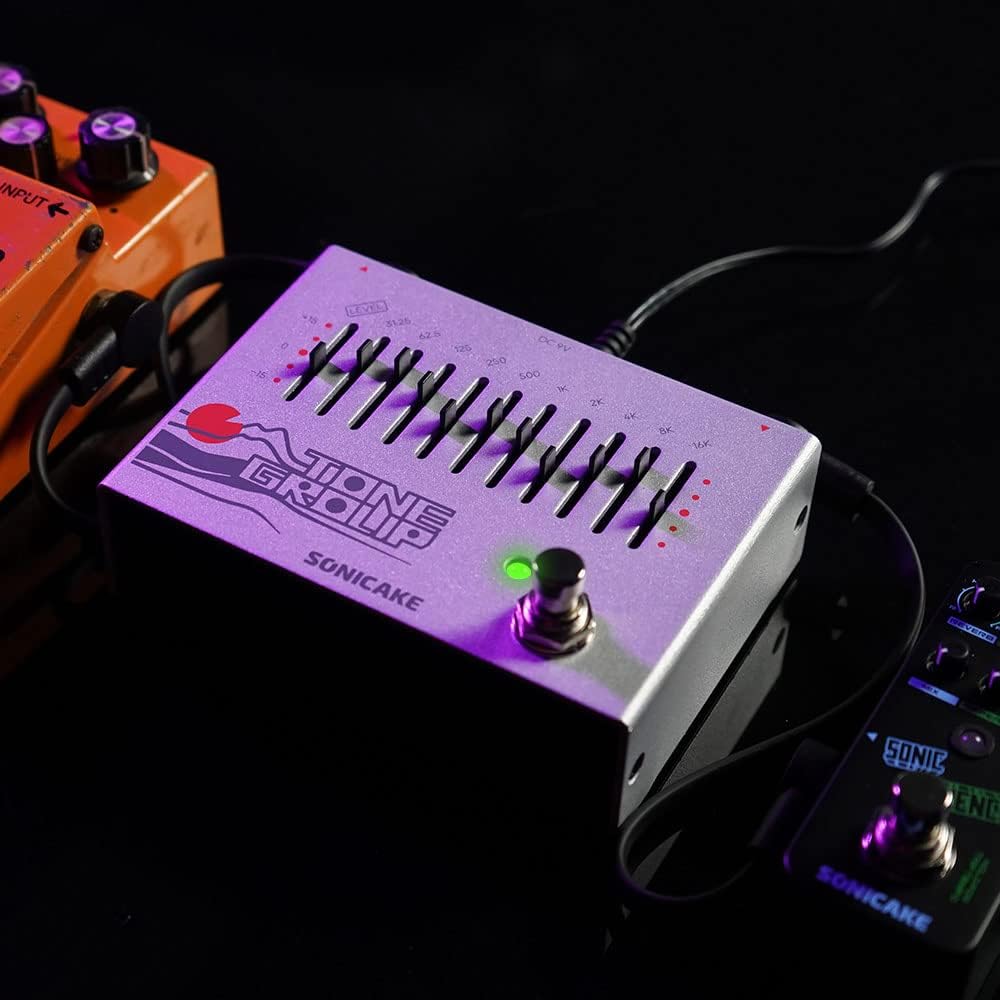
Image: The EQ Equalizer pedal integrated into a pedalboard setup, demonstrating typical connections.
5. Kullanım Talimatları
To operate your SONICAKE EQ Equalizer pedal:
- Engage/Disengage Effect: Press the footswitch (6) to toggle the equalizer effect on or off. The LED indicator will light up when the effect is active.
- Adjusting Frequency Bands: Use the ten frequency band sliders (4) to boost or cut specific frequencies. Moving a slider up boosts that frequency, while moving it down cuts it. Experiment with different settings to find your desired tone.
- Adjusting Overall Level: Use the Level slider (5) to control the overall output volume of the pedal. This is useful for compensating for volume changes introduced by EQ adjustments or for matching the volume with other pedals in your chain.
- Tone Shaping Tips:
- Low Frequencies (31.25Hz - 125Hz): Affect bass and sub-bass. Boosting can add warmth and fullness; cutting can reduce muddiness.
- Mid Frequencies (250Hz - 2kHz): Crucial for presence and clarity. Boosting around 500Hz-1kHz can add body; cutting can reduce harshness. Boosting 2kHz can add bite.
- High Frequencies (4kHz - 16kHz): Control treble and brilliance. Boosting can add sparkle and air; cutting can reduce hiss or harshness.

Resim: Yakın çekim view of the footswitch on the EQ Equalizer pedal, illustrating its true bypass functionality.
6. Bakım
Pedalınızın uzun ömürlü ve en iyi performansı göstermesi için:
- Temizlik: Pedalların dış yüzeyini temizlemek için yumuşak, kuru bir bez kullanın. Aşındırıcı temizleyicilerden veya çözücülerden kaçının.
- Depolamak: Pedalı kuru bir ortamda, aşırı sıcaklık, nem ve doğrudan güneş ışığından uzakta saklayın.
- Güç Kaynağı: Always use a regulated 9V DC center-negative power supply. Incorrect power can damage the unit.
- Bağlantılar: Periodically check all cable connections for wear and tear.
7. Sorun Giderme
If you encounter issues with your EQ Equalizer pedal, consider the following:
- Ses Yok:
- Güç kaynağının doğru şekilde bağlandığından ve çalıştığından emin olun.
- Check all instrument cables for proper connection and functionality.
- Şunu doğrulayın: amplifier is on and its volume is up.
- Ensure the pedal's Level slider is not set to minimum.
- Zayıf veya Bozuk Ses:
- Check the power supply; insufficient power can cause distortion.
- Ensure instrument cables are not faulty.
- Adjust the Level slider to prevent signal clipping.
- İstenmeyen Gürültü/Uğultu:
- Use a high-quality, regulated power supply.
- Tüm kabloların uygun şekilde korunduğundan ve bağlandığından emin olun.
- Try isolating the pedal from other power sources or noisy equipment.
8. Özellikler
| Model Numarası | QDS |
| Ürün Ağırlığı | 12.7 ons (0.36 Kilogram) |
| Ürün Boyutları | 3.54"U x 2.16"G x 4.88"Y (9 x 5.5 x 12.4 cm) |
| Güç Kaynağı | DC Power Supply (9V Center Negative, not included) |
| Cilttage | 9 Volt |
| Sinyal Biçimi | Analog |
| Bağlayıcı Türü | 1/4 inç ses jakı |
| Donanım Arayüzü | 1/4 inç Ses |
9. Garanti ve Destek
For warranty information, technical support, or service inquiries regarding your SONICAKE EQ Equalizer pedal, please refer to the documentation included with your purchase or visit the official SONICAKE webSite. Satın alma belgenizi herhangi bir garanti talebi için saklayın.