
giriiş
This manual provides detailed instructions for the installation, operation, and maintenance of your GAMEMAX Master M905 Full Tower PC Chassis. Please read this manual thoroughly before beginning assembly or use to ensure proper functionality and longevity of your product.
The GAMEMAX Master M905 is a full tower chassis designed for high airflow and extensive hardware compatibility, supporting E-ATX, ATX, and M-ATX motherboards. It features ample storage options, efficient cooling with pre-installed LED fans, and a user-friendly design for system builders.
Paket İçeriği
Kuruluma devam etmeden önce tüm bileşenlerin mevcut olduğundan emin olun:
- GAMEMAX Master M905 Full Tower Chassis
- 3 x 12cm 32 LEDs Blue Cooling Fans (pre-installed)
- Accessory Kit (screws, standoffs, cable ties, etc.)
- Kullanım Kılavuzu (bu belge)
Kurulum ve Yükleme
Follow these steps for initial setup and component installation:
1. Şasinin Hazırlanması
Carefully remove the chassis from its packaging. Place it on a stable, flat surface. Remove the side panels by unscrewing the thumb screws at the rear of the chassis and sliding the panels backward.

Resim: Dahili view of the GAMEMAX Master M905 chassis with the side panel removed, illustrating the spacious interior and drive bays.
2. Anakart Kurulumu
Install the I/O shield into the rear opening of the chassis. Align your E-ATX, ATX, or M-ATX motherboard with the pre-installed standoffs. Secure the motherboard using the provided screws from the accessory kit.
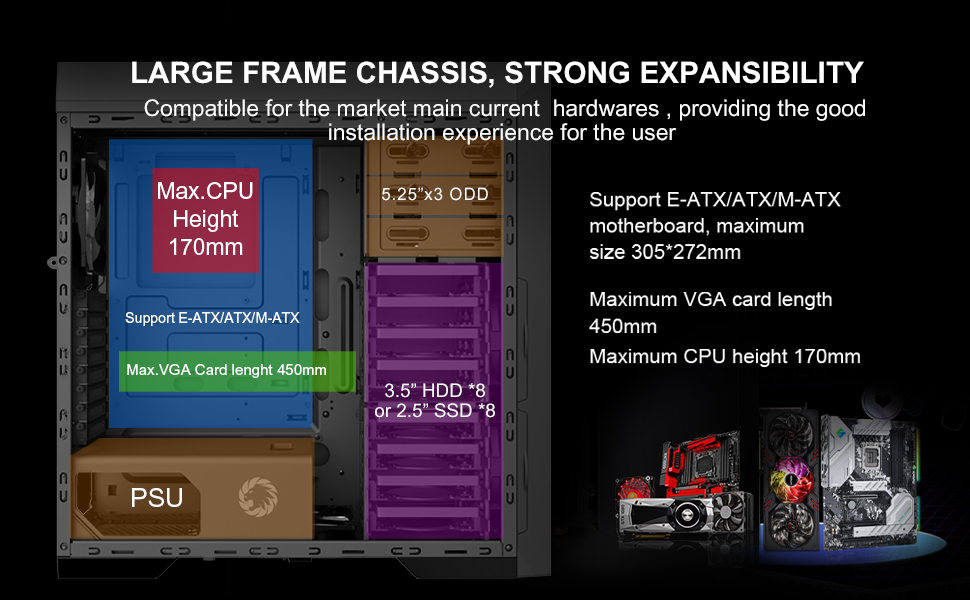
Resim: Diagram illustrating the internal layout and compatibility for E-ATX/ATX/M-ATX motherboards, maximum VGA card length, and CPU cooler height.
3. Güç Kaynağı Ünitesi (PSU) Kurulumu
The Master M905 features a bottom-mounted PSU design. Install your power supply into the designated compartment at the bottom rear of the chassis. Secure it with screws from the outside rear of the case.
Resim: Illustration of the bottom-mounted PSU design, highlighting the hidden compartment and cable management options for a cleaner build.
4. Depolama Sürücüsü Kurulumu
The chassis supports multiple storage configurations:
- 5.25" ODDs: Install up to three 5.25" optical disk drives in the front bays.
- 3.5" HDDs / 2.5" SSDs: Utilize the eight 3.5" HDD bays or eight 2.5" SSD bays. Note: Installing longer VGA cards may require removing the middle HDD bracket.
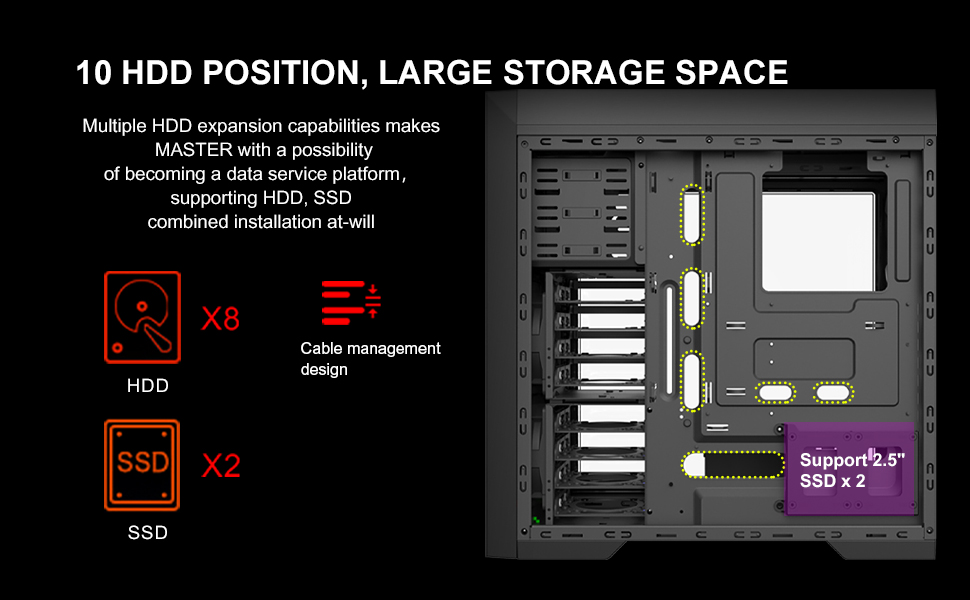
Resim: Ayrıntılı diyagram gösterimiasing the extensive storage capabilities, including 8 HDD bays and 2 SSD positions, along with cable management features.
5. Grafik Kartı ve Genişletme Kartları
Install your graphics card and other expansion cards into the appropriate PCIe slots on your motherboard. Ensure they are securely fastened. The chassis supports VGA cards up to 450mm in length.
6. Kablo Yönetimi
Utilize the cable routing options behind the motherboard tray to organize and hide cables. This improves airflow and aesthetics.
7. Ön Panel Giriş/Çıkış Bağlantıları
Connect the front panel cables (USB 3.0, USB 2.0, audio, power, reset, LED indicators) to the corresponding headers on your motherboard. Refer to your motherboard manual for specific header locations.

Resim: Yakın çekim view of the top panel, showing the USB 3.0, USB 2.0, audio ports, power button, reset button, and fan controller switches.
Kullanım Talimatları
Açma/Kapatma
Press the power button located on the top panel to turn your system on or off. A short press typically initiates power on, while a longer press (usually 4-5 seconds) will force a shutdown.
Fan Kontrolü
The top panel includes a fan controller. Use the switches to adjust the speed of the connected fans, allowing you to balance cooling performance and noise levels according to your preference.
Ön Panel Bağlantısı
Utilize the front panel USB 3.0 and USB 2.0 ports for connecting peripherals and external storage devices. The audio jacks provide convenient access for headphones and microphones.
Bakım
Regular maintenance helps ensure optimal performance and extends the lifespan of your PC chassis.
Toz Filtresi Temizliği
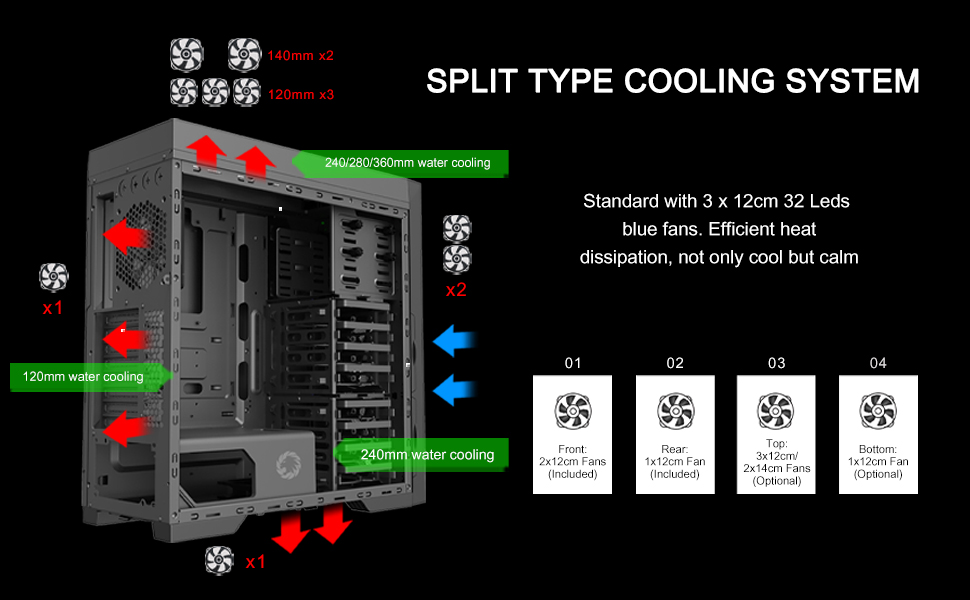
The Master M905 features filtered front, top, and base air intakes with pull-out dust filters. Regularly remove and clean these filters to prevent dust buildup inside the chassis, which can impede airflow and component cooling.

Resim: Arka ve alt view of the chassis, highlighting the easily accessible, pull-out dust filters for convenient cleaning.
İç Temizlik
Periodically open the side panels and use compressed air to remove dust from internal components, especially fan blades and heatsinks. Ensure the system is powered off and unplugged before cleaning.
Sorun giderme
If you encounter issues with your chassis, refer to the following common problems and solutions:
- Sistem açılmıyor:
- Güç kaynağının duvar prizine ve anakarta doğru şekilde bağlı olduğundan emin olun.
- Verify all front panel power switch cables are correctly connected to the motherboard headers.
- Check if the power supply unit (PSU) switch is in the "ON" position.
- Fans are not spinning or LEDs are off:
- Confirm fan power cables are securely connected to the motherboard or fan controller.
- Check the fan controller settings on the top panel.
- Ensure LED power cables are connected if applicable.
- Front panel USB/Audio ports not working:
- Verify that the front panel USB and audio cables are correctly connected to the corresponding headers on your motherboard.
- Check your motherboard's BIOS/UEFI settings to ensure USB/audio ports are enabled.
- Excessive dust buildup:
- Regularly clean the pull-out dust filters as described in the Maintenance section.
- Ensure proper airflow direction with intake and exhaust fans.
Özellikler
| Özellik | Detay |
|---|---|
| Model Adı | Usta M905 |
| Marka | OYUNMAKS |
| Dava Türü | Tam kule |
| Anakart Uyumluluğu | E-ATX, ATX, M-ATX |
| Boyutlar (UxGxY) | 20.16 x 8.26 x 20.75 inç (512 x 210 x 527 mm) |
| Ürün Ağırlığı | 23.4 pound (10.6 kg) |
| Malzeme | Alaşımlı Çelik |
| Renk | Siyah |
| 5.25" Sürücü Yuvaları | 3 |
| 3.5" HDD Bays | 8 |
| 2.5" SSD Yuvaları | 8 |
| Ön G / Ç Bağlantı Noktaları | 2 x USB 3.0, 2 x USB 2.0, HD Audio (Mic/Headphone), Fan Controller |
| Önceden yüklenmiş Fanlar | 3 x 12cm 32 LEDs Blue Fans (Front) |
| Maksimum VGA Kart Uzunluğu | 450mm |
| Maksimum CPU Soğutucu Yüksekliği | 170mm |
| Güç Kaynağı Montaj Tipi | Rear Mount (Bottom) |
| Soğutma Yöntemi | Air, Water (supports 240/280/360mm radiators) |

Resim: A diagram illustrating the key dimensions of the GAMEMAX Master M905 chassis.
Garanti ve Destek
GAMEMAX products are manufactured to the highest quality standards. For warranty information and technical support, please refer to the official GAMEMAX websiteyi ziyaret edin veya yerel perakendecinizle iletişime geçin.
Daha fazla yardım için lütfen şu adresi ziyaret edin: Amazon'daki GAMEMAX Mağazası or consult the manufacturer's official support channels.