
1. Giriş
This manual provides instructions for the safe assembly, operation, and maintenance of your Yaheetech Balcony Crank Retractable Sun Shade. Please read all instructions carefully before installation and use. Retain this manual for future reference.
The sun shade is designed to provide shade and UV protection for balconies, verandas, windows, and patios. It features a durable construction with adjustable height and a retractable canopy operated by a crank mechanism.
2. Güvenlik Talimatları
- Kullanmadan önce tüm bileşenlerin güvenli bir şekilde sabitlendiğinden emin olun.
- Do not use the sun shade in strong winds, heavy rain, or snow. Retract the canopy completely during adverse weather conditions to prevent damage.
- Keep children and pets away from the sun shade during assembly and operation.
- Do not hang heavy objects from the sun shade structure.
- Regularly inspect the sun shade for any signs of wear, damage, or loose connections. Discontinue use if damage is found and contact customer support.
- Ensure the installation surface is stable and capable of supporting the sun shade's weight and any forces from wind.
3. Paket İçeriği
Verify that all parts are present before beginning assembly. If any parts are missing or damaged, do not proceed with assembly and contact customer service.
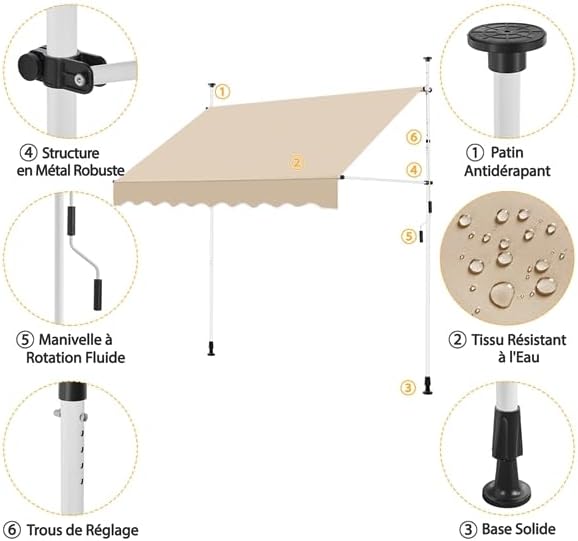
Şekil 3.1: Patlatılmış view of the sun shade components. Includes poles, fabric canopy, crank, and various connectors.
- Telescopic Support Poles (2x)
- Canopy Fabric Assembly (1x)
- Crank Handle (1x)
- Adjustable Brackets (2x)
- Non-slip Top Pads (2x)
- Solid Base Feet (2x)
- Fasteners and Connectors (various)
4. Montaj Talimatları
Montaj genellikle iki kişi gerektirir. Lütfen şu adımları dikkatlice izleyin:
4.1 Prepare the Poles
- Tüm bileşenleri ambalajından çıkarın ve temiz, düz bir yüzeye yerleştirin.
- Attach the non-slip top pads to the upper ends of the telescopic support poles.
- Attach the solid base feet to the lower ends of the telescopic support poles.

Figure 4.1: Non-slip pad for secure top fixation.

Figure 4.2: Adjustable base foot for stability on uneven surfaces.
4.2 Attach the Canopy
- Slide the canopy fabric assembly onto the horizontal support bars.
- Connect the horizontal support bars to the telescopic poles using the provided adjustable brackets. Ensure the brackets are positioned correctly to allow for height and angle adjustment.

Figure 4.3: Overall dimensions and component layout. Note the 250 cm width and 120 cm projection.
4.3 Position and Secure
- Place the assembled sun shade in the desired location.
- Extend the telescopic poles to the desired height (adjustable from 210 cm to 300 cm). Use the mounting holes on the poles to secure the height.
- Ensure the non-slip pads at the top are firmly pressed against a stable overhead surface (e.g., ceiling, overhang).
- Tighten all knobs and fasteners to secure the poles and canopy in place.

Figure 4.4: Telescopic pole with multiple adjustment holes for height customization.
5. Kullanım Talimatları
5.1 Extending and Retracting the Canopy
- To extend the canopy, insert the crank handle into the designated opening and turn it clockwise. The canopy will smoothly unroll.
- To retract the canopy, turn the crank handle counter-clockwise. The canopy will roll back into its housing.
- Ensure the canopy is fully retracted when not in use or during strong winds.

Figure 5.1: Operating the crank handle to extend or retract the canopy.
5.2 Adjusting Canopy Angle
- The angle of the canopy can be adjusted by manipulating the adjustable brackets on the telescopic poles.
- Loosen the knobs on the brackets, adjust the canopy to the desired angle, and then securely tighten the knobs.

Figure 5.2: Illustration of how the canopy angle can be adjusted for optimal shade.

Figure 5.3: The canopy can be fully retracted or extended to provide shade or privacy.
6. Bakım
- Kumaşın Temizliği: Clean the canopy fabric with mild soap and water. Use a soft brush or cloth. Rinse thoroughly and allow to air dry completely before retracting to prevent mildew. Do not use harsh chemicals or abrasive cleaners.
- Çerçeve Bakımı: Metal çerçeveyi reklamla silinamp cloth to remove dust and dirt. Periodically check all screws and connections and tighten if necessary.
- Depolamak: During off-season or prolonged periods of non-use, it is recommended to retract the canopy and store it in a dry, protected area to prolong its lifespan.

Figure 6.1: The canopy fabric is designed to be UV resistant and water resistant, but proper care is essential.
7. Sorun Giderme
| Sorun | Olası Neden | Çözüm |
|---|---|---|
| Canopy does not extend/retract smoothly. | Mekanizma sertleşmiş veya tıkanmış durumda. | Check for any obstructions in the rolling mechanism. Apply a silicone-based lubricant to moving parts if necessary. |
| Sun shade feels unstable. | Poles not fully extended or tightened; uneven surface. | Ensure telescopic poles are fully extended and locked at the desired height. Tighten all fasteners. Adjust base feet for level contact. |
| Canopy sags. | Incorrect angle adjustment or fabric stretch. | Adjust the canopy angle to ensure proper tension. If fabric is stretched, it may be due to prolonged exposure or heavy rain accumulation. |
8. Özellikler
| Özellik | Detay |
|---|---|
| Model Numarası | YA-00114003 |
| Boyutlar (G x D) | 250x120 cm |
| Ayarlanabilir Yükseklik | 210 - 300 cm |
| Malzeme | Iron, Aluminium, Polyester fabric with PU coating |
| Renk | Bej |
| Ürün Ağırlığı | 9 Kilogram |
| Çalışma Modu | Manual (Crank) |
| Montaj Gerekli | Evet |
9. Garanti ve Destek
For warranty information or technical support, please refer to the purchase documentation or contact Yaheetech customer service directly. Contact details can typically be found on the product packaging or the official Yaheetech webalan.
Please have your model number (YA-00114003) and purchase date available when contacting support.