
1. Giriş
This manual provides comprehensive instructions for the installation, operation, and maintenance of your MUBVIEW Adjustable Angle Mount. This accessory is designed to enhance the viewing capabilities of your compatible video doorbell by allowing precise angle adjustments.

Figure 1: MUBVIEW Doorbell with Adjustable Angle Mount installed.
2. Uyumluluk
MUBVIEW Adjustable Angle Mount is specifically designed for use with the following MUBVIEW video doorbell models:
- MUBVIEW J7 Doorbell
- MUBVIEW J9 Doorbell
- MUBVIEW J9 Plus Doorbell
Ensure your doorbell model is listed above for proper fit and function.

Figure 2: Visual representation of compatible MUBVIEW doorbell models (J7, J9, J9 Plus).
3. Temel Özellikler
- Ayarlanabilir Viewaçı: Allows horizontal adjustment from 25 to 50 degrees to optimize your doorbell's field of view.
- Gelişmiş Hareket Algılama: Improves the doorbell's ability to detect motion by providing a broader or more targeted viewing alanı.
- Dayanıklı Yapı: Manufactured from rugged materials designed to withstand various outdoor weather conditions.
- Kolay Kurulum: Designed for straightforward installation, typically completed within 10-15 minutes with included hardware.
4. Paket İçeriği
Kuruluma başlamadan önce tüm bileşenlerin mevcut olduğundan emin olun:
- MUBVIEW Ayarlanabilir Açı Montajı
- Mounting Screws (Stainless Steel)
- Wall Anchors (if applicable)
- Kurulum Kılavuzu (bu belge)
5. Kurulum Kılavuzu
Follow these steps to install your MUBVIEW Adjustable Angle Mount:
- Montaj Yüzeyini Hazırlayın: Choose a suitable location on your wall where the doorbell will be installed. Ensure the surface is clean and stable.
- Attach the Angle Mount: Position the angle mount at the desired location. Use the provided screws to secure the mount to the wall. If mounting on masonry or drywall, use appropriate wall anchors.
- Açı Ayarı: Loosen the adjustment screw on the side of the mount. Rotate the doorbell to achieve the desired horizontal viewing angle (between 25 and 50 degrees). Once the angle is set, tighten the adjustment screw firmly to secure the position.
- Kapı zilini monte edin: Attach your compatible MUBVIEW J7, J9, or J9 Plus doorbell onto the adjustable angle mount according to your doorbell's specific mounting instructions. Ensure it is securely fastened.
- Test İşlevselliği: Verify that the doorbell is securely mounted and that the camera's field of view is optimized for your needs.
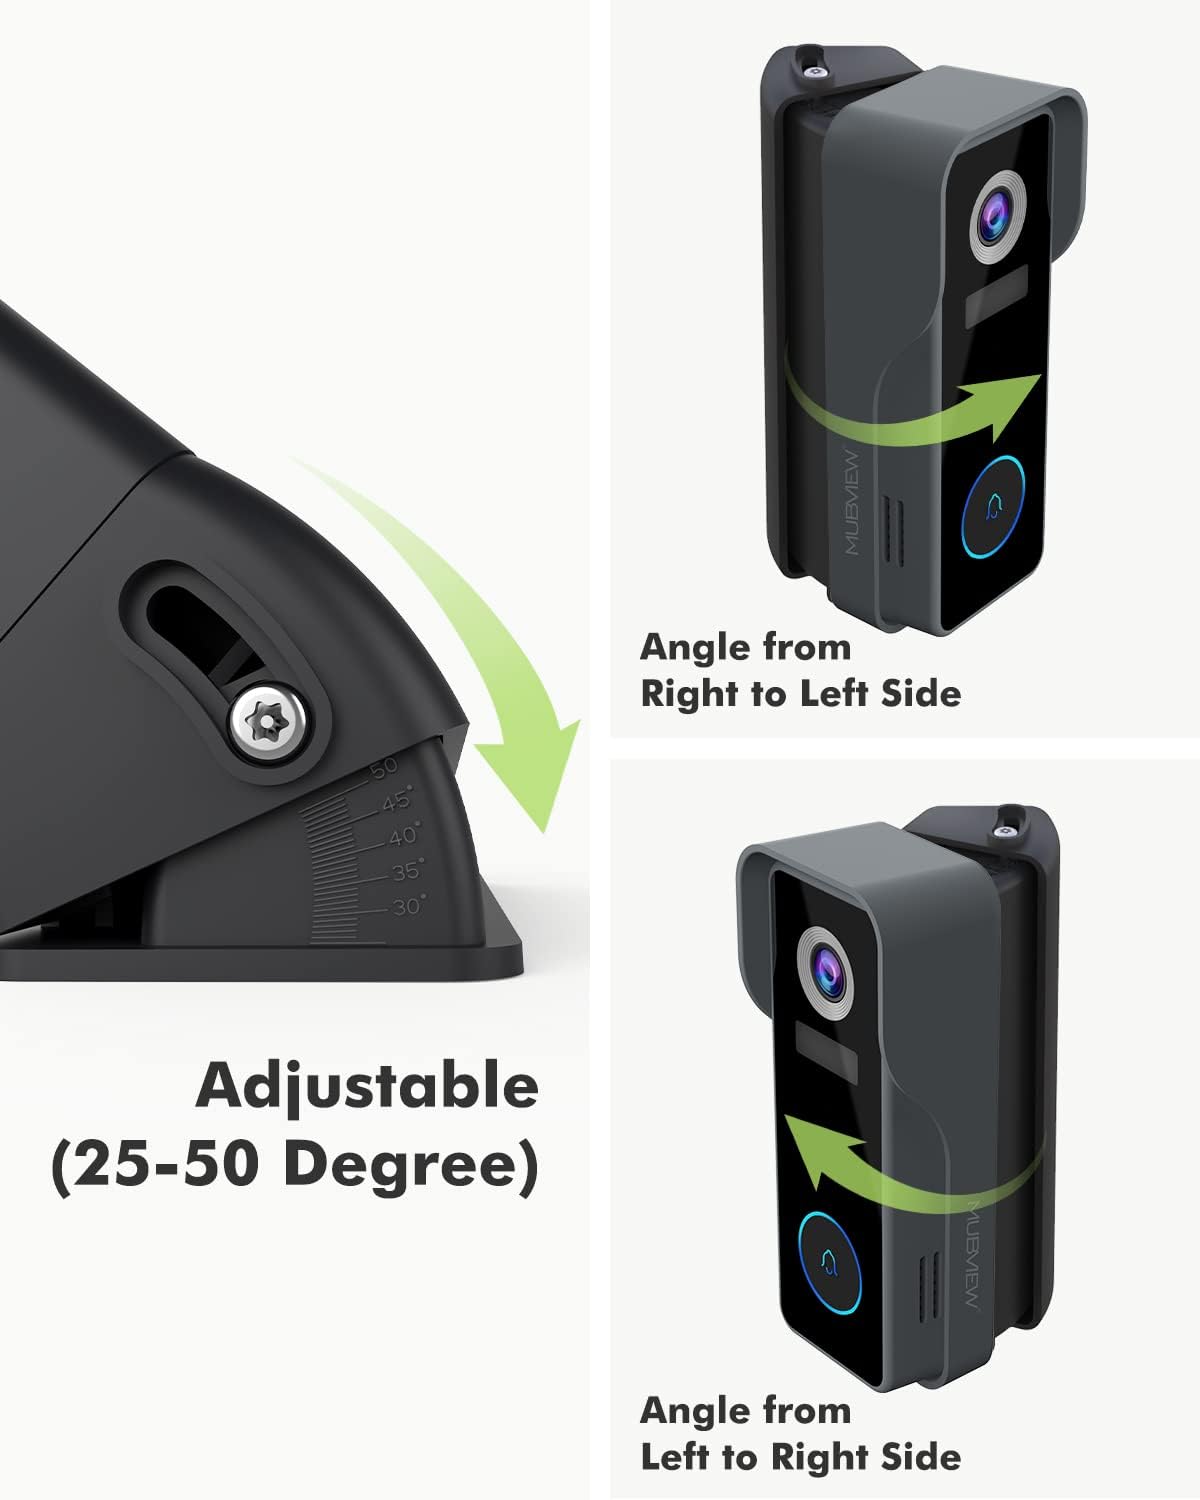
Figure 3: Illustration of the adjustable angle mechanism, allowing rotation from 25 to 50 degrees.

Şekil 4: Ör.ample of the MUBVIEW Adjustable Angle Mount with doorbell securely installed on a wall.

Figure 5: Comparison demonstrating the expanded visible area achieved with the angle mount versus without it.
6. Operasyon
The primary function of the MUBVIEW Adjustable Angle Mount is to provide flexible positioning for your doorbell camera. Once installed, you can fine-tune the horizontal viewaçı:
- To adjust the angle, gently loosen the adjustment screw located on the side of the mount.
- Carefully rotate the doorbell and mount assembly to the left or right until the desired field of view is achieved. The mount allows for adjustments between 25 and 50 degrees.
- Once the optimal angle is found, securely tighten the adjustment screw to lock the position. This ensures the doorbell remains stable and maintains its set viewaçı.
7. Bakım
MUBVIEW Adjustable Angle Mount is constructed from durable, weather-resistant materials designed for outdoor use. Minimal maintenance is required:
- Temizlik: Periodically wipe the mount with a soft, damp cloth to remove dust, dirt, or debris. Avoid using harsh chemicals or abrasive cleaners, as these may damage the finish.
- Denetleme: Occasionally check the mounting screws to ensure they remain tight and secure. Re-tighten if necessary.
8. Sorun Giderme
MUB'unuzla ilgili sorunlarla karşılaşırsanızVIEW Adjustable Angle Mount, consider the following:
- Montaj gevşek gibi görünüyor: Ensure all mounting screws are securely tightened. If installed with wall anchors, verify they are properly seated in the wall.
- Açıyı ayarlamakta zorluk: Check that the adjustment screw is sufficiently loosened before attempting to rotate the mount. Do not force the rotation.
- Fakir viewing angle after adjustment: Re-adjust the angle as described in the "Operation" section. Use your doorbell's live view feature to confirm the optimal field of view.
9. Özellikler
| Marka | MUBVIEW |
| Örnek | Ayarlanabilir Açı Montajı |
| Montaj Tipi | Duvara Montaj |
| Adjustable Angle Range | 25 to 50 degrees (horizontal) |
| Malzeme | Stainless Steel (screws), Rugged Composite (mount) |
| Ürün Ağırlığı | 3.52 ons |
| Paket Boyutları | 5.12 x 3.19 x 1.73 inç |
| Üretici | MUBVIEW |
| İlk Mevcut Tarih | 22 Şubat 2022 |
10. Garanti ve Destek
MUBVIEW products are designed for reliability and performance. For specific warranty information or technical support, please refer to the documentation included with your original MUBVIEW doorbell or visit the official MUBVIEW webalan. Garanti talepleri için satın alma makbuzunuzu saklayın.