giriiş
This manual provides detailed instructions for the installation, operation, and maintenance of your VANBAR 12-inch 2.5K Mirror Dash Cam. Please read this manual thoroughly before using the product to ensure proper function and safety. Keep this manual for future reference.
Güvenlik Bilgileri
- Always use the dedicated power cord provided by VANBAR. Using other power cords may cause battery swelling or malfunction due to exceeding the rated voltag3.7V'un e'si.
- Araç içi kameranın güvenli bir şekilde monte edildiğinden ve sürücünün görüşünü engellemediğinden emin olun. view veya araç güvenlik özelliklerine müdahale edebilir.
- Cihazı aşırı sıcaklıklara, uzun süre doğrudan güneş ışığına veya aşırı neme maruz bırakmayın.
- Avoid disassembling or modifying the device, as this will void the warranty and may cause damage or injury.
- Regularly check the device for any signs of damage or malfunction. If issues arise, contact customer support.
Paket İçeriği
Aşağıda listelenen tüm öğelerin paketinizde bulunduğunu doğrulayın:
- VANBAR 12-inch Mirror Dash Cam Unit
- Su Geçirmez Arka Kamera
- 32 GB SD Kart
- Çakmak Güç Adaptörü
- GPS Modülü
- Yansıma Önleyici Film
- Rubber Bands (for mounting)
- Kablo Sökme Aleti
- Alcohol Cleaner & Cleaning Cloth
- Kullanım Kılavuzu (Japonca)
- Recording Sticker

Image: All components included in the VANBAR 12-inch 2.5K Mirror Dash Cam package.
Ürün Özellikleri
- 12-inch Super Wide Digital Inner Mirror: Displays high-quality images from the 140-degree wide-angle rear camera, offering approximately 3 times wider field of view geleneksel arka kısımdan dahaview mirrors. Features a right-side camera placement optimized for Japanese roads. Includes a dedicated anti-reflection film.
- SüperView Image Processing & Touch Screen: Süper kullanırView image enhancement technology for rich color reproduction and a display resolution of 1920x480px. Swipe up/down on the screen to adjust front/rear camera angles, and swipe left/right to adjust screen brightness.
- Sony IMX415 Sensor & Super Night Function: Equipped with a Sony IMX415 sensor, enabling simultaneous high-quality recording: Front 2.5K Full HD + Rear 1080P Full HD. STARVIS compatibility ensures clear images even in low-light conditions, outperforming standard dash cams. Supports vertical/horizontal image flip settings for flexible rear camera installation.
- GPS Function & 24-Hour Parking Monitoring: Records vehicle speed and direction along with video data. Playback on a PC allows tracking of driving routes (requires internet connection for map data). Features a built-in battery for emergency recording during parking monitoring, automatically locking impact footage.
- Backup Assist Function: Arka kamerayı otomatik olarak görüntüler view with adjustable guidelines when reversing. The adjusted angle is saved for subsequent use.
- Japanese Signal Light & Noise Reduction: Front camera frame rate (27.5fps) is set to avoid flickering with Japanese LED traffic lights. Designed with noise reduction measures for the circuit board, lens, rear camera, and power cable to minimize interference with digital TV reception and GPS signals.

Image: Voice control feature in use, allowing hands-free operation while driving.

Image: Front and rear camera angle adjustment and image flip options.

Image: High-performance AI chip for smooth recording and playback.
Kurmak
1. Ana Ünite Kurulumu
- Attach the main mirror dash cam unit over your vehicle's existing rearview mirror using the provided rubber bands. Ensure it is securely fastened and does not vibrate.
- Apply the anti-reflection film to the dash cam screen if desired, following the instructions provided with the film.
2. Arka Kamera Kurulumu
- Choose an installation location for the waterproof rear camera. Common locations include above the license plate or inside the rear window.
- Route the rear camera cable from the rear of the vehicle to the main unit, ensuring it is tucked away safely and does not interfere with moving parts or airbags. Use the pry tool to assist with cable routing.
- Arka kamera kablosunu ana ünitedeki belirlenmiş bağlantı noktasına bağlayın.
- For the backup assist function, connect the red wire from the rear camera cable to your vehicle's reverse light positive wire.

Image: Waterproof rear camera.
3. GPS Modülü Bağlantısı
- Attach the GPS module to the windshield in a location that has a clear view of the sky, typically near the main unit.
- Connect the GPS module cable to the corresponding port on the main unit.
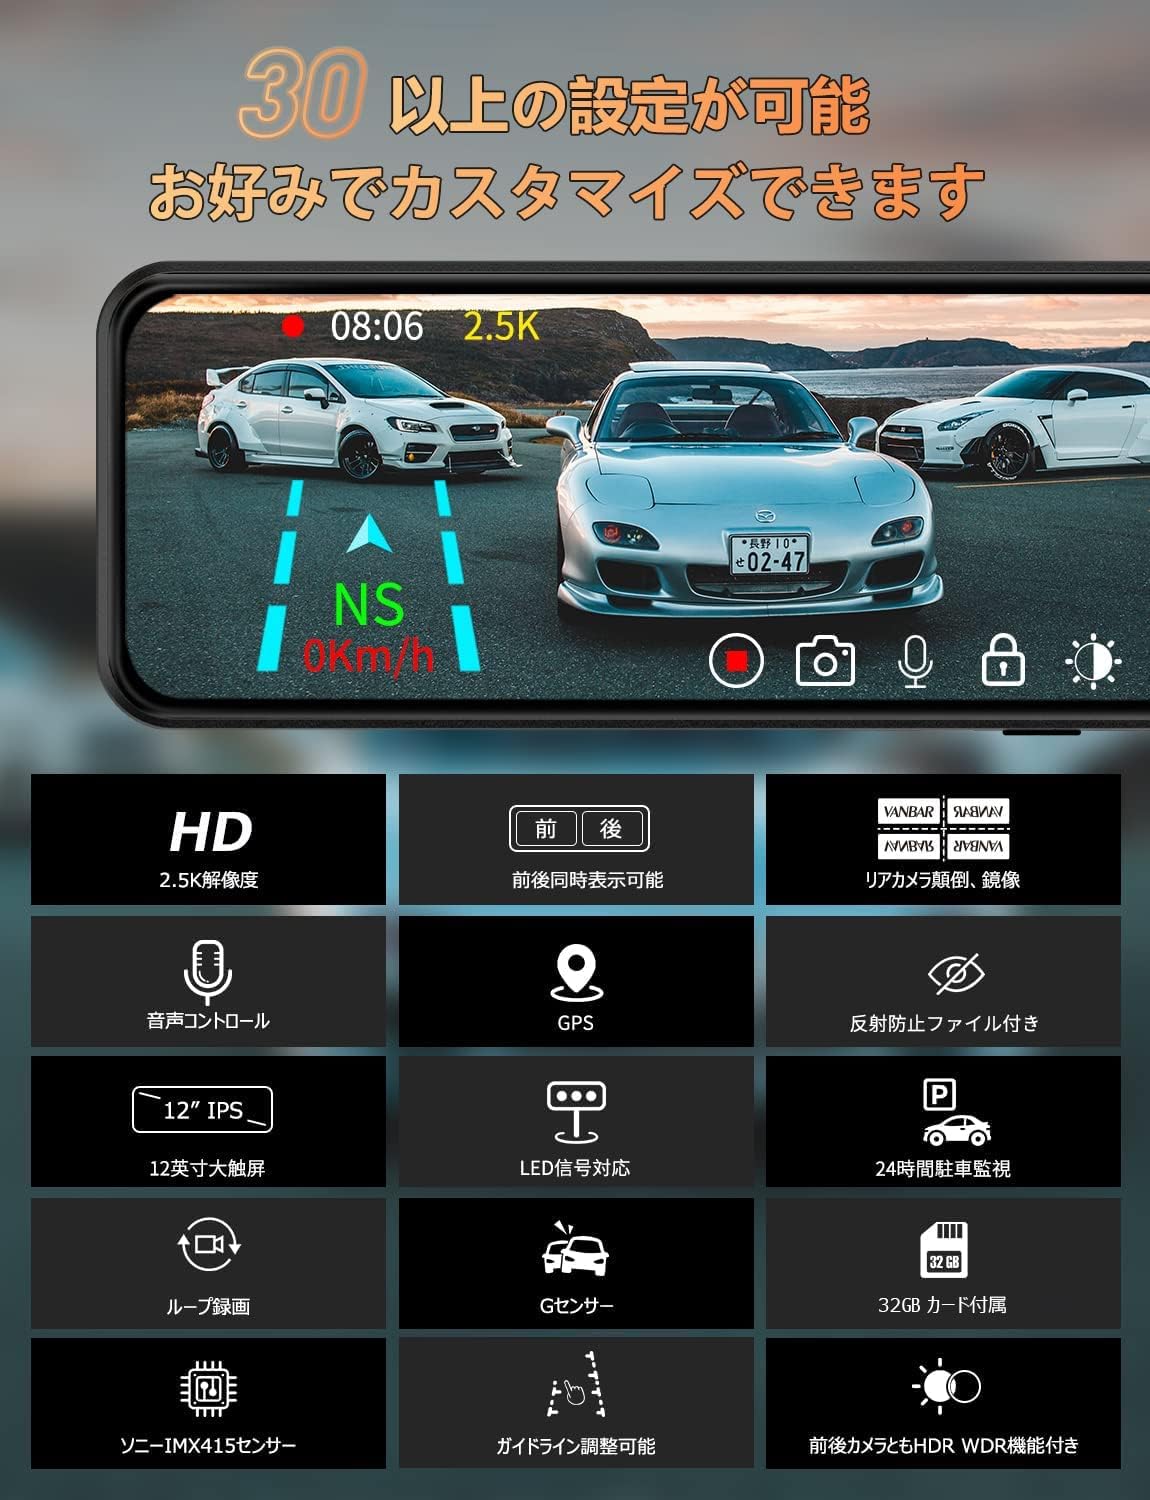
Image: GPS module.
4. Güç Bağlantısı
- Insert the provided cigarette lighter power adapter into your vehicle's 12V power outlet.
- Connect the power cable from the adapter to the main unit. Route the cable neatly to avoid obstruction.
5. SD Kart Takılması
- Insert the provided 32GB SD card into the SD card slot on the main unit. Ensure it clicks into place.
- It is recommended to format the SD card within the dash cam settings before first use and periodically thereafter.
Kullanım Talimatları
1. Güç Açma/Kapatma
- The dash cam will automatically power on and begin recording when the vehicle engine starts.
- It will automatically power off when the engine is turned off.
- To manually power on/off, press and hold the power button on the device.
2. Ses Kontrolü
The device supports Japanese voice commands for hands-free operation. Speak clearly and directly to the device.
- "録音開始" (Record Start): Begin recording.
- "録音終了" (Record End): Stop recording.
- "写真撮ります" (Take Photo): Capture a still image.
- "モニターオン" (Monitor On): Turn the screen on.
- "モニターオフ" (Monitor Off): Turn the screen off.
- "フロントカメラ" (Front Camera): Switch to front camera view.
- "バックカメラ" (Back Camera): Switch to rear camera view.
- "ロックオンカイシ" (Lock On Start): Start emergency lock recording.
- "ロックオンシュウリョウ" (Lock On End): Stop emergency lock recording.
3. Touch Screen Gestures
- Yukarı/Aşağı Kaydırma: Dikeyi ayarla viewing angle of the front or rear camera on the screen. This allows you to see a wider range regardless of the camera's physical mounting position.
- Sola/Sağa Kaydır: Ekran parlaklığını ayarlayın.
- Musluk: Access menu options or switch between front/rear camera views.
4. Döngü Kaydı
The dash cam records video in continuous loops. When the SD card is full, the oldest unlocked files will be overwritten automatically. This ensures continuous recording without manual intervention.

Image: Loop recording function illustration.
5. G-Sensor (Impact Recording)
The built-in G-sensor detects sudden impacts or collisions. When an impact is detected, the current video segment is automatically locked and saved to prevent it from being overwritten by loop recording. This feature helps preserve critical evidence in case of an accident.

Image: Impact recording (G-sensor) function.
6. Otopark İzleme
With the engine off, the dash cam's internal battery allows it to detect impacts and automatically start recording. This provides surveillance for your parked vehicle. For continuous 24-hour parking monitoring, a dedicated hardwire kit (sold separately or available upon request) is recommended.
7. GPS Playback on PC
İle view recorded videos with GPS data (speed, direction, route), you can use a dedicated player on your computer.
- Windows Player: İndir http://www.sunningsoft.com/en/pcgps.html
- Mac Player: Arama "GXplayer" in the App Store.
Note: An internet connection is required for map data display during GPS playback.

Image: GPS function playback on a computer.
Bakım
1. Temizlik
- Use the provided cleaning cloth or a soft, dry cloth to wipe the screen and lens.
- For stubborn smudges, use the alcohol cleaner sparingly on the cloth, not directly on the device.
- Ensure the rear camera lens is clean for optimal image quality, especially after driving in adverse weather.
2. SD Kart Yönetimi
- Format the SD card regularly (e.g., once a month) through the dash cam's settings menu to maintain optimal recording performance and prevent data corruption.
- Replace the SD card if you experience frequent recording errors or if the card is old.
3. Pil Bakımı
- Always use the VANBAR-supplied power cord. Using non-dedicated power cords with voltage exceeding 3.7V can cause the internal battery to swell and become unusable.
- Avoid leaving the device in direct sunlight in a parked car for extended periods, especially in hot climates, to prevent battery degradation.
Sorun giderme
| Sorun | Olası Neden / Çözüm |
|---|---|
| Cihaz açılmıyor. | Check power connection. Ensure the cigarette lighter adapter is firmly inserted and the vehicle's 12V outlet is functional. Verify the power cable is connected to the dash cam. |
| Kayıt durdurulur veya filebozuk. | Format the SD card. Ensure the SD card is a high-speed Class 10 or U3 card. Replace the SD card if the issue persists. |
| Voice control is not responding or misinterpreting commands. | Speak clearly and at a moderate volume. Reduce background noise. Ensure the microphone is not obstructed. Adjust voice control sensitivity in settings if available. |
| Screen is too dark/bright or has glare. | Adjust screen brightness by swiping left/right on the screen. Ensure the anti-reflection film is properly applied. |
| GPS sinyali zayıf veya alınamıyor. | GPS modülünün düzgün bir şekilde monte edildiğinden emin olun. view of the sky. Avoid placing it under metallic tints or other obstructions. |
| Parking monitoring is not activating. | Ensure the G-sensor sensitivity is set appropriately. For continuous 24-hour monitoring, a hardwire kit is required. |
| Arka kamera görüntüsü ters veya aynalı. | Adjust the image flip settings (vertical/horizontal) in the dash cam's menu to match your installation. |
Özellikler
| Özellik | Detay |
|---|---|
| Ekran Boyutu | 12 inç |
| Görüntü Türü | LCD |
| Ön Kamera Çözünürlüğü | 2.5K (2560x1440) |
| Arka Kamera Çözünürlüğü | 1080P (1920x1080) |
| Ön Lens Açısı | 170° Geniş Açı |
| Arka Lens Açısı | 140° Geniş Açı |
| Sensör | Sony IMX415 |
| Depolamak | Supports up to 32GB SD card (included) |
| Bağlantı | USB |
| Özel Özellikler | Loop Recording, Built-in GPS, G-Sensor, Parking Monitoring, Voice Control, HDR/WDR, Japanese Signal Light Compatibility |
| Montaj Tipi | Yapışkan Montaj |
| Ürün Boyutları | 5.08 x 10.16 x 10.16 cm; 1 kg (yaklaşık) |
| Renk | Siyah |
Garanti ve Destek
VANBAR offers a 3-year quality warranty for this product. In case of any issues or defects, please contact our customer support team. We are committed to providing excellent service and will respond to inquiries within 24 hours (excluding weekends).
İletişim Bilgileri:
Please refer to the last page of the included Japanese user manual for specific contact details, including our LINE ID for support inquiries.
For PC playback software, please visit the links provided in the Operating Instructions section.
Note: The warranty is valid only for purchases made on Amazon. Resale is not covered.