1. Giriş
This manual provides essential information for the installation, operation, and maintenance of your Apevia ATX-GX850W Galaxy 850W 80+ Gold Certified Semi-Modular Gaming Power Supply. Please read this manual thoroughly before installation and retain it for future reference.

Figure 1: Apevia ATX-GX850W Galaxy 850W Power Supply
The Apevia Galaxy 850W Power Supply is designed to deliver reliable and efficient power to your computer system. It features an 80+ Gold certification for high efficiency, a semi-modular cable design for improved cable management, and various protection mechanisms to safeguard your components.
2. Güvenlik Bilgileri
- Güç kaynağını takmadan, çıkarmadan veya temizlemeden önce daima güç kablosunu duvar prizinden çıkarın.
- Bu güç kaynağı yalnızca kişisel bilgisayarlarda kullanılmak üzere tasarlanmıştır. Başka bir amaçla kullanmayın.
- Güç kaynağı ünitesini açmayın. Yüksek sestagCihazın içinde bazı parçalar bulunmaktadır ve cihazın açılması garantiyi geçersiz kılacaktır.
- Elektrik çarpmasını önlemek için topraklamanın uygun olduğundan emin olun.
- Keep the power supply away from moisture, extreme temperatures, and direct sunlight.
- Aşırı ısınmayı önlemek için güç kaynağını iyi havalandırılan bir alana yerleştirin.
3. Paket İçeriği
Paketin içinde tüm öğelerin mevcut olduğundan emin olun:
- Apevia ATX-GX850W Galaxy 850W Power Supply Unit
- AC Güç Kablosu
- Modular Cable Set (including 20/24pin Main Power, P8(4+4P) ESP 12V, 8(6+2)pin PCI-E, SATA, Peripheral, Floppy connectors)
- Montaj Vidaları
- Kullanım Kılavuzu (bu belge)
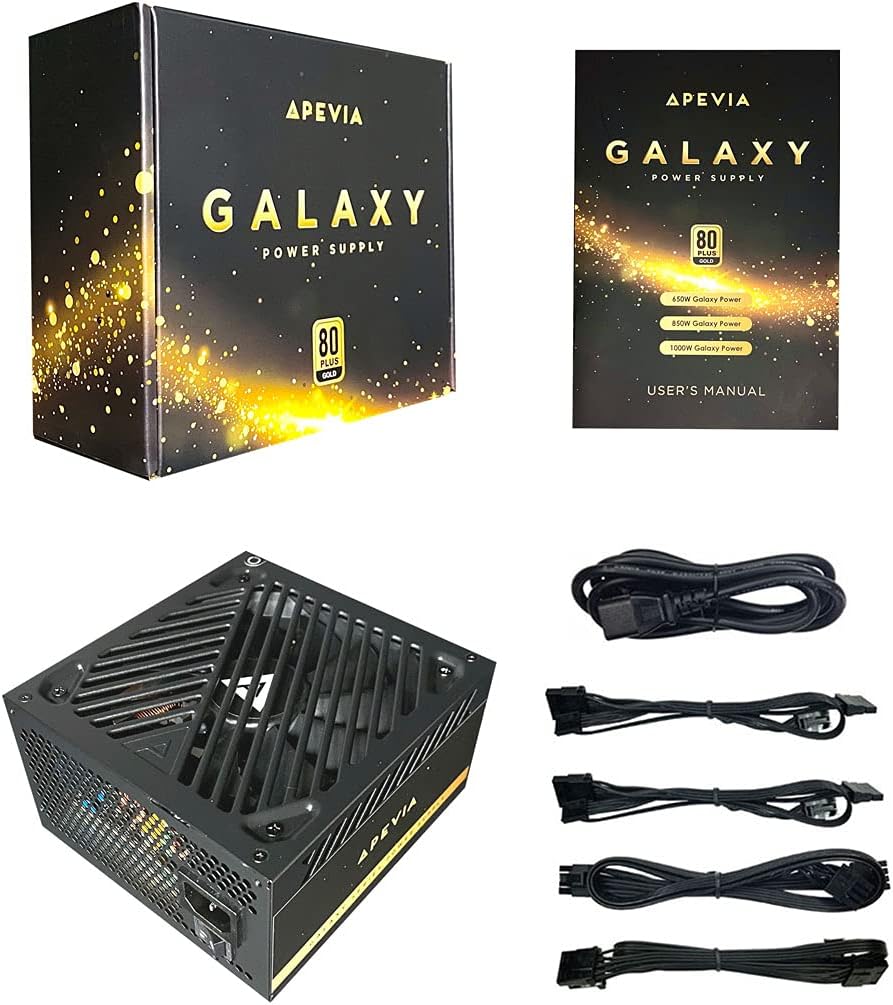
Figure 2: Power Supply Unit, Box, and Included Cables
4. Ürün Özellikleri
- 850W 80+ Gold Certified: Ensures high power efficiency (90%+ efficiency) at 20-100% load levels, reducing heat generation and electricity consumption.
- Active PFC: Power Factor Correction of 99% for stable power delivery.
- Yarı Modüler Tasarım: Allows connection of only necessary cables, improving airflow and cable management within the PC case.
- Auto-Thermally Controlled 135mm Fan: Features a quiet black fan that adjusts its speed based on the power supply's temperature, ensuring optimal cooling and reduced noise.
- Heavy Duty Protections: Includes Short-Circuit Protection (SCP), Over-Voltage Protection (OVP), Over-Power Protection (OPP), and Under-Voltage Protection (UVP) to safeguard your system components.
- Double Forward Converter Design: Enhances stability and efficiency.
- Geniş Uyumluluk: Supports ATX 12V 2.3 Version, Dual/Quad Core CPUs, SLI/Crossfire configurations, and Haswell processors.
- Large Japanese Capacitor: Provides enhanced reliability and performance.
- Tek +12V Çıkış: Delivers strong, stable power for high-performance components.
- Otomatik Sestage Geçiş: Automatically switches between 110V and 230V depending on the power grid.
5. Kurulum Kılavuzu
5.1 Kurulum Öncesi Kontrol Listesi
- Bilgisayar kasanızın ATX form faktörlü güç kaynaklarıyla uyumlu olduğundan emin olun.
- Gather necessary tools: screwdriver, zip ties or cable management straps.
- Unplug your computer from the wall outlet and discharge any residual power by pressing the power button a few times.
5.2 Fiziksel Kurulum
- Bilgisayarınızın kasasını açın.
- Locate the power supply mounting bay, typically at the top or bottom rear of the case.
- Carefully slide the Apevia ATX-GX850W into the bay, ensuring the fan is oriented correctly (usually facing downwards or inwards, depending on case design).
- Birlikte verilen montaj vidalarını kullanarak güç kaynağını kasaya sabitleyin.
5.3 Kablo Bağlantıları
The Apevia ATX-GX850W is a semi-modular power supply. Connect only the cables required for your system components. Refer to your motherboard and component manuals for specific connection points.
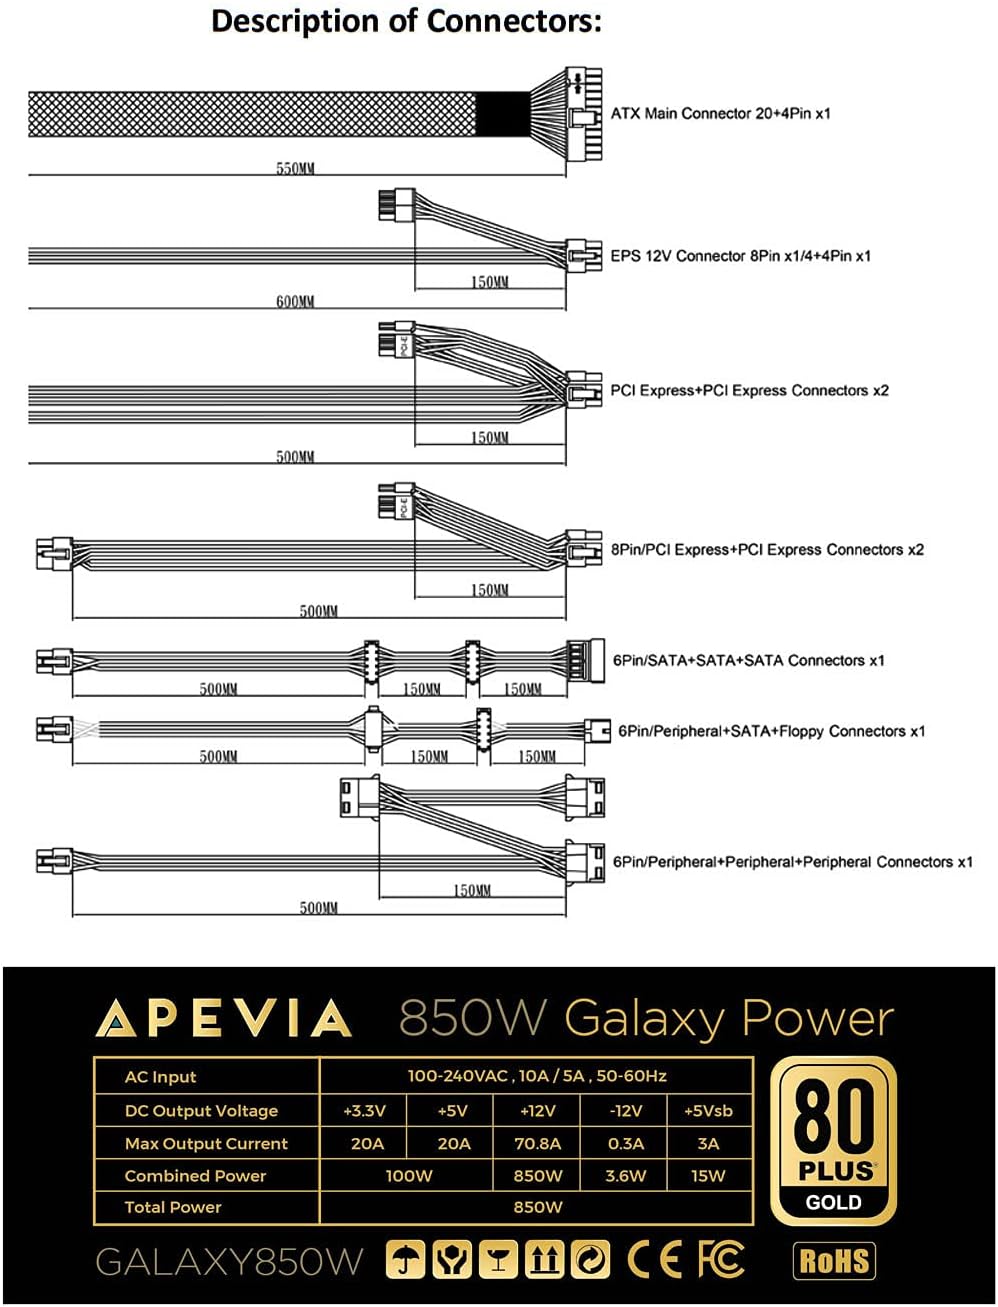
Figure 3: Description of Connectors

Figure 4: Modular Cable Ports
- 20/24-pin Main Power Connector: Connect this to your motherboard. The 24-pin connector can be split into 20+4 pins for motherboards requiring a 20-pin connector.
- P8 (4+4P) EPS 12V Connector: Connect this to your motherboard's CPU power input. The 8-pin connector can be split into 4+4 pins for motherboards requiring a 4-pin connector.
- 8 (6+2)pin PCI-E Connectors: Connect these to your graphics card(s). The 8-pin connector can be split into 6+2 pins for graphics cards requiring a 6-pin connector.
- SATA Konnektörleri: Connect these to SATA devices such as SSDs, HDDs, and optical drives.
- Çevresel (Molex) Konnektörler: Used for older peripherals or case fans.
- Floppy Connector: Used for legacy floppy drives or some fan controllers.
IMPORTANT: The power supply will not power on simply by connecting the power cord to both the power supply and wall outlet. Ensure that all the power supply cables are properly connected to the PC for it to power on.
5.4 Güç Bağlantısı
- Tüm iç bağlantılar yapıldıktan sonra bilgisayar kasasını kapatın.
- Connect the AC power cord to the power supply's input socket.
- AC güç kablosunun diğer ucunu topraklı bir duvar prizine takın.
- Flip the power switch on the back of the power supply to the 'ON' position.

Figure 5: Power Supply Rear Panel with AC Input and Switch
6. Kullanım Talimatları
After successful installation, you can power on your computer. The power supply's 135mm fan will automatically adjust its speed based on the internal temperature, providing efficient cooling while minimizing noise.
To power off your computer, use the operating system's shutdown function. For a complete power cycle, you can also switch off the power supply using the switch on its rear panel after the system has shut down.
7. Bakım
Güç kaynağınızın en iyi performansı ve uzun ömrünü sağlamak için:
- Temizlik: Periodically clean the exterior of the power supply and the fan grille to prevent dust buildup. Use compressed air to gently clear dust from the fan and vents. Ensure the power supply is disconnected from the wall outlet before cleaning.
- Havalandırma: Ensure your PC case has adequate airflow and that the power supply's fan is not obstructed.
- Kablo yönetimi: Kabloların düzgün yönetimi sadece estetiği iyileştirmekle kalmaz, aynı zamanda hava akışını da artırarak güç kaynağı da dahil olmak üzere tüm bileşenlerin daha iyi soğutulmasına katkıda bulunur.
8. Sorun Giderme
8.1 Power Supply Does Not Turn On
- Güç Kablosunu Kontrol Edin: AC güç kablosunun hem güç kaynağına hem de çalışan bir duvar prizine güvenli bir şekilde bağlı olduğundan emin olun.
- Güç düğmesi: Verify that the power switch on the back of the power supply is in the 'ON' position.
- Dahili Bağlantılar: Double-check all modular cables are firmly connected to both the power supply and your computer components (motherboard, CPU, GPU, drives). A loose connection can prevent the system from powering on.
- Motherboard Stand-offs: Ensure your motherboard is correctly installed with stand-offs to prevent short circuits.
- Faulty Components: If the issue persists, try testing the power supply with a known working system or consult a qualified technician.
8.2 Aşırı Fan Gürültüsü
- Toz Oluşumu: Clean the power supply fan and vents as described in the Maintenance section.
- Aşırı yük: Ensure your system's power requirements do not exceed the 850W capacity of the power supply. High loads can cause the fan to spin faster.
- Engelleme: Check for any cables or objects obstructing the fan's rotation.
9. Özellikler
| Özellik | Şartname |
|---|---|
| Model Adı | Gökada |
| Marka | Apevia |
| Uyumlu Cihazlar | Kişisel Bilgisayar |
| Bağlayıcı Türü | ATX, Floppy, PCI-E, SATA |
| Çıkış Watttage | 850 Watt |
| Form Faktörü | ATX |
| Soğutma Yöntemi | Hava (135 mm fan) |
| Ürün Boyutları (U x G x Y) | 6.2 x 5.9 x 3.4 inç |
| Ürün Ağırlığı | 4.6 Pound |
| Güç Kaynağı Tasarımı | Yarı Modüler |
| Hayran Sayısı | 1 |
| Maksimum Giriş Hacmitage | 230 Volt |
| Minimum Giriş Hacmitage | 110 Volt |
| System Bus Connector Type | 24 Pin |
| UPC | 810047130796 |
| Mfr Parça Numarası | ATX-GX850W |
Output Table:
| Çıktı | Akım |
|---|---|
| +3.3V | 20A |
| +5V | 20A |
| +12V | 66A |
| -12V | 0.3A |
| +5Vsb | 3A |
10. Garanti Bilgileri
The Apevia ATX-GX850W Galaxy 850W 80+ Gold Certified Power Supply typically comes with a 3-year manufacturer's warranty. Please retain your proof of purchase for warranty claims. For detailed warranty terms and conditions, refer to the official Apevia websiteye gidin veya müşteri desteğiyle iletişime geçin.
11. Destek
Daha fazla yardım, teknik destek veya view other Apevia products, please visit the official Apevia store: