
1. Giriş
This manual provides detailed instructions for the installation, operation, and maintenance of your SECULINK 16-Channel 4K/8MP Network Video Recorder (NVR). This NVR is designed to provide a comprehensive security solution, supporting up to 16 channels of 4K (8MP) video recording from ONVIF-compliant IP cameras. It features advanced H.265+ compression, motion detection recording, and P2P remote access for convenient monitoring.
2. Ürün Bittiview
Temel Özellikler
- Ultra HD Video: Full 4K (3840x2160P) video viewing and recording on all 16 channels, supporting 8MP/5MP/4MP/3MP/1080p ONVIF IP cameras.
- H.265+ Sıkıştırma: Enhances bandwidth and storage efficiency, providing smaller file sizes, higher definition, and longer recording times. Supports simultaneous network transmission and playback.
- Hareket Algılama Kaydı: Configurable to record only when motion is detected, optimizing storage space.
- Kolay Kurulum: Requires a wired connection to your router for operation and manages all connected IP cameras on your network.
- Çoklu Depolama Seçenekleri: Supports up to 6TB internal SATA HDD (sold separately) and cloud storage service (sold separately). Backup options include USB flash disk, USB DVR writer, and network.
- P2P Remote Access: Cloud P2P function for remote viewing on smartphones, tablets, and PCs via the XMeye app.
Paket İçeriği
- 1x SECULINK 16-Channel Network Video Recorder (NVR1616PF-4K)
- 1x Güç Adaptörü
- 1x USB Fare
3. Kurulum Kılavuzu
3.1 Fiziksel Bağlantılar
NVR cihazını çalıştırmadan önce, gerekli tüm bağlantıların yapıldığından emin olun.
- Monitörü bağlayın: NVR cihazını monitöre veya televizyona bağlamak için HDMI veya VGA kablosu kullanın.
- Fareyi bağlayın: Plug the included USB mouse into one of the USB ports on the NVR.
- Ağ bağlantısı: Connect the NVR's LAN port to your router using an Ethernet cable. This NVR requires a wired network connection.
- Güç Bağlantısı: Connect the power adapter to the NVR's DC 12V input and then plug it into a power outlet.

Şekil 3.1: NVR Arka Panel Bağlantıları
3.2 Hard Drive Installation (HDD Not Included)
The NVR supports a single SATA hard drive up to 6TB for local storage. Follow these steps to install an HDD:
- Unscrew the top cover of the NVR chassis.
- Connect the SATA data and power cables from the NVR to the corresponding ports on the hard drive.
- Verilen vidaları kullanarak sabit sürücüyü NVR kasasına sabitleyin.
- Üst kapağı yerine takın ve vidalarla sabitleyin.
After installation, the NVR will typically detect the new HDD. You may need to format the HDD through the NVR's system settings before recording can begin.
3.3 Ağ Yapılandırması
The NVR connects to your network via an Ethernet cable. Ensure your router is functioning correctly. The NVR will typically obtain an IP address automatically via DHCP. For remote access, ensure your network allows outbound connections for the NVR's P2P service.
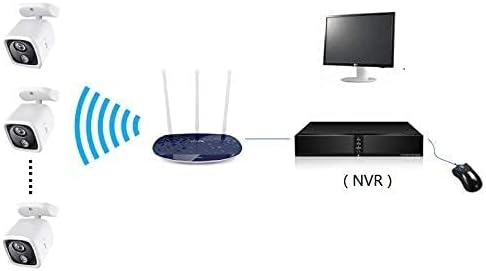
Figure 3.2: NVR Network Connection Diagram
3.4 Kamera Entegrasyonu
The NVR supports ONVIF-compliant IP cameras. To add cameras:
- Ensure your IP cameras are powered on and connected to the same network as the NVR.
- Access the NVR's main menu using the connected monitor and mouse.
- Navigate to the Camera Management or Channel Setup section.
- The NVR should automatically detect ONVIF cameras on the network. Select and add them, providing credentials if required.
4. Kullanım Talimatları
4.1 Kullanıcı Arayüzü Gezintisi
Use the connected USB mouse to navigate the NVR's graphical user interface (GUI). Right-click to access the main menu, and left-click to select options or open sub-menus.
4.2 Kayıt Yönetimi
The NVR offers flexible recording options:
- Sürekli Kayıt: 7/24 kesintisiz kayıt.
- Hareket Algılama Kaydı: Records only when motion is detected by the cameras, saving storage space. Configure motion detection zones and sensitivity in the NVR settings.
- Planlanmış Kayıt: Set specific times for recording to occur.
These modes can be configured per channel in the NVR's recording settings.

Figure 4.1: Recording Modes
4.3 Uzaktan Erişim (P2P)
İle view kameralarınızı uzaktan:
- İndir XMeye Akıllı telefonunuzda veya tabletinizde uygulama.
- Bir hesap kaydedin ve giriş yapın.
- Add your NVR device by scanning the QR code displayed on the NVR's monitor (usually found in the P2P or Cloud settings) or by manually entering the device ID.
- Bir kez eklendiğinde, şunları yapabilirsiniz: view canlı yayınlar ve kaydedilen foo'nun oynatımıtagİnternet bağlantısı olan her yerden.

Figure 4.2: P2P Remote Access
4.4 Video Oynatma ve Yedekleme
Yırttıview kaydedilmiş footage, access the Playback menu from the NVR's main interface. You can search by time, date, event, or channel. To back up footage, connect a USB flash drive to the NVR's USB port and use the backup function in the menu.
5. Bakım
5.1 Sabit Sürücü Yönetimi
Regularly check the status of your hard drive through the NVR's system settings. Consider backing up critical footage periodically to an external device or cloud storage. If the HDD fails, replace it following the installation steps in Section 3.2.
5.2 Sistem Güncellemeleri
Üreticinin periyodik olarak kontrol edin website for firmware updates. Keeping your NVR's firmware updated can improve performance, add new features, and enhance security. Follow the provided instructions carefully when performing firmware updates.
5.3 Temizlik
Ensure the NVR unit is kept in a clean, dry, and well-ventilated area. Dust can accumulate and affect performance. Use a soft, dry cloth to clean the exterior of the NVR. Do not use liquid cleaners or aerosols.
6. Sorun Giderme
- Monitörde Video Çıkışı Yok:
- Check HDMI/VGA cable connections to both NVR and monitor.
- Ensure the monitor is set to the correct input source.
- Verify the NVR is powered on (power indicator light should be active). - Ağ Bağlantısı Yok:
- Ensure the Ethernet cable is securely connected to both the NVR and the router.
- Check if your router is functioning correctly.
- Verify network settings in the NVR's menu (e.g., DHCP enabled). - Kameralar Görüntü Vermiyor/Kayıt Yapmıyor:
- Confirm IP cameras are powered on and connected to the network.
- Check camera IP addresses and ensure they are discoverable by the NVR.
- Verify camera credentials (username/password) are correctly entered in the NVR's camera management.
- Ensure the HDD is installed and formatted correctly for recording. - Uzaktan Erişim Çalışmıyor:
- Ensure the NVR has an active internet connection.
- Verify the P2P function is enabled in the NVR's network settings.
- Check your smartphone/tablet's internet connection.
- Ensure the correct device ID is entered in the XMeye app. - Kötü Video Kalitesi:
- Ensure cameras are set to their highest resolution (e.g., 4K/8MP).
- Check network bandwidth if experiencing lag or pixelation, especially for remote viewIng.
7. Özellikler
| Özellik | Şartname |
|---|---|
| Model Numarası | NVR1616PF-4K |
| Kanal Sayısı | 16 |
| Çözünürlük | 16*4K 8MP |
| Video Çıkışı | 1x VGA, 1x HDMI |
| Ses Çıkışı | 1 adet RCA |
| Ağ Bağlantı Noktası | 1x RJ45 10M/100M |
| USB Bağlantı Noktası | 2x USB2.0 |
| Streaming Specification | ONVIF |
| Kayıt Modu | Manual > Alarm > Motion Detection > Timing |
| Video Arama | Time, Date, Event, Channel Search |
| Güç | Doğru Akım 12V |
| Kasa Boyutu | 260 mm x 43 mm x 190 mm (10.24" U x 7.48" G x 1.69" Y) |
| HDD Arayüzü | SATA (Max 6TB) |
| UYGULAMA | XMeye |
| Bağlantı Teknolojisi | Ethernet, HDMI, USB, VGA |
| Ses Girişi | Mikrofon |
| Ürün Ağırlığı | 1.01 Kilogram |
8. Garanti ve Destek
For warranty information, please refer to the documentation provided with your purchase or contact SECULINK customer support directly. Technical support is available through the manufacturer's official channels. Please visit the SECULINK webEn güncel destek kaynakları, SSS ve iletişim bilgileri için siteyi ziyaret edin.