
LUXMAN LXV-OT6
LUXMAN Vakum Tüplü Harmonizatör LXV-OT6 Kullanım Kılavuzu
Model: LXV-OT6
1. Giriş
Thank you for choosing the LUXMAN Vacuum Tube Harmonizer LXV-OT6. This device is designed to enhance your audio experience by introducing the warm, rich sound characteristic of vacuum tubes. It processes audio signals to add a subtle, pleasing even-order harmonic distortion, making digital audio sources sound more natural and engaging.
This product is an assembled kit version of the LXV-OT6 harmonizer, originally released as an appendix to a MOOK (magazine-book) by Ongaku no Tomo Sha. This manual provides essential information for its safe and effective use.
2. Güvenlik Bilgileri
Lütfen cihazı çalıştırmadan önce tüm güvenlik talimatlarını dikkatlice okuyunuz.
- Güç Kaynağı: Use only the specified AC100V 50/60Hz power source. Ensure the power cable is securely connected and not damaged.
- Havalandırma: Do not block ventilation openings. Ensure adequate space around the unit for proper heat dissipation. Operating the unit in an enclosed space can lead to overheating.
- Nem ve Sıvılar: Keep the unit away from water, moisture, and high humidity. Do not place liquid-filled objects on or near the unit. In case of liquid spillage, immediately disconnect power and consult a qualified technician.
- Yabancı Cisimler: Do not insert any foreign objects into the unit's openings. This can cause electric shock or damage.
- Vakum tüpü: The vacuum tube operates at high temperatures. Avoid touching the vacuum tube during operation or immediately after turning off the unit. Allow sufficient time for cooling before handling.
- Sökme: Do not attempt to disassemble or modify the unit. There are no user-serviceable parts inside, except for the vacuum tube replacement as described in this manual. Unauthorized disassembly voids the warranty and poses a risk of electric shock.
- Atama: Place the unit on a stable, level surface. Avoid placing it in direct sunlight, near heat sources, or in areas with excessive dust or vibrations.
3. Ürün Bittiview ve Bileşenler
The LXV-OT6 Vacuum Tube Harmonizer is a compact audio device designed to enrich your sound. Below are the key components and their functions.
3.1 Ön Panel

Şekil 3.1: Ön view of the LXV-OT6 Harmonizer.
This image shows the front of the harmonizer. On the left, there is a toggle switch labeled "POWER" for turning the unit on and off. To the right, a rectangular window allows visibility of the internal vacuum tube, which glows orange when the unit is powered on. The top surface has "Stereo Luxman VACUUM TUBE HARMONIZED AMPLIFIER LXV-OT6" printed on it.
- Güç düğmesi: A toggle switch located on the front panel to turn the unit ON or OFF.
- Vacuum Tube Window: A transparent window allowing visual confirmation of the vacuum tube's operation and glow.
3.2 Arka Panel
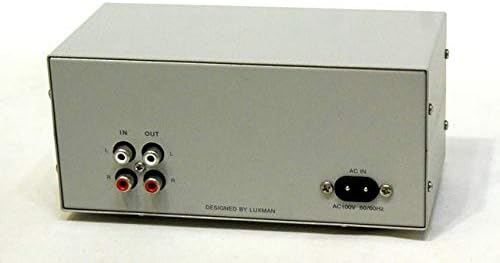
Şekil 3.2: Arka view of the LXV-OT6 Harmonizer.
This image displays the rear panel of the harmonizer. On the left side, there are two pairs of RCA jacks: "IN" (input) and "OUT" (output), each with red (right channel) and white (left channel) connectors. On the right side, there is a standard IEC C8 power inlet labeled "AC IN" with "AC100V 50/60Hz" printed below it. The text "DESIGNED BY LUXMAN" is visible at the bottom center.
- IN (Input) Terminals: RCA jacks (Left/Right) for connecting your audio source (e.g., CD player, PC sound card, DAC).
- OUT (Output) Terminals: RCA jacks (Left/Right) for connecting to your amplifli veya güçlendirilmiş hoparlörler.
- AC IN (Power Inlet): For connecting the provided AC power cable.
3.3 Dahil Aksesuarlar

Figure 3.3: LXV-OT6 Harmonizer and accessories.
This image shows the complete package. The assembled LXV-OT6 harmonizer unit is visible in the foreground. To its left, a Japanese magazine/instruction manual titled "快音!真空管サウンドに癒やされる" (Pleasant Sound! Healed by Vacuum Tube Sound) is displayed. To the right of the harmonizer, a black AC power cable with a two-prong plug is shown.
- LXV-OT6 Vacuum Tube Harmonizer Unit (assembled)
- AC Güç Kablosu
- Original Japanese MOOK/Instruction Manual (for reference)
4. Kurulum
Follow these steps to set up your LXV-OT6 Vacuum Tube Harmonizer:
- Atama: Choose a stable, flat surface for the harmonizer, ensuring good ventilation around the unit. Keep it away from direct sunlight, heat sources, and strong magnetic fields.
- Ses Kaynağını Bağlayın: Using RCA audio cables (not included), connect the audio output of your source device (e.g., CD player, PC sound card, DAC) to the "IN" (Input) terminals on the rear panel of the LXV-OT6. Ensure left (white) and right (red) channels are correctly matched.
- Bağlan AmpAmplifikatör/Hoparlörler: Using another set of RCA audio cables (not included), connect the "OUT" (Output) terminals on the rear panel of the LXV-OT6 to an available input on your amplifier, receiver, or powered speakers. Again, ensure left and right channels are correctly matched.
- Gücü bağlayın: Insert the provided AC power cable into the "AC IN" inlet on the rear panel of the LXV-OT6. Then, plug the other end of the power cable into a standard AC100V 50/60Hz wall outlet.
- İlk Kontrol: Before powering on, ensure all connections are secure and correct. Make sure your amplifier's volume is set to a low level.
5. Operasyon
Operating the LXV-OT6 is straightforward:
- Güç Açık: Flip the "POWER" toggle switch on the front panel to the ON position. The vacuum tube inside the unit will begin to glow, indicating that the unit is powered on.
- Isınma Süresi: Allow approximately 30 seconds to 1 minute for the vacuum tube to warm up and stabilize. During this time, you may not hear sound or the sound quality may not be optimal.
- Sesi Çal: Bağlı kaynak cihazınızdan ses çalmaya başlayın.
- Sesi Ayarla: Sesi kademeli olarak artırın amplifier or powered speakers to your desired listening level.
- Enjoy the Sound: The LXV-OT6 will process the audio signal, adding a subtle, warm, and rich characteristic to the sound, enhancing your listening experience. The harmonizer is designed to fix the even-order distortion rate for consistent performance.
- Kapat: When you are finished listening, flip the "POWER" toggle switch to the OFF position.
6. Bakım
Proper maintenance will ensure the longevity and optimal performance of your LXV-OT6 Harmonizer.
6.1 Temizlik
- Temizliğe başlamadan önce mutlaka güç kablosunu çıkarın.
- Ünitenin dış yüzeyini silmek için yumuşak, kuru bir bez kullanın.
- Do not use abrasive cleaners, waxes, or solvents, as they may damage the finish.
- Cihazın üzerine doğrudan sıvı püskürtmekten kaçının.
6.2 Vakum Tüpü Değişimi
The LXV-OT6 uses an ECC82 (12AU7) vacuum tube. While vacuum tubes have a long lifespan, they may eventually degrade or fail. Replacing the tube can restore performance or allow for sound customization with different brands of ECC82/12AU7 tubes.
Caution: Vacuum tubes can be hot. Always allow the unit to cool down completely before attempting replacement. Disconnect power before proceeding.
- Gücü Kesin: Ensure the unit is turned off and unplugged from the wall outlet.
- Soğutmaya İzin Ver: Wait at least 15-30 minutes for the vacuum tube to cool down.
- Access Tube: The vacuum tube is typically accessible from the top or by removing the top cover (refer to the original Japanese manual for specific instructions if needed, as this is an assembled kit). Gently pull the tube straight up from its socket. Avoid wiggling it side-to-side, which can damage the pins or socket.
- Insert New Tube: Align the pins of the new ECC82/12AU7 vacuum tube with the holes in the socket. Gently push the tube straight down until it is firmly seated. Do not force it.
- Yeniden birleştirme: If you removed a cover, reattach it securely.
- Test: Reconnect power and test the unit.
Replacement ECC82/12AU7 tubes can be purchased from reputable audio component suppliers.
7. Sorun Giderme
If you encounter issues with your LXV-OT6 Harmonizer, refer to the following common problems and solutions:
| Sorun | Olası Neden | Çözüm |
|---|---|---|
| Ses çıkışı yok veya çok düşük. |
|
|
| Bozuk veya düşük ses kalitesi. |
|
|
| Uğultu veya vızıltı sesi. |
|
|
| Vacuum tube not glowing. |
|
|
If the problem persists after trying these solutions, please contact your retailer or a qualified audio technician for assistance.
8. Özellikler
| Özellik | Tanım |
|---|---|
| Örnek | LXV-OT6 |
| Çalışma Prensibi | Harmonized even-order distortion rate fixed |
| Vakum tüpü | ECC82 (Chinese-made) |
| Dirençler | General-purpose metal film resistors 1/4W |
| Capacitors (Coupling, Power Supply, etc.) | Rubycon electrolytic capacitors |
| Giriş/Çıkış Terminalleri | General-purpose RCA type |
| Güç Tüketimi | 4W |
| Dış Boyutlar (G x Y x D) | 180mm x 80mm x 90mm (yaklaşık 7.1 x 3.1 x 3.5 inç) |
| Ağırlık | Approx. 800g (approx. 1.76 lbs) |
| Güç Gereksinimi | AC100V 50 / 60Hz |
9. Garanti ve Destek
As this product is an assembled kit, specific warranty terms may vary. Please refer to the original purchase documentation or contact the retailer from whom you acquired the unit for details regarding warranty coverage and support.
For technical inquiries or further assistance, it is recommended to consult the original Japanese MOOK/manual for detailed circuit diagrams or contact a qualified audio technician.
Ask a question about this manual
Ask about setup, troubleshooting, compatibility, parts, safety, or missing instructions. Manuals+ will review the question and use this page’s manual context to help answer it.