1. Giriş
This manual provides detailed instructions for the setup, operation, and maintenance of your VSDISPLAY 10.3-inch LCD Screen with USB SD LCD Controller Board (Model HSD103KPW2-A10). Please read this manual thoroughly before using the product to ensure proper functionality and to prevent damage.
2. Paket İçeriği
Aşağıda listelenen tüm ürünlerin paketinizde mevcut olduğundan emin olun. Eksik veya hasarlı bir ürün varsa, lütfen müşteri hizmetleriyle iletişime geçin.
- 1 × 10.3" HSD103KPW2-A10 1920x720 LCD Screen
- 1 × USB SD LCD Controller Board (AV input unavailable by default)
- 1 × Converter Board
- 1 × Signal Cable
- 1 × Keyboard with Cable
Note: A power adapter is NOT included in the packing list. A 12Vdc, 2A or more power adapter is recommended.
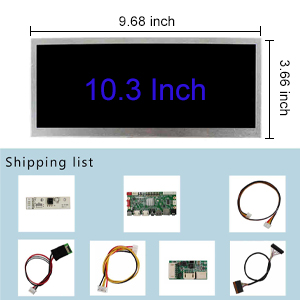
Şekil 2.1: Pakete dahil bileşenler.
3. Ürün Özellikleri
- Görüntülemek: 10.3-inch HSD103KPW2-A10 LCD Screen with 1920x720 resolution.
- Parlaklık: 850 cd/m² (Typical).
- Kontrast Oranı: 1000:1 (Typical).
- Viewaçı: 85/85/85/85 (Typical) [Left / Right / Up / Down].
- Kontrol Kartı: USB SD LCD Controller Board for LVDS LCD Screens.
- Ses: USB SD Audio Input, Speaker and Earphone Audio Output.
- Multimedya Desteği: Supports MP4 and various other multimedia formats via USB and SD card.
- Güç Tüketimi: Standby mode consumes less than 0.3W.
4. Kurulum Talimatları
Follow these steps to correctly assemble and connect your VSDISPLAY LCD screen and controller board.
4.1 Controller Board Overview

Figure 4.1: VSDISPLAY LCD Controller Board layout with labeled ports (DC-IN, Keyboard, LVDS Interface, VGA, Speaker, Earphone, HD1, HD2, CVBS, USB, SD Card, Inverter).
Familiarize yourself with the various ports and connectors on the controller board as shown in Figure 4.1.
4.2 Bileşenlerin Bağlanması
- Connect the Keyboard Cable: Attach the keyboard cable to the designated "Keyboard" port on the controller board.
- Connect the Inverter Cable: Connect the inverter cable to the "Inverter" port on the controller board.
- Connect the Signal Cable (LVDS): Carefully connect the signal cable to the "LVDS Interface" on the controller board. Ensure the orientation is correct: the circle dot on the cable port should correspond to the circle dot on the board. The dot on the back of the cable is square.
- Connect the Signal Cable to LCD Panel: Attach the other end of the signal cable to the LCD panel. Ensure the black side of the connector is "up" and the metal side is "down" when inserting.
- Connect the Converter Board: Connect the converter board to the appropriate port on the LCD panel.
- Gücü bağlayın: Connect a 12Vdc power adapter (not included) to the DC-IN port on the controller board.
- Video Kaynağını Bağlayın: Connect your video source (e.g., PC, laptop, PS5) to one of the HDMI ports (HD1 or HD2) on the controller board.

Şekil 4.2: Ayrıntılı view of LCD panel ribbon cable connection.
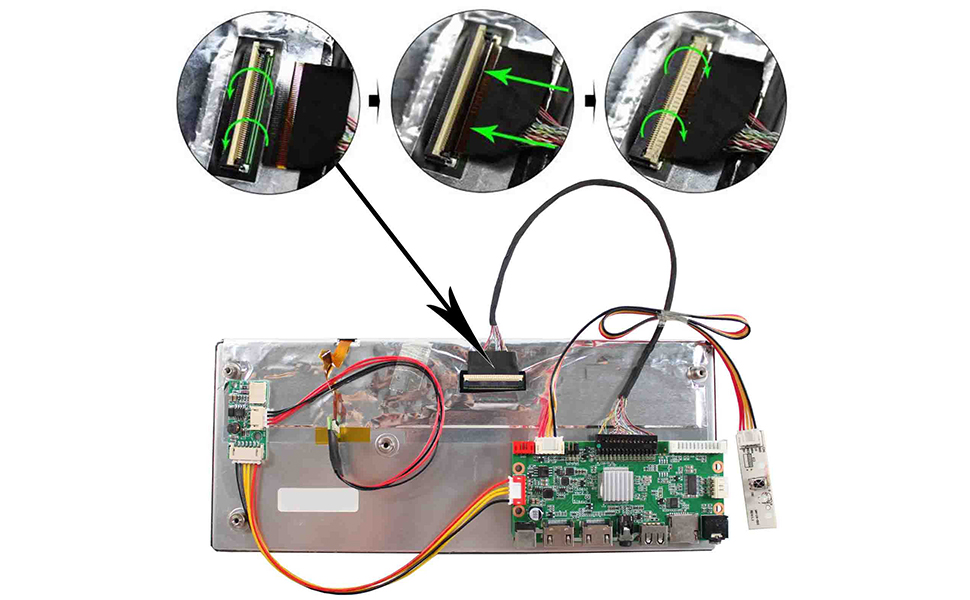
Figure 4.3: Overall connection diagram for the LCD screen kit.
4.3 Video Guide: Connecting the Controller Board
For a visual guide on connecting the controller board to the LCD display, please watch the video below.
Video 4.1: This video demonstrates the step-by-step process of connecting the VSDISPLAY controller board to the 10.3-inch LCD display, including cable orientation and proper insertion techniques.
Important: The controller board must not touch any conductive surfaces when powered on to prevent short circuits or damage.
5. Kullanım Talimatları
5.1 Güç Açma/Kapatma
- To power on the display, ensure all connections are secure and plug in the 12Vdc power adapter.
- The display will enter standby mode if no signal is detected.
- To power off, disconnect the power adapter.
5.2 Giriş Seçimi
Use the provided keyboard with cable to navigate the display's menu and select input sources (HDMI, USB, SD Card, VGA).
5.3 Multimedia Playback (USB/SD Card)
The controller board supports multimedia playback directly from USB drives and SD cards. Insert your storage device into the respective port. Use the keyboard to browse and select media files.

Figure 5.1: Supported Multimedia Playback Formats.
Refer to Figure 5.1 for a comprehensive list of supported video and audio formats, including maximum resolutions and data rates.
6. Bakım
6.1 Temizlik
- Temizlemeden önce daima gücü kesin.
- Use a soft, dry cloth to wipe the screen and controller board.
- Ekrandaki inatçı lekeler için hafifçe silinampen the cloth with water or a screen-safe cleaning solution. Do not spray liquid directly onto the screen or components.
- Avoid using abrasive cleaners, solvents, or alcohol-based solutions, as these can damage the surfaces.
6.2 Depolama
When not in use for extended periods, store the display and components in a cool, dry place away from direct sunlight and extreme temperatures.
7. Sorun Giderme
If you encounter issues with your VSDISPLAY LCD screen, refer to the following common problems and solutions:
| Sorun | Olası Neden | Çözüm |
|---|---|---|
| Ekran yok/Siyah ekran |
|
|
| Display flickers or loses connection intermittently |
|
|
| Image is not centered or has incorrect aspect ratio |
|
|
| Light areas at the edge of the screen |
|
|
| Ses çıkışı yok |
|
|
8. Özellikler
| Özellik | Detay |
|---|---|
| Marka | VS GÖRÜNTÜLEME |
| Model Numarası | HSD103KPW2-A10 |
| Ekran Boyutu | 10.3 inç |
| Çözünürlük | 1920x720 |
| Görüntü Türü | LCD |
| Parlaklık | 850 cd/m² (Tipik) |
| Kontrast Oranı | 1000:1 (Tipik) |
| ViewAçı | 85/85/85/85 Degrees (Left/Right/Up/Down) |
| Yenileme Hızı | 60 Hz |
| Tepki Süresi | 5 Milisaniye |
| Power Input (Recommended) | 12Vdc, >2A |
| Bekleme Güç Tüketimi | <0.3W |
| Multimedya Desteği | MP4, various video/audio formats via USB/SD card |
| Ürün Boyutları (D x G x Y) | 0.62"D x 10.23"G x 4.41"Y |
9. Garanti ve Destek
9.1 Garanti Bilgileri
Specific warranty details for the VSDISPLAY 10.3-inch LCD Screen (Model HSD103KPW2-A10) are typically provided at the point of purchase or can be obtained directly from the manufacturer. Please retain your proof of purchase for warranty claims.
9.2 Müşteri Desteği
For technical assistance, troubleshooting not covered in this manual, or warranty inquiries, please contact VSDISPLAY customer support through their official webÜrünün satın alındığı site veya perakendeci.