
1. Giriş
The EPEVER Tracer1210AN MPPT Solar Charge Controller is designed to efficiently manage power from your solar panels to charge batteries. It features advanced Maximum Power Point Tracking (MPPT) technology, ensuring high tracking efficiency of over 99.5%. This controller supports 12V and 24V battery systems automatically and can handle a maximum PV input voltage of 100V. It is compatible with various battery types, including sealed lead-acid, gel, flooded, and lithium batteries. The built-in LCD screen displays key charging parameters, and multiple connectivity options allow for personalized settings and monitoring via remote meter, mobile app, or PC software.
2. Ürün Özellikleri
The Tracer1210AN controller integrates several features for optimal performance and user interaction.

- LCD Ekran: Shows real-time operating data and fault information.
- Seçim Düğmesi: Used to navigate through different display interfaces.
- Giriş Düğmesi: Used to confirm selections or enter settings menus.
- Montaj delikleri: For secure installation of the controller.
- Sıcaklık Sensörü Bağlantı Noktası: Connects the Remote Temperature Sensor (RTS) for accurate battery temperature compensation.
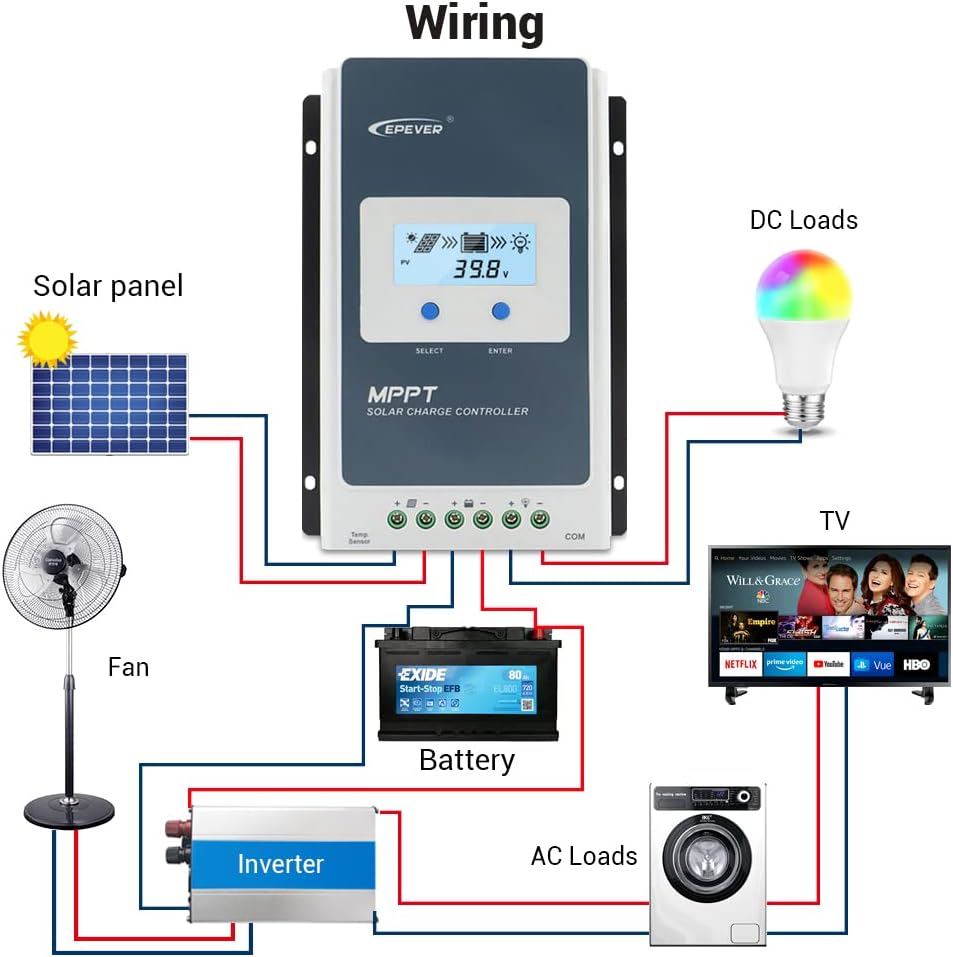
- Güneş Paneli Terminalleri: Güneş paneli dizisine bağlanır.
- Akü Terminalleri: Akü bankasına bağlanır.
- Yükleme Terminalleri: DC yüklere bağlanır.
- COM Port (RS485): For communication with accessories like the MT50 remote meter, PC software, or mobile app.

3. Kurulum ve Kurulum
Güneş enerjisi şarj kontrol cihazınızın güvenli ve verimli çalışması için doğru kurulum çok önemlidir. Lütfen bu adımları dikkatlice izleyin.
3.1 Kutudan Çıkarma ve Bileşenler
Before installation, ensure all components are present and undamaged. The package typically includes the Tracer1210AN controller, an MT50 remote meter, a Remote Temperature Sensor (RTS), and an RS485 PC communication cable.

3.2 Kablolama Şeması
Connect the components in the specified order to prevent damage. The connection order is: Battery → Solar Panel → Load. The disassembly order is the reverse: Load → Solar Panel → Battery.
3.3 Communication Ports and Accessories
The controller features various ports for enhanced monitoring and control.

- Uzaktan Sıcaklık Sensörü (RTS): Connect the RTS300R47K3.81A to the designated port for accurate battery temperature compensation. The standard cable length is 3m.
- RS485 İletişim Bağlantı Noktası: This RJ45 port allows connection to various accessories for monitoring and parameter setting.
3.4 Kurulum Adımları
- Mount the controller securely using the provided mounting holes.
- Pili kontrol ünitesinin pil terminallerine bağlayın. Kutupların doğru olduğundan emin olun.
- Connect the solar panel to the controller's solar panel terminals. Ensure correct polarity.
- Connect the DC loads to the controller's load terminals. Ensure correct polarity.
- Connect the temperature sensor probe to the controller.
3.5 Video: Unboxing and Installation
Watch this video for a visual guide on unboxing and installing the EPEVER Tracer-AN controller and its accessories.
4. Kullanım Talimatları
This section covers basic operation and how to configure essential settings on your controller.
4.1 Manual Control Mode
The controller supports manual control of the load. Press the 'ENTER' button to toggle the load on or off.
4.2 Setting the Battery Type
It is essential to set the correct battery type for optimal charging and battery longevity. The controller supports various battery types including Sealed (default), Gel, Flooded, and different Lithium battery configurations.
Pil türünü ayarlamak için:
- Press and hold the 'ENTER' button for 5 seconds when the battery voltagArayüz görüntülenir.
- Press the 'SELECT' button when the battery type interface is flashing to cycle through available battery types.
- Press the 'ENTER' button to confirm your selection.
4.3 Setting the Load Mode
The load working mode determines how the connected DC loads operate. Options include Light ON/OFF, various timer settings, test mode, and manual mode.
To set the load mode:
- Press and hold the 'ENTER' button for 5 seconds when the load mode interface is displayed.
- Press the 'SELECT' button when the load mode interface is flashing to cycle through available modes.
- Press the 'ENTER' button to confirm your selection.
5. Özellikler
Below are the technical specifications for the Tracer1210AN MPPT Solar Charge Controller.
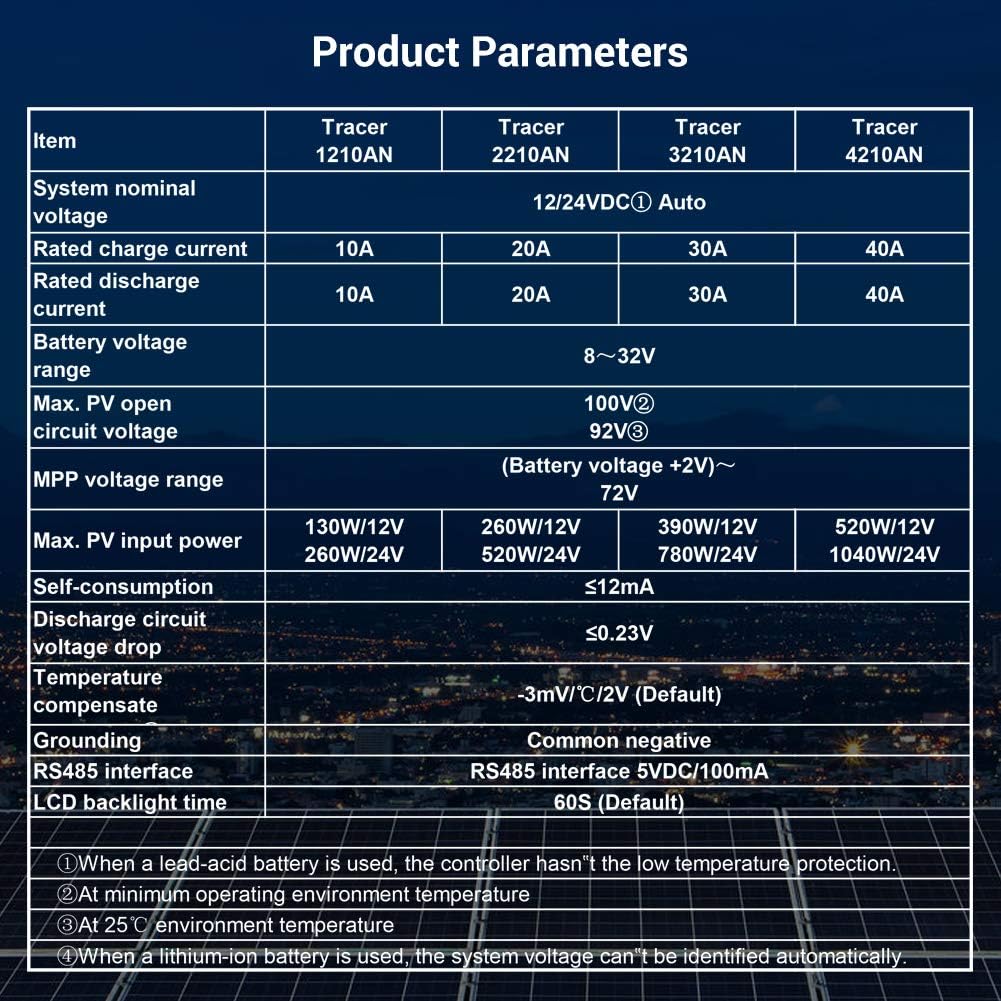
| Parametre | Değer (Tracer1210AN) |
|---|---|
| Sistem Nominal Hacmitage | 12 / 24VDC Otomatik |
| Anma Şarj Akımı | 10A |
| Nominal Deşarj Akımı | 10A |
| Pil Hacmitage Aralık | 8~32V |
| Maks. PV Açık Devre Hacmitage | 100V (25°C ortam sıcaklığında) |
| MPP Hacmitage Aralık | Pil Hacmitage +2V ~ 72V |
| Maksimum PV Giriş Gücü | 130W/12V, 260W/24V |
| Kendi kendine tüketim | ≤12mA |
| Deşarj Devresi Hacmitage Bırak | ≤0.23V |
| Temperature Compensate | -3mV/°C/2V (Varsayılan) |
| Topraklama | Ortak Negatif |
| RS485 Arayüzü | 5VDC / 100mA |
| LCD Arka Aydınlatma Süresi | 60S (Varsayılan) |
6. Aksesuarlar
The EPEVER Tracer1210AN controller is often bundled with or compatible with several accessories to enhance its functionality.
- MT50 Uzaktan Ölçüm Cihazı: This remote meter can display various operating data and fault information. It features easy-to-operate buttons and a clear numeric display. It is used for monitoring and setting controller parameters.
- Uzaktan Sıcaklık Sensörü (RTS300R47K3.81A): Acquires battery temperature for accurate temperature compensation of control parameters. The standard length of the cable is 3m.
- USB - RS485 Kablosu (CC-USB-RS485-150U): Used to connect the controller to a PC for monitoring and setting parameters via Solar Station PC software. The cable length is 1.5m.
- OTG Kablosu (OTG-12CM): Used to connect a mobile communication cable to achieve real-time monitoring and parameter modification via a mobile APP.
- WiFi Seri Adaptörü (eBox-WiFi-01): Allows monitoring and setting parameters via mobile APP software through WiFi signals.
- RS485 - Bluetooth Adaptörü (eBox-BLE-01): Enables monitoring and setting parameters via mobile APP software through Bluetooth signals.
- Kayıt Cihazı (eLOG01): Records the operating status of the controller for later review.

7. Sorun Giderme
If you encounter issues with your EPEVER Tracer1210AN controller, refer to the following common troubleshooting tips:
- LCD'de Görüntü Yok: Pil bağlantılarını kontrol edin ve pilin dolu olduğundan emin olun.tage çalışma aralığındadır.
- Şarj Yok: Verify solar panel connections and ensure sufficient sunlight. Check for any shading on the solar panels. Confirm the battery type setting is correct.
- Yük Çalışmıyor: Check load connections and ensure the load mode is set correctly (e.g., Manual ON, Light ON/OFF). Verify that the battery voltage düşük ses seviyesinin üstündetage bağlantı kesme eşiği.
- Yanlış Sıcaklık Okuması: Ensure the Remote Temperature Sensor (RTS) is properly connected and positioned near the battery.
- İletişim Sorunları: Check the RS485 cable connections to the remote meter, PC, or adapter. Ensure drivers are installed for PC communication.
For more detailed troubleshooting, consult the full product manual or contact EPEVER customer support.
8. Bakım
Regular maintenance helps ensure the longevity and optimal performance of your solar charge controller.
- Temizlik: Kontrol cihazını temiz ve toz ve kalıntılardan uzak tutun. Temizlik için kuru bir bez kullanın.
- Bağlantılar: Tüm kablo bağlantılarını sıkılık ve korozyon açısından düzenli olarak kontrol edin. Gevşek bağlantılar aşırı ısınmaya ve hasara neden olabilir.
- Havalandırma: Ensure adequate airflow around the controller to facilitate heat dissipation. Do not block the heat sink fins.
- Pil Sağlığı: Pil hacmini izleyintage and health regularly. Ensure the battery type setting on the controller matches your battery.
- Donanım Yazılımı Güncellemeleri: Üreticinin kontrol edin webPerformansı iyileştirmek veya yeni özellikler eklemek için mevcut tüm ürün yazılımı güncellemeleri için siteyi ziyaret edin.
9. Garanti ve Destek
EPEVER ürünleri güvenilirlik ve performans için tasarlanmıştır. Garanti bilgileri ve teknik destek için lütfen resmi EPEVER web sitesine başvurun. websiteyi ziyaret edin veya yerel distribütörünüzle iletişime geçin.
You can also visit the official iSunergy store on Amazon for product information and support: iSunergy Amazon Store.