
OUKANING Retro Industriad Cage 1
OUKANING 52-Inch Retro Industrial Ceiling Fan Light - Instruction Manual
Model: Retro Industriad Cage 1
giriiş
This manual provides detailed instructions for the safe installation, operation, and maintenance of your OUKANING 52-Inch Retro Industrial Ceiling Fan Light. Please read all instructions carefully before beginning installation and retain this manual for future reference.
Önemli Güvenlik Bilgileri
- Kurulum veya bakım işlemlerinden önce mutlaka ana devre kesiciden elektriği kesin.
- Tüm elektrik bağlantılarının yerel yönetmelik ve yönetmeliklere uygun olduğundan emin olun.
- Kablolama prosedürleri konusunda emin değilseniz kalifiye bir elektrikçiye danışın.
- Mount the fan to a ceiling joist or a securely anchored support structure capable of supporting the fan's weight.
- Kurulum veya temizlik sırasında bıçak tutucularını bükmeyin.
- Ensure there is adequate clearance between the fan blades and any obstacles.
Kutuda Neler Var?
Your OUKANING 52-Inch Retro Industrial Ceiling Fan Light package includes the following components:
- Ceiling Fan Light Unit
- Fan Motor
- Cage Fixtures
- Montaj Braketi
- Tavan Örtüsü
- Down Rod (two sizes: 3.93 inch and 7.87 inch)
- Motor Kapağı
- Genişletme Vidaları
- Fan Blade Screws
- Remote Control Set (remote and receiver)
- Fan Kanatları (5 adet)
- Kurulum Kılavuzu

Resim: Paket içerisinde bulunan tüm bileşenler.
Kurulum ve Yükleme
Video: Detailed steps for the installation of the OUKANING 52-Inch Industrial Vintage Cage Ceiling Fan. Refer to the timestamps below for specific steps.
1. Fan Blade Installation
Refer to video segment 1:02 - 1:30.
- First, assemble each fan blade with its corresponding fan blade bracket. Each set requires 3 screws and screw pads.
- Loosen the screws on the motor safety buckle and remove the motor safety buckle from the fan motor.
- Install the fan blade bracket onto the main body of the fan using the loosened screws. Ensure all 5 blades are securely attached.

Image: Close-up of a fan blade securely attached to the motor housing.
2. Connecting Cage Fixtures with Fan Motor
Refer to video segment 1:38 - 2:30.
- Unscrew the 3 screws at the connection point of the lampshade (cage fixture).
- Connect the white wire to the white wire, and the blue wire to the black wire.
- Align the cage fixture with the screw holes on the main unit and install it using the screws.

Image: Detail of the cage fixture and light sockets.
3. Down Rod, Ceiling Cover, and Motor Cover Installation
Refer to video segment 2:37 - 3:55.
- Choose a down rod of appropriate length according to your height requirements. Two sizes are provided: 3.93 inches (default) and 7.87 inches. You can switch the size by loosening the screws on the bracket.
- Cross the down rod through the ceiling cover and the motor cover in the correct direction.
- First, remove the R-shaped safety pin on the connector and the connecting bolt.
- Pass the wires through the down rod.
- Insert the down rod into the connector, then insert the connection bolt and R-shaped safety pin. Tighten the screw.
4. Remote Control Wiring
Refer to video segment 4:01 - 4:12.
- Connect the 3 wires from the remote control receiver to the motor wires, matching colors one by one.
5. Mounting Bracket - Install Ceiling Fans
Refer to video segment 4:35 - 4:43.
- Put the down rod into the bracket and rotate to ensure the groove on the hanger snaps onto the bulge of the bracket.
6. Güç Kaynağını Bağlayın
Refer to video segment 4:48 - 5:19.
- The input power of the remote control is divided into 2 wires. The black wire is connected to the power wire, and the white wire is connected to the neutral wire.
- The yellow wire on the host must be connected to the earth wire.
- Install the ceiling cover after finishing the wires and tighten the screws.
7. Işık Kurulumu
Refer to video segment 4:13 - 4:30.
Install 5 E27 bulbs into the sockets within the cage fixture. The lighting part requires 3 E27 round bulbs or other suitable shape to match in the lampgölge.
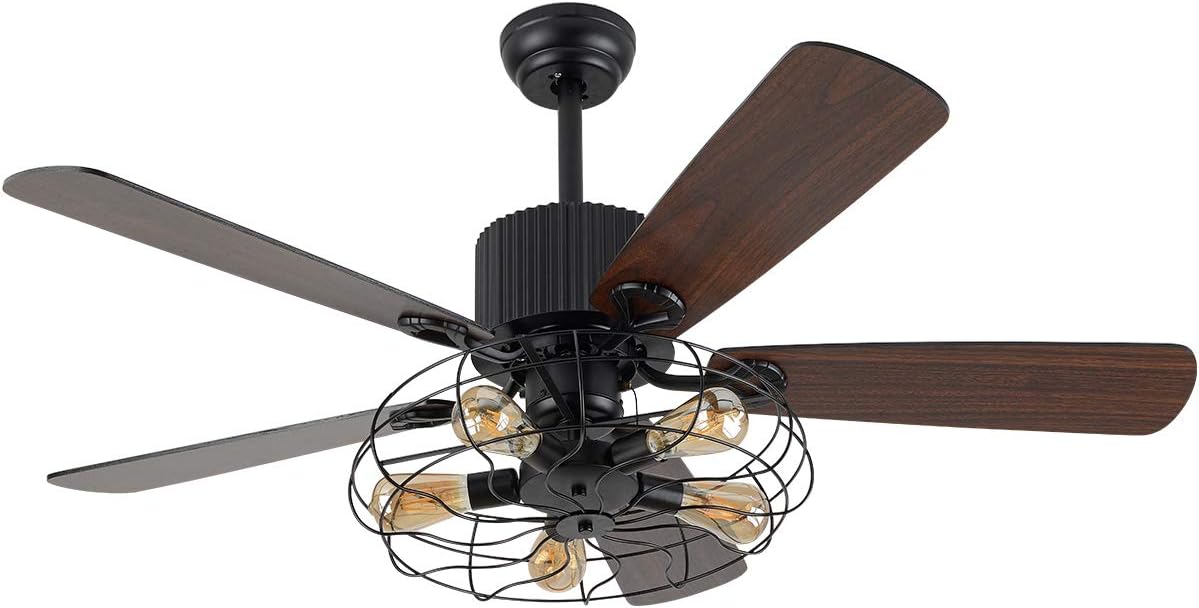
Image: The ceiling fan light with five E27 bulbs installed.
Operasyon
Video: Demonstration of the OUKANING 52-Inch Retro Ceiling Fan Light, highlighting its reversible blade function and overall design.
Uzaktan Kumanda Fonksiyonları
The ceiling fan is operated via the included remote control. It provides the following functions:
- 3 Fan Hızı: Yüksek, orta ve düşük fan hızları arasında seçim yapın.
- Işık Kontrolü: Turn the fan light on or off.
- Zamanlama Fonksiyonu: Set a timer for the fan to operate.
Reversible Blade Function
This fan features 5 reversible wood blades. This allows for two modes of operation:
- Yaz Modu: Kanatlar saat yönünün tersine dönerek aşağı doğru bir hava akımı oluşturur ve bu da soğutma etkisi sağlar.
- Kış Modu: Blades rotate clockwise to create an upward airflow, circulating warm air near the ceiling throughout the room.
Bakım
- Temizlik: Vantilatörü temizlemek için yumuşak bir bezle silin.amp bezle silin. Aşındırıcı temizleyiciler veya çözücüler kullanmayın.
- Bıçak Dengesi: If you notice the fan rotating unevenly after installation, you can adjust the fan blade balance by pasting a patch on the blade.
- Motor: The motor is designed for powerful air movement and quiet performance. It features a heat sink hole to reduce internal temperature and extend motor life. No special maintenance is typically required for the motor.
- Ampul Değişimi: Ensure power is off before replacing E27 bulbs.
Sorun giderme
- Fan Light Not Turning On with Remote:
- Check the battery in the remote control first.
- If the issue persists after changing the battery, connect the ceiling fan directly to the power supply to check if it can be turned on.
- If the fan light turns on when directly connected, the remote control's driver might be damaged. If it still doesn't turn on, the main unit might be damaged.
- Fan Çalışmıyor: Ensure all electrical connections are secure and the circuit breaker is on.
- Aşırı Sallanma: Check that all fan blade screws are tightened and the down rod is securely seated in the mounting bracket. Refer to the fan blade balance adjustment in the Maintenance section.
Özellikler
| Marka | OUKANING |
| Örnek | Retro Industriad Cage 1 |
| Renk | Retro Industriad Cage 1 (Black) |
| Malzeme | Wood, Crystal, Iron, Metal |
| Stil | Retro Industrial Cage |
| Oda Tipi | Yatak odası oturma odası |
| İç/Dış Mekan Kullanımı | Kapalı |
| Güç Kaynağı | AC |
| Kontrol Yöntemi | Uzaktan kumanda |
| Işık kaynağı | E27 (E26 compatible) |
| Işık Kaynağı Sayısı | 5 |
| Cilttage | 110 Volt |
| Netage | 60 watts (per bulb, recommended) |
| Ürün Boyutları (U x G x Y) | 52"U x 19.6"G x 52"Y |
| Ürün Ağırlığı | 20.2 Pound |
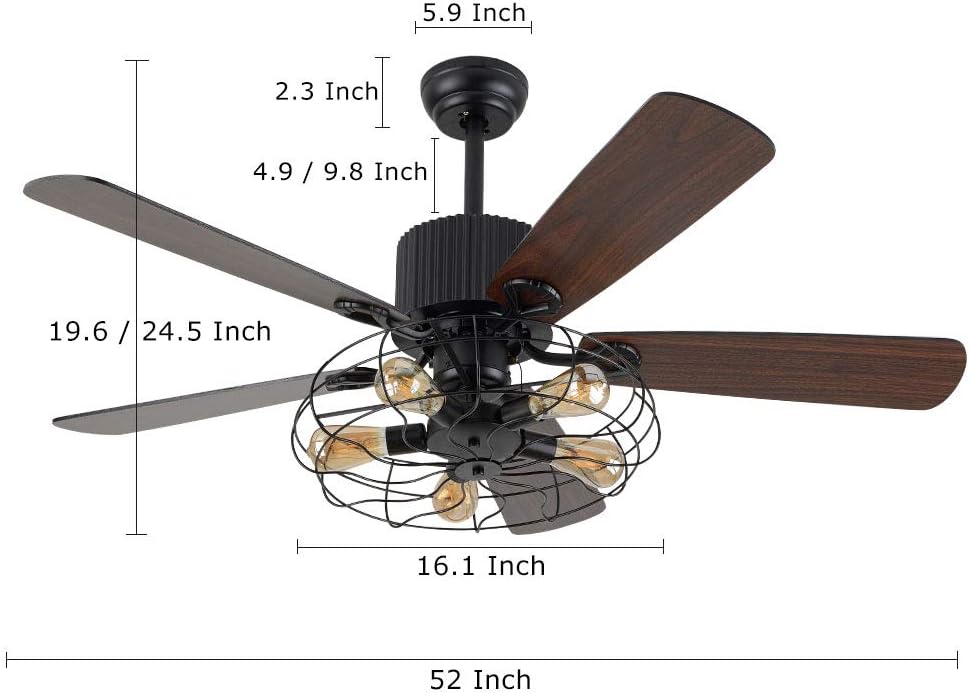
Image: Dimensional diagram of the ceiling fan.
Garanti ve Destek
The OUKANING 52-Inch Retro Industrial Ceiling Fan Light comes with a 1 yıllık sınırlı garanti ve bir 30 günlük para iade garantisi.
For any issues or inquiries, please feel free to contact OUKANING customer support. We have a professional after-sales team dedicated to assisting you and providing the most satisfactory service.
Contact information can typically be found on the product packaging or the official OUKANING webalan.
Ask a question about this manual
Ask about setup, troubleshooting, compatibility, parts, safety, or missing instructions. Manuals+ will review the question and use this page’s manual context to help answer it.