
1. Giriş
This manual provides essential instructions for the setup, operation, and maintenance of your SUNMI T2 Smart POS Terminal. The T2 is an integrated point-of-sale device featuring a 15.6-inch Full HD touch screen and a built-in thermal printer, designed for various commercial applications.
2. Ürün Bittiview
2.1 Cihaz Bileşenleri
The SUNMI T2 terminal integrates a high-resolution display, a powerful processor, and a thermal printer into a single unit. Key components include:
- 15.6-inch Full HD Touch Screen (1920x1080)
- Integrated Thermal Printer (80mm paper width, 200mm/s print speed)
- Base Unit with connectivity ports
- Güç Girişi
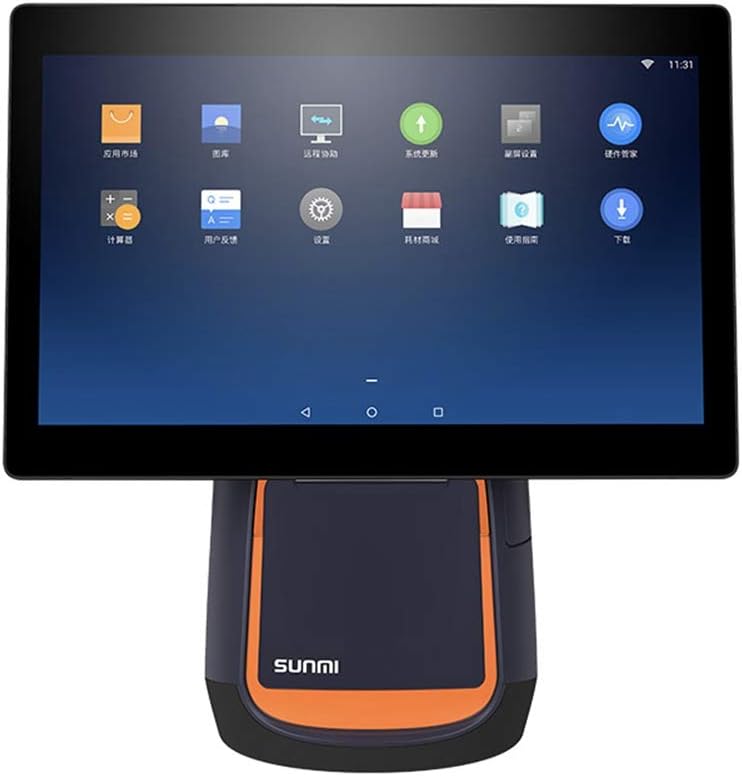
Şekil 2.1: Ön view of the SUNMI T2 Smart POS Terminal. The 15.6-inch touch screen is visible, displaying various application icons, indicating its Android operating system interface.

Şekil 2.2: Yan view of the SUNMI T2 terminal, illustrating the design of the stand and the adjustable angle of the main display unit.
2.2 Paket İçeriği
Paketi açtıktan sonra tüm eşyaların eksiksiz olduğundan emin olun:
- SUNMI T2 Printer (T2 model)
- Güç kablosu
- Kullanım Kılavuzu (bu belge)
3. Kurulum Talimatları
3.1 Paketten Çıkarma ve Yerleştirme
- Carefully remove the SUNMI T2 terminal from its packaging.
- Place the device on a stable, flat surface, ensuring adequate ventilation around the unit.
- Avoid placing the device near heat sources, direct sunlight, or in areas with high humidity or dust.
3.2 Güç Bağlantısı
- Connect the provided power cable to the power input port located at the rear of the device base.
- Güç kablosunun diğer ucunu standart bir elektrik prizine takın.
- The device will typically power on automatically or can be powered on using the power button.
3.3 İlk Güç Açma ve Yapılandırma
- Press and hold the power button (refer to Section 5.1 for button location) until the screen illuminates.
- Follow the on-screen prompts to complete the initial setup, including language selection, Wi-Fi connection, and time zone settings.
- Connect to your local network via Wi-Fi or Ethernet (if available) to ensure proper functionality and updates.
4. Kullanım Talimatları
4.1 Dokunmatik Ekranın Çalıştırılması
The SUNMI T2 features a capacitive multi-touch screen. Operate the device using standard touch gestures:
- Musluk: Öğeleri seçin veya işlevleri etkinleştirin.
- Tokatlamak: Navigate through menus or scroll content.
- Yakınlaştırmak için sıkıştırın: Adjust the size of on-screen content.
4.2 Integrated Printer Operation
The T2 includes an 80mm thermal printer for receipts and order tickets.
4.2.1 Yazıcı Kağıdının Yüklenmesi
- Locate the printer cover on the front of the device base.
- Press the release button or latch to open the printer cover.
- Insert a new roll of 80mm thermal paper, ensuring the paper feeds from the bottom and the leading edge extends slightly out of the printer slot.
- Yazıcı kapağını yerine oturana kadar sıkıca kapatın.
- Tear off any excess paper.
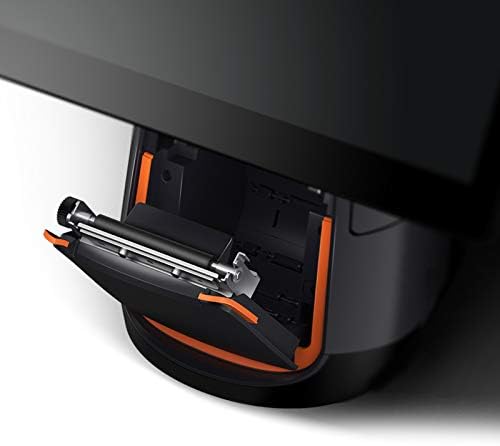
Şekil 4.1: Ayrıntılı view of the integrated thermal printer compartment with the cover open, illustrating the correct method for inserting a new 80mm thermal paper roll.

Şekil 4.2: Dahili view of the SUNMI T2's thermal printer mechanism, highlighting its design for efficient paper handling and high-speed printing up to 200mm/s.
4.2.2 Fiş Yazdırma
Once paper is loaded, the printer will automatically activate when a print command is issued from your POS software application. Ensure your application is correctly configured to use the integrated printer.
4.3 Bağlantı
The SUNMI T2 supports various connectivity options:
- Wifi: 2.4G/5G (IEEE 802.11 a/b/g/n) for wireless network access.
- Bluetooth: Supports Bluetooth 2.1/3.0/4.0 (BLE) for connecting peripherals.
- USB Bağlantı Noktaları: USB Type A port x1, USB 3.1 Type C x1, USB 2.0 x2 (total 3 USB ports).
- RJ11: Cash drawer port x1.
- RJ45: LAN port x1 for wired network connection.
- Kulaklık girişi: 3.5mm ses çıkışı.
- Mikro-USB: Debug port x1.
Connect external devices such as barcode scanners, external keyboards, or cash drawers to the appropriate ports as needed.
5. Bakım
5.1 Cihazın Temizlenmesi
- Power off the device and disconnect the power cable before cleaning.
- Yumuşak, tiftiksiz bir bez kullanın ve hafifçe kurulayın.ampened with water or a mild, non-abrasive cleaner to wipe the screen and exterior surfaces.
- Do not use harsh chemicals, abrasive pads, or excessive moisture.
- For the thermal printer head, use a specialized thermal printer cleaning pen or card to ensure optimal print quality.
5.2 Yazılım Güncellemeleri
Regularly check for and install software updates for the SUNMI OS and your POS application to ensure optimal performance, security, and access to new features. Updates can typically be found in the device's settings menu or through your POS software provider.
6. Sorun Giderme
6.1 Yaygın Sorunlar ve Çözümler
- Cihaz açılmıyor:
- Ensure the power cable is securely connected to both the device and a working electrical outlet.
- Elektrik prizinin çalışır durumda olduğundan emin olun.
- Güç düğmesini 10-15 saniye basılı tutmayı deneyin.
- Ekran yanıt vermiyor:
- Cihazı yeniden başlatın.
- Ekranın temiz ve kalıntılardan arınmış olduğundan emin olun.
- Yazıcı yazdırmıyor:
- Check if thermal paper is loaded correctly and not jammed.
- Ensure the printer cover is securely closed.
- Verify that the POS application is sending print commands and is configured for the integrated printer.
- Cihazı yeniden başlatın.
- No network connection (Wi-Fi/Ethernet):
- Check Wi-Fi settings and ensure you are connected to the correct network.
- For Ethernet, ensure the cable is securely connected to the RJ45 port and your router/switch.
- Restart your network equipment (router/modem).
If issues persist, refer to the support section or contact your vendor.
7. Özellikler
The following table details the technical specifications of the SUNMI T2 Smart POS Terminal:

Şekil 7.1: Üzeriview of SUNMI T2 Technical Specifications, detailing hardware and software components.
| Özellik | Detay |
|---|---|
| Örnek | T2 |
| Ana Ekran | 15.6" FHD, 1920x1080 |
| İşlemci | Qualcomm Snapdragon Octa-core processor |
| İşletim Sistemi | Android 7.1, SUNMI OS |
| Hafıza | 2GB RAM, 16GB ROM |
| Dokunmatik Ekran | G+G capacitive multi-touch screen |
| Yazıcı | Built-in high speed 80mm thermal printer with automatic cutter, print speed 200mm/s |
| Wifi | 2.4G/5G (IEEE 802.11 a/b/g/n) |
| Bluetooth | Supports Bluetooth 2.1/3.0/4.0 (BLE) |
| Harici Bağlantı Noktaları | USB Type A x1, RJ11 cash drawer x1, RJ45 LAN x1, Headphone jack x1, Power port x1, Micro-USB debug x1 |
| USB Bağlantı Noktaları | USB 3.1 Type C x1, USB 2.0 x2 |
| Harici Bellek | Supports MicroSD (TF) up to 64GB |
| Güç Adaptörü | Giriş: AC100-240V/1.7A, Çıkış: DC24V/2.5A |
| Boyutlar | 37.4cm x 33.8cm x 22.4cm |
| Ürün Ağırlığı | 17.6 pound (yaklaşık 7.98 kg) |
| Çalışma Ortamı | Temp: 0°C - 40°C |
| Depolama Ortamı | Temp: -20°C - 60°C |
8. Garanti ve Destek
For warranty information and technical support, please refer to the documentation provided with your purchase or contact the vendor/manufacturer directly. Keep your purchase receipt as proof of purchase.
Manufacturer: Kunxilin Electronic CO. (Brand: SUNMI)