
1. Giriş
This manual provides essential instructions for the safe and effective use of your DT321B Digital Multimeter. This portable device is designed for measuring AC/DC voltage, DC current, resistance, and includes features for diode testing, continuity, battery testing, and transistor (hFE) measurements. Please read this manual thoroughly before operation and retain it for future reference.
2. Güvenlik Bilgileri
Always observe basic safety precautions when using this multimeter to reduce the risk of fire, electric shock, or personal injury.
- Vol uygulamayıntage veya multimetrenin belirtilen maksimum sınırlarını aşan akım.
- Ölçüm yapmadan önce test uçlarının iyi durumda ve doğru şekilde bağlı olduğundan emin olun.
- Never use the multimeter if it appears damaged or if the test leads are damaged.
- Vol ile çalışırken dikkatli oluntag30V AC RMS, 42V tepe veya 60V DC'nin üzerinde. Bu hacimtagşok tehlikesi yaratabilir.
- Always disconnect power to the circuit under test before measuring resistance or continuity.
- Do not operate the multimeter in explosive atmospheres.
- Doğru okumalar sağlamak için düşük pil göstergesi göründüğünde pilleri değiştirin.
3. Ürün Bittiview
The DT321B Digital Multimeter features a clear LCD display and a rotary switch for selecting various measurement functions. Input jacks are provided for connecting test leads.

Şekil 3.1: Ön view of the DT321B Digital Multimeter with key components labeled. The display shows numerical readings, the hold button freezes the current reading, and the rotary switch selects measurement functions. The '10A' jack is for high current measurements, 'COM' is the common ground, and 'VΩmA' is for voltage, direnç ve düşük akım ölçümleri.
The multimeter includes a blue backlight for improved visibility in low-light conditions and a data hold function to freeze the displayed reading.
4. Kurulum
4.1 Pil Kurulumu
The DT321B Digital Multimeter requires two 1.5V batteries (Type 7, typically AAA) for operation. To install or replace batteries:
- Multimetrenin KAPALI olduğundan emin olun.
- Ünitenin arkasındaki pil bölmesi kapağını bulun.
- Tutma vidasını/vidalarını sökün ve kapağı çıkarın.
- Insert the two 1.5V batteries, observing the correct polarity (+ and -) as indicated inside the compartment.
- Pil bölmesi kapağını yerine takın ve vida(lar) ile sabitleyin.
5. Kullanım Talimatları
Before making any measurements, ensure the test leads are securely plugged into the correct input jacks.

Figure 5.1: The DT321B Multimeter with test probes connected. The black probe is connected to the 'COM' (common) jack, and the red probe is connected to the 'VΩmA' jack for most voltage, direnç ve düşük akım ölçümleri.
5.1 DC Vol Ölçümütage (V–)
- Insert the red test lead into the 'VΩmA' jack and the black test lead into the 'COM' jack.
- Döner anahtarı istenen DC Vol değerine ayarlayıntage (V–) range (e.g., 200m, 2, 20, 200, 1000V). If the voltage is unknown, start with the highest range and work downwards.
- Ölçüm yapılacak bileşen veya devre uçlarını birbirine bağlayın.
- Cildi okutagLCD ekranda e değeri.
5.2 AC Vol Ölçümütage (V∼)
- Insert the red test lead into the 'VΩmA' jack and the black test lead into the 'COM' jack.
- Döner anahtarı istenen AC Vol değerine ayarlayıntage (V∼) range (e.g., 200, 750V).
- Ölçüm yapılacak bileşen veya devre uçlarını birbirine bağlayın.
- Cildi okutagLCD ekranda e değeri.
5.3 Measuring DC Current (A–)
DİKKAT: To avoid damage to the multimeter or the circuit, never connect the test leads in parallel across a voltage source when measuring current. Always connect in series.
- For currents up to 200mA, insert the red test lead into the 'VΩmA' jack. For currents up to 10A, insert the red test lead into the '10A MAX' jack. The black test lead always goes into the 'COM' jack.
- Set the rotary switch to the desired DC Current (A–) range (e.g., 200u, 2m, 20m, 200m, 10A).
- Akımın ölçüleceği devreyi açın ve multimetreyi devreye seri olarak bağlayın.
- LCD ekranda mevcut değeri okuyun.
5.4 Direncin Ölçülmesi (Ω)
DİKKAT: Ensure the circuit under test is completely de-energized before measuring resistance.
- Insert the red test lead into the 'VΩmA' jack and the black test lead into the 'COM' jack.
- Set the rotary switch to the desired Resistance (Ω) range (e.g., 200, 2k, 20k, 200k, 2M).
- Ölçümü yapılacak bileşenin üzerine test problarını bağlayın.
- LCD ekranda direnç değerini okuyun.
5.5 Diyot Testi
- Insert the red test lead into the 'VΩmA' jack and the black test lead into the 'COM' jack.
- Set the rotary switch to the diode symbol (→|).
- Kırmızı probu diyotun anot ucuna, siyah probu ise diyotun katot ucuna bağlayın. Ekranda ileri-geri akım (ileri-geri) değeri gösterilecektir.tage damla.
- Reverse the probes. The display should show 'OL' (open loop) for a good diode.
5.6 Süreklilik Testi
- Insert the red test lead into the 'VΩmA' jack and the black test lead into the 'COM' jack.
- Set the rotary switch to the continuity symbol (♫).
- Connect the test probes across the circuit or component. If continuity exists (resistance below a certain threshold), the buzzer will sound.
5.7 Battery Testing (1.5V / 9V)
- Insert the red test lead into the 'VΩmA' jack and the black test lead into the 'COM' jack.
- Set the rotary switch to the '1.5V BATT' or '9V BATT' position.
- Kırmızı probu akünün pozitif kutbuna, siyah probu ise negatif kutbuna bağlayın.
- Pil hacmini okuyuntage ekranda.
5.8 Transistör (hFE) Testi
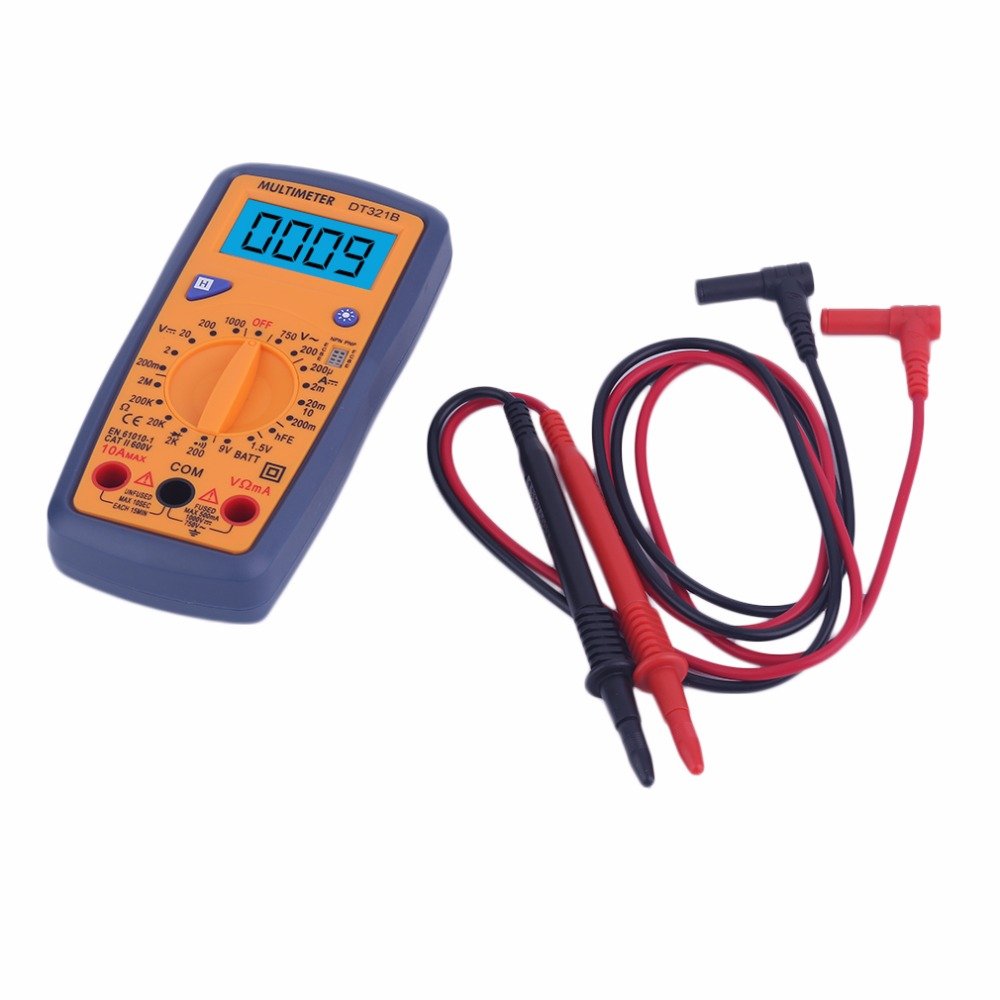
Figure 5.2: The DT321B Multimeter in use, with an inset showing a transistor being tested. The multimeter can measure the hFE (current gain) of NPN and PNP transistors.
- Döner anahtarı 'hFE' konumuna getirin.
- Identify the NPN or PNP type of the transistor.
- Insert the transistor leads (Emitter, Base, Collector) into the corresponding sockets in the 'hFE' test socket on the multimeter.
- LCD ekranda hFE değerini okuyun.
5.9 Veri Tutma Fonksiyonu
Press the 'Hold' button to freeze the current reading on the display. Press it again to release the hold function and resume live readings.
5.10 Arka Aydınlatma Fonksiyonu
The multimeter features a blue backlight. Press the backlight button (often integrated with the 'Hold' button or a separate button with a light symbol) to turn the backlight on or off for improved visibility.
6. Bakım
6.1 Temizlik
Davayı reklamla silinamp Bir bez ve hafif bir deterjan kullanın. Aşındırıcı veya çözücü maddeler kullanmayın. Kullanmadan önce multimetrenin tamamen kuru olduğundan emin olun.
6.2 Pil Değişimi
When the low battery symbol appears on the display, replace the batteries as described in Section 4.1. Remove batteries if the multimeter is not used for extended periods to prevent leakage.
7. Sorun Giderme
- Ekranda görüntü yok veya çok silik görüntü var: Pillerin takılıp takılmadığını kontrol edin ve şarj edin. Gerekirse pilleri değiştirin.
- Yanlış okumalar: Ensure the rotary switch is set to the correct function and range. Check test lead connections. Verify the circuit under test is properly prepared (e.g., de-energized for resistance).
- 'OL' (Aşırı Yük) görüntülendi: Ölçülen değer seçilen aralığı aşıyor. Daha yüksek bir aralığa geçin veya açık devre olup olmadığını kontrol edin.
- No continuity buzzer: Ensure the multimeter is in continuity mode and the circuit is closed.
8. Özellikler
| Ölçüm | Menzil | Kesinlik |
|---|---|---|
| DC Hacmitage | 200mV, 2V, 20V, 200V, 1000V | ±%0.5 |
| AC Hacmitage | 200V, 750V | ±%1.0 |
| Doğru Akım | 200uA, 2mA, 20mA, 200mA, 10A | ±%1.8 |
| Rezistans | 200Ω, 2kΩ, 20kΩ, 200kΩ, 2MΩ | ±%1.0 |
Genel Özellikler:
- LCD Ekran Boyutu: 45x23mm
- Ürün Boyutu: 160x76x32mm
- Güç Kaynağı: 2 x 1.5V batteries (Type 7 / AAA)
- Düşük Hacimtage Symbol Display: Evet
- Aşırı Yük Koruması: Evet
- Diyot Algılama: Evet
- On-off Detection & Buzzer: Evet
- Pil Kapasitesi Algılama: 1.5V / 9V
- Transistor Detection (hFE): Evet
- Veri Saklama: Evet
- Arka Işık Ekranı: Evet
9. Garanti ve Destek
Specific warranty and support information for the DT321B Digital Multimeter is not available in the provided product details. Please refer to the retailer or manufacturer's website for any applicable warranty terms or customer support contacts.