
1. Giriş
This manual provides detailed instructions for the installation, operation, and maintenance of your ASRock B365 PRO4 ATX Motherboard. Please read this manual thoroughly before proceeding with installation to ensure correct setup and to prevent damage to the components.
The ASRock B365 PRO4 motherboard supports 9th and 8th Generation Intel Core Processors, offering a robust platform for personal computing. It features a Digi Power Design with an 8 Power Phase Design, ensuring stable power delivery to the CPU.
2. Güvenlik Bilgileri
- Herhangi bir parçayı takmadan veya çıkarmadan önce daima güç kaynağının bağlantısını kesin.
- Hassas bileşenlerin elektrostatik deşarj (ESD) hasarından korunması için antistatik bileklik takın.
- Hassas parçalara dokunmaktan kaçınmak için anakartı kenarlarından tutun.
- Aşırı ısınmayı önlemek için bilgisayarınızın kasasında yeterli havalandırma olduğundan emin olun.
- Anakartı nemden ve aşırı sıcaklıklardan uzak tutun.
3. Kurulum ve Kurulum
3.1 Paket İçeriği
Paketin içinde tüm öğelerin mevcut olduğundan emin olun:
- ASRock B365 PRO4 Motherboard
- Hızlı Kurulum Kılavuzu
- Destek CD'si
- I / O Kalkanı
- 2 x SATA Veri Kabloları
- 3 adet M.2 soketli vida
- 1 x M.2 Soket için Ara Parça

Image: ASRock B365 PRO4 Motherboard and its included accessories, including the quick installation guide, support CD, I/O shield, SATA cables, and M.2 screws/standoff.
3.2 Anakart Düzeni
Anakart üzerindeki temel bileşenleri ve bağlantı noktalarını iyice öğrenin.

Resim: Yukarıdan aşağıya view of the ASRock B365 PRO4 Motherboard, highlighting the CPU socket, RAM slots, PCIe slots, and M.2 slots.

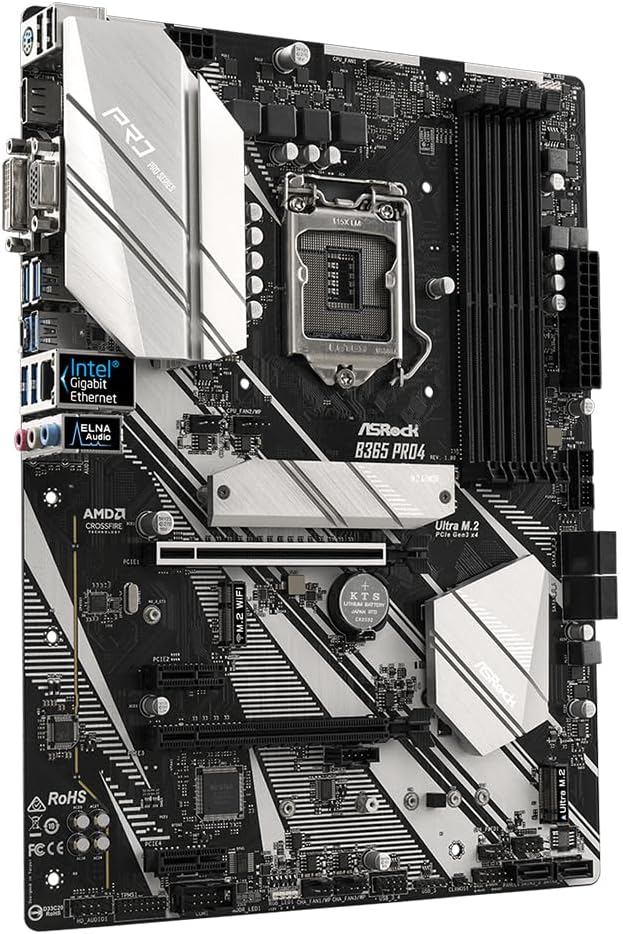
Resim: Açısal view of the ASRock B365 PRO4 Motherboard, showing the heatsinks and various connectors.
3.3 İşlemci Kurulumu (LGA1151)
- CPU soket kolunu açın ve yük plakasını kaldırın.
- CPU'yu soketle dikkatlice hizalayın, CPU üzerindeki altın üçgenin soket üzerindeki üçgenle eşleştiğinden emin olun.
- CPU'yu zorlamadan yavaşça sokete yerleştirin.
- Yük plakasını kapatın ve kolla sabitleyin.
3.4 Bellek (RAM) Kurulumu
The motherboard features 4 DDR4 DIMM slots, supporting dual-channel memory up to 64GB.
- DIMM yuvasının her iki ucundaki klipsleri açın.
- RAM modülündeki çentiği DIMM yuvasındaki anahtarla hizalayın.
- Insert the RAM module firmly until the clips snap into place.
3.5 Depolama Aygıtı Kurulumu
The motherboard supports 6 SATA3 ports and 2 Ultra M.2 ports.
- SATA Sürücüler: Connect SATA data cables to the SATA ports on the motherboard and to your storage devices (HDDs/SSDs). Connect power cables from your power supply to the devices.
- M.2 SSD'ler: Locate the M.2 slots. Insert the M.2 SSD into the slot at an angle, then gently push it down and secure it with the provided screw and standoff.
3.6 Genişletme Kartı Kurulumu (PCIe)
The motherboard has 2 PCI-Express 3.0 x16 slots and 2 PCI-Express 3.0 x1 slots.
- Select an appropriate PCIe slot for your expansion card (e.g., graphics card).
- Bilgisayar kasanızdan ilgili metal braketi çıkarın.
- Kartı yuvaya hizalayın ve doğru şekilde yerine oturana kadar sıkıca bastırın.
- Kartı bir vida kullanarak bilgisayar kasasına sabitleyin.
3.7 Connecting Peripherals to the I/O Panel
Arka giriş/çıkış paneli, harici cihazların bağlanması için çeşitli bağlantı noktaları sunar.
Resim: Yakın çekim view of the ASRock B365 PRO4 Motherboard's rear I/O panel, showing ports for PS/2, USB 2.0, USB 3.1 Gen 1, VGA, DVI-D, HDMI, LAN, and audio jacks.
- USB Bağlantı Noktaları: Connect USB devices (keyboard, mouse, external drives) to the available USB 2.0 (5 ports) and USB 3.1 Gen 1 (8 ports, including 1 Type-C rear) ports.
- Görüntü Çıkışları: Connect your monitor to the VGA, DVI-D, or HDMI port.
- LAN Bağlantı Noktası: Ağ erişimi için bir Ethernet kablosu bağlayın.
- Ses Jakları: Connect speakers, headphones, or microphones to the audio jacks.
- PS/2 Bağlantı Noktası: Connect a PS/2 keyboard or mouse.
4. Kullanım Talimatları
4.1 İlk Önyükleme ve BIOS Kurulumu
- After assembling all components, connect the power supply and monitor.
- Power on your system. Press Del or F2 Başlatma sırasında BIOS/UEFI kurulum yardımcı programına girmek için.
- Configure boot order, system time, and other necessary settings. Save changes and exit.
- Install your operating system from a bootable USB drive or optical media.
4.2 Sürücü Kurulumu
After installing the operating system, install the necessary drivers from the provided Support CD or download the latest versions from the ASRock webSite. Başlıca etkenler şunlardır:
- Yonga Seti Sürücüleri
- Ses Sürücüleri (Realtek ALC892)
- LAN Drivers (Intel I219V Gigabit Ethernet)
- Grafik Sürücüleri (entegre grafikler veya ayrı GPU için)
5. Bakım
- Toz Giderimi: Regularly clean dust from the motherboard and case fans using compressed air. Ensure the system is powered off and unplugged before cleaning.
- BIOS Güncellemeleri: ASRock'ı kontrol edin. website periodically for BIOS updates. Updates can improve system stability and compatibility. Follow the instructions carefully when updating the BIOS.
- Kablo yönetimi: Hava akışını iyileştirmek ve paraziti önlemek için kabloların düzgün bir şekilde yönlendirildiğinden emin olun.
6. Sorun Giderme
- Güç Yok:
- Check all power connections, including the 24-pin ATX and 8-pin 12V CPU power connectors.
- Güç kaynağı anahtarının AÇIK konumunda olduğundan emin olun.
- Görüntü yok:
- Verify that the monitor is connected to the correct video output (either integrated graphics or discrete GPU).
- Ekran kartını ve RAM modüllerini yeniden yerleştirin.
- Sistem Kararsızlığı/Çökmeler:
- RAM modüllerinin doğru şekilde takılıp takılmadığını kontrol edin.
- İşlemci soğutucusunun doğru şekilde takıldığından ve iyi temas sağladığından emin olun.
- Update drivers and BIOS to the latest versions.
- M.2 SSD Algılanamadı:
- M.2 SSD'nin doğru şekilde yerleştirildiğinden ve sabitlendiğinden emin olun.
- Check BIOS settings to ensure M.2 slots are enabled and configured correctly (SATA vs. PCIe mode).
7. Özellikler
| Özellik | Detay |
|---|---|
| CPU Soketi | LGA1151 |
| Uyumlu İşlemciler | 9./8. Nesil Intel Core İşlemciler (95W'a kadar) |
| Yonga seti | Intel B365 |
| Hafıza | 4 x DDR4 DIMM slots, Dual Channel, Non-ECC, Buffered, Max 64GB (2666/2400/2133 MHz) |
| Genişleme Yuvaları | 2 x PCIe 3.0 x16, 2 x PCIe 3.0 x1 |
| Çoklu Grafik Desteği | AMD Quad CrossFireX and CrossFire Technology |
| Depolamak | 6 x SATA3 ports (RAID 0, 1, 5, 10), 2 x Ultra M.2 ports (PCIe Gen3 x4 & SATA3) |
| Ses | Realtek ALC892 7.1 Kanallı HD Ses |
| Yerel Ağ | Intel I219V Gigabit Ethernet |
| USB Bağlantı Noktaları | 8 x USB 3.1 Gen1 (1 Type-C rear, 5 rear, 2 via header), 5 x USB 2.0 (2 rear, 3 via header) |
| Video Çıkışları | 1 x VGA, 1 x DVI-D, 1 x HDMI |
| Form Faktörü | ATX (12.0 x 9.0 inch / 30.5 x 22.9 cm) |
8. Garanti ve Destek
8.1 Garanti Bilgileri
The ASRock B365 PRO4 Motherboard comes with a 1 yıllık sınırlı garanti. This warranty covers defects in materials and workmanship under normal use. For specific terms and conditions, please refer to the warranty card included with your product or visit the official ASRock webalan.
Note: Damage caused by improper installation, misuse, unauthorized modifications, or natural disasters is not covered under warranty.
8.2 Teknik Destek
For technical assistance, driver downloads, BIOS updates, or further troubleshooting, please visit the official ASRock support webalan:
You may also contact ASRock customer service directly through their webKişiselleştirilmiş destek için site.