
Artillery SW-X1
Artillery Sidewinder X1 3D Yazıcı Kullanım Kılavuzu
Model: SW-X1
1. Giriş
This manual provides essential information for the setup, operation, maintenance, and troubleshooting of your Artillery Sidewinder X1 3D Printer. Please read this manual thoroughly before operating the device to ensure proper use and to prevent damage.

Figure 1.1: The Artillery Sidewinder X1 3D Printer, showcasintasarımı veample print.
2. Temel Özellikler
- Ultra-Quiet Stepper Driver: Designed for reduced heat dissipation and higher torque, contributing to quieter operation.
- Synchronized Dual Z System: Ensures consistent and parallel movement of the X-carriage relative to the build plate, even if one Z-stepper encounters an issue.
- Direkt Tahrikli Ekstrüder: Enhances reliability, particularly when printing with flexible filaments.
- AC Heating Platform: Provides rapid heating of the build plate. The lattice glass surface offers excellent adhesion when heated and allows for easy removal of prints once cooled.
- Elektrik Kesintisi Koruması: Enables the printer to resume printing from the last recorded position after a power interruption.
- Filament Runout Sensor: Automatically pauses printing and prompts for filament feeding when the material runs out.
- Tam Dokunmatik Ekran: Provides clear instructions and intuitive control.

Figure 2.1: Visual representation of the Artillery Sidewinder X1's key features, including quiet operation, heated bed, and various sensors.
3. Kutuda Neler Var?
Upon unboxing, verify that all components listed below are present and undamaged:
- 1 x Artillery Sidewinder X1 3D Printer
- 1 x Montaj Alet Takımı
- 1 x Assembly Instruction Manual
- 1 x Assembly Guide (likely a quick start guide or visual aid)

Şekil 3.1: Ayrıntılı view of the included assembly tool kit, showing various tools and spare parts.
4. Kurulum ve Montaj
The Artillery Sidewinder X1 comes 95% pre-assembled. Follow the included Assembly Instruction Manual for detailed steps. Key assembly points include:
- Paketin açılması: Tüm bileşenleri dikkatlice ambalajından çıkarın.
- Vinç Montajı: Secure the gantry to the base unit. Ensure all connections are firm.
- Filament Tutucu: Attach the filament spool holder to the top of the gantry.
- Kablo Bağlantıları: Connect all necessary cables, paying attention to proper routing to avoid interference with moving parts.
- Güç Bağlantısı: Connect the power supply unit. Ensure the correct voltage (110V) is selected if applicable.
4.1 Initial Leveling
Accurate bed leveling is crucial for successful prints. The Sidewinder X1 features large leveling knobs for easier adjustment.
- Heat the build plate to your typical printing temperature (e.g., 60°C for PLA) before leveling.
- Use the touch screen to move the nozzle to each corner and the center of the build plate.
- Adjust the leveling knobs until a piece of paper can slide with slight friction between the nozzle and the build plate.

Figure 4.1: Components facilitating setup and operation, including the direct drive extruder, large leveling knob, synchronized dual Z system, and inductive endstop sensors.
5. Kullanım Talimatları
5.1 Filament Yükleme
To load filament, gently press the extruder arm and insert the filament into the direct drive extruder until it catches. Use the touch screen controls to extrude a small amount of filament to ensure it is flowing correctly through the nozzle.
5.2 Printing from SD Card/USB Stick
The Sidewinder X1 supports printing directly from a TF Card or USB Stick.
- Prepare your 3D model using a slicing software (e.g., Cura, PrusaSlicer, Simplify3D) and save the G-code file to your TF Card or USB Stick.
- Insert the storage device into the designated slot on the printer.
- Navigate the full touch screen interface to select your desired G-code file ve yazdırma işlemini başlatın.
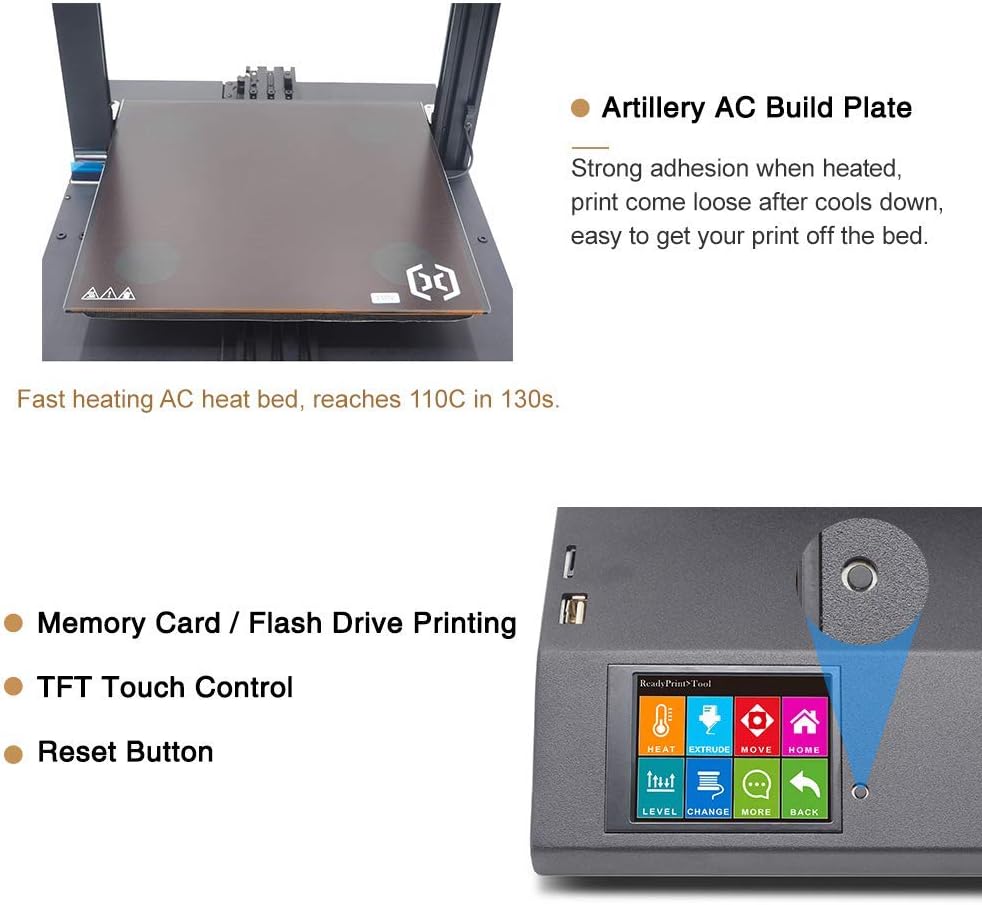
Figure 5.1: The Artillery AC Build Plate, known for its strong adhesion when heated, and the intuitive TFT Touch Control screen with a reset button for easy operation.
6. Bakım
Düzenli bakım, 3D yazıcınızın optimum performans göstermesini ve uzun ömürlü olmasını sağlar.
- Baskı tablasını temizleyin: After each print, allow the build plate to cool completely before removing the print. Clean the surface with isopropyl alcohol to remove any residue.
- Meme Temizliği: Periodically check the nozzle for clogs. Use the included needle or a brass brush to clean any filament buildup.
- Yağlama: Apply a small amount of lubricant to the Z-axis lead screws and smooth rods every few months or as needed.
- Kemer gerginliği: X ve Y ekseni kayışlarının doğru şekilde gerildiğinden emin olun. Kayışlar gergin olmalı, ancak aşırı gergin olmamalıdır.
- Donanım Yazılımı Güncellemeleri: Check the official Artillery webPerformansı iyileştirmek veya yeni özellikler eklemek için mevcut tüm ürün yazılımı güncellemeleri için siteyi ziyaret edin.
7. Sorun Giderme
Bu bölümde karşılaşabileceğiniz yaygın sorunlar ele alınmaktadır.
7.1 Yaygın Yazdırma Sorunları
- Zayıf İlk Kat Yapışma:
- Baskı tablasının düzgün bir şekilde hizalandığından emin olun.
- Verify the correct bed temperature for your filament type.
- Clean the build plate surface thoroughly.
- Filament Çıkmıyor:
- Check for a clogged nozzle.
- Ensure the filament is loaded correctly and the extruder gear is gripping it.
- Verify the hotend temperature is appropriate for the filament.
- Katman Kaydırma:
- X ve Y eksenlerindeki kayış gerginliğini kontrol edin.
- Ensure the printer is on a stable surface.
- Reduce print speed if necessary.
7.2 Elektrik Kesintisi Sonrası Kurtarma
The Sidewinder X1 features power failure recovery. If power is interrupted during a print, the printer will attempt to resume from the last position once power is restored.

Figure 7.1: The printer's power failure detection system, which allows it to resume printing after a power outage, preventing print job ruin.
8. Teknik Özellikler
| Parametre | Değer |
|---|---|
| Katman Çözünürlüğü | 0.1mm |
| Çerçeve | Alüminyum Ekstrüzyon |
| XYZ Positioning Accuracy | 0.05mm, 0.05mm, 0.1mm |
| Filament Yazdırma | PLA, ABS, TPU, Esnek Malzemeler |
| Filament Çapı | 1.75mm |
| Nozul Çapı | 0.4mm |
| Maksimum Baskı Hızı | 150 mm/s |
| Maksimum Seyir Hızı | 250mm/s |
| Hacim Oluştur | 300x300x400 mm |
| Ekstruder Tipi | Doğrudan Tahrikli Ekstruder |
| Maximum Build Plate Temperature | 130°C |
| Güç Gereksinimi | 110V |
| Bağlantı | USB, TF Card, USB Stick |
| Kontrol Paneli | MKS Gen L |
| Meme Türü | Volkan |
| Makine Boyutları | 550x405x640 mm (550x405x870 mm with spool holder) |
| Ürün Ağırlığı | 17.3 Kilogram (38.1 pound) |
| Desteklenen File Biçim | slicer, prusaslicer, cura, kisslicer, ideamaker, slic3r, simplify3d |

Figure 8.1: A visual summary of the Artillery Sidewinder X1's technical specifications and dimensions.
9. Destek ve Garanti
For any assistance, questions, or warranty inquiries, please contact Artillery customer support. You can typically find contact information on the official Artillery website veya ürünün satın alındığı perakendeci aracılığıyla.
As per the product description, for help or questions, contact "Rxlife" (the seller) by clicking "Ask a question" behind "sold by".
Ask a question about this manual
Ask about setup, troubleshooting, compatibility, parts, safety, or missing instructions. Manuals+ will review the question and use this page’s manual context to help answer it.